Stealing virtual machines and virtual machine data
Network administration - If you use an virtualized email server or payroll system in any environment, any user with administrative access to the virtual environment can easily steal this system and all data. stored in it without leaving any trace. Stealing a physical server from the data center without being detected is impossible, however, stealing a virtual machine can be done anywhere on the network, and everyone You can easily use a USB drive to steal the virtual machines you want.
 Figure 1. We can affirm that virtualization has a lot of benefits compared to physical servers, but there are also many unanticipated risks that we need to take into account in order to apply good protection Most avoid loss of important data. Since the virtual machine is encapsulated in a single virtual disk file on a virtual server, it is not difficult to create a copy of the virtual disk file and access all the data in it with appropriate access. well suited. This is a very simple operation, and in this article we will learn the steps to take to protect the environment against similar attacks.
There are basically two ways to access the virtual disk file (.vmdk) of a virtual machine. The first way is to use the ESX Service Console. If someone knows the root password or a user account on the server, they can gain access to VMFS drives containing virtual machine files and then use copy tools such as Secure Copy or SCP. to copy these files again. The second way is to use the vSphere / VMware Infrastructure Client with a built-in data warehouse browsing tool; This is the method we will study.
Step 1: Snapshot virtual machine
The first thing to do is take a virtual machine image. Then the virtual machine's virtual drive will go into read-only mode and create a new file to write new data to the drive. We have to do this because this virtual machine is running and using its disk file. If you skip this operation, we will not be able to copy the VMDK file because it is locked. This is the same method that many virtual machine backup applications use when backing up virtual machines. If the virtual machine is off or hung, then we can skip this operation.

Step 2: Copy the virtual drive
The next step is to create a copy of the virtual disk file. We can choose to copy the configuration file (.vmx) to this virtual machine so it can be imported into Player or Workstation more easily. The virtual disk file (.vmdk) actually consists of two files, a large file containing disk blocks, a small file is a text file describing the drive. If we use the integrated repository search application in the vSphere workstation, these files will appear as a single and copied file. If you use another copy application like WinSCP, you will have to copy both files.
To browse the database when the virtual machine is running, go to the home directory of the virtual machine, select the required files and then click Download . We can then select a folder on the PC running the vSphere workstation to download the selected files. Depending on the size of the virtual disk file and network speed, these files will be downloaded over a certain period of time. When finished, we will move on to the final step. We can delete the snapshot of the virtual machine when we have finished copying the virtual disk file.

Figure 3.

Figure 4.

Figure 5.
Step 3: Access the virtual disk file


Figure 8.

Figure 9.


 Figure 1. We can affirm that virtualization has a lot of benefits compared to physical servers, but there are also many unanticipated risks that we need to take into account in order to apply good protection Most avoid loss of important data. Since the virtual machine is encapsulated in a single virtual disk file on a virtual server, it is not difficult to create a copy of the virtual disk file and access all the data in it with appropriate access. well suited. This is a very simple operation, and in this article we will learn the steps to take to protect the environment against similar attacks.
 There are basically two ways to access the virtual disk file (.vmdk) of a virtual machine. The first way is to use the ESX Service Console. If someone knows the root password or a user account on the server, they can gain access to VMFS drives containing virtual machine files and then use copy tools such as Secure Copy or SCP. to copy these files again. The second way is to use the vSphere / VMware Infrastructure Client with a built-in data warehouse browsing tool; This is the method we will study.
Step 1: Snapshot virtual machine
The first thing to do is take a virtual machine image. Then the virtual machine's virtual drive will go into read-only mode and create a new file to write new data to the drive. We have to do this because this virtual machine is running and using its disk file. If you skip this operation, we will not be able to copy the VMDK file because it is locked. This is the same method that many virtual machine backup applications use when backing up virtual machines. If the virtual machine is off or hung, then we can skip this operation.
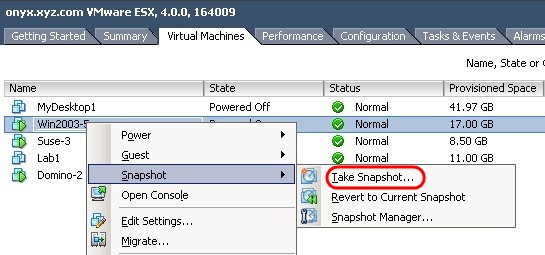
Figure 2.
Step 2: Copy the virtual drive
The next step is to create a copy of the virtual disk file. We can choose to copy the configuration file (.vmx) to this virtual machine so it can be imported into Player or Workstation more easily. The virtual disk file (.vmdk) actually consists of two files, a large file containing disk blocks, a small file is a text file describing the drive. If we use the integrated repository search application in the vSphere workstation, these files will appear as a single and copied file. If you use another copy application like WinSCP, you will have to copy both files.
To browse the database when the virtual machine is running, go to the home directory of the virtual machine, select the required files and then click Download . We can then select a folder on the PC running the vSphere workstation to download the selected files. Depending on the size of the virtual disk file and network speed, these files will be downloaded over a certain period of time. When finished, we will move on to the final step. We can delete the snapshot of the virtual machine when we have finished copying the virtual disk file.
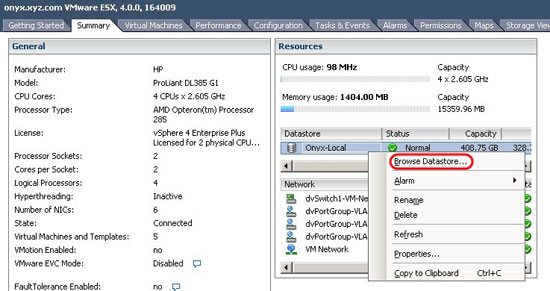
Figure 3.
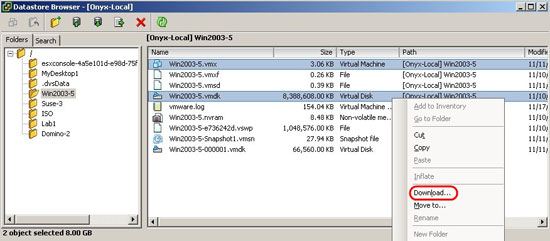
Figure 4.
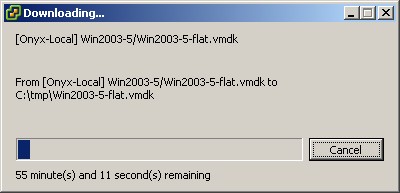
Figure 5.
Step 3: Access the virtual disk file
We now have the virtual disk file and can access the data in these two ways:
1. Install the virtual disk file on your PC using the vmware-mount command from Virtual Disk Development (VDDK) of VMware. This virtual disk will then appear as a drive on the computer and allow browsing. This method only allows us to access the files stored on that virtual machine and does not allow running any applications on it.
2. Enter this virtual machine into VMware Player, Workstation or Server and then run it. One drawback of this method is that it requires information to be entered into the operating system. To fix this, we can boot from a Live CD, or unlock / change the administrator password or directly access the file system.
Here are the steps of each method:
- The first step for both methods

Figure 6.
- Method 1: Install the virtual drive
1. First download VDDK from VMware website. This tool includes Windows version (33MB) and Linux (49MB).
2. Next, proceed to install VDDK. Normally after installing this tool will be in the path C: Program FilesVMwareVMware Virtual Disk Development Kit .
3. The vmware-mount.exe command is located in the bin directory; Open the Command Prompt and then navigate to that folder. Can we enter the vmware-mount / command ? to see options for this command. To install a disk file, use the command with the following syntax:
VMware-mount.exe4. Once the drive is installed, we can use the vmware-mount.exe / L command to check the installation results, or just access the new drive and then perform directory listing.
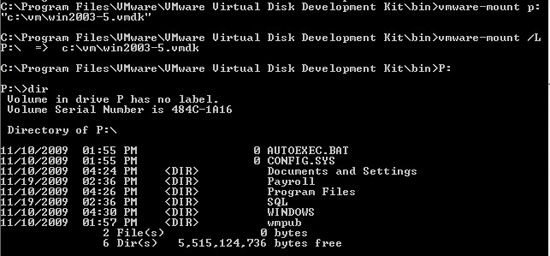
Figure 7.
5. At this point the virtual drive is installed and we can access everything on this drive as if it were accessing a local drive.
2. In this example, we will use VMware Player. When launching this tool, go to Open a Virtual Machine and browse to the .vmx file of the virtual machine you want to read on your PC.
- Method 2: Enter the virtual machine
2. In this example, we will use VMware Player. When launching this tool, go to Open a Virtual Machine and browse to the .vmx file of the virtual machine you want to read on your PC.
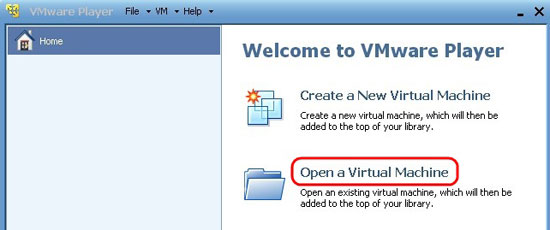
Figure 8.
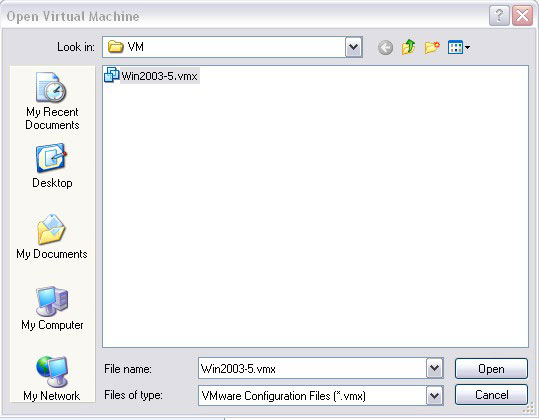
Figure 9.
3. Then click on the Play Virtual Machine link to run the virtual machine. At that point, we may receive a message that the virtual machine has been moved or copied because some of its files do not exist, and some of the information in the configuration file is not appropriate for the region. new archive. If you receive a message like this, just select the option I copied it and click OK , the missing files will be automatically created and the configuration file will be updated. It is possible that a VMware Tools message will appear in case these tools are installed on the system; That's because the version of ESX in use is a bit different from the ones on the server like Player. We can choose whether to download another ESX version or not because it doesn't affect virtual machines very much.
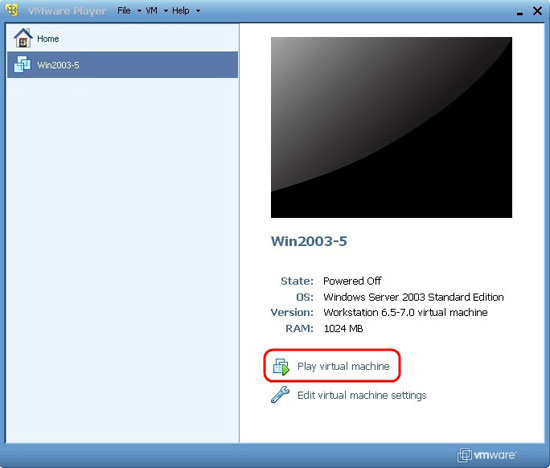
Figure 10.

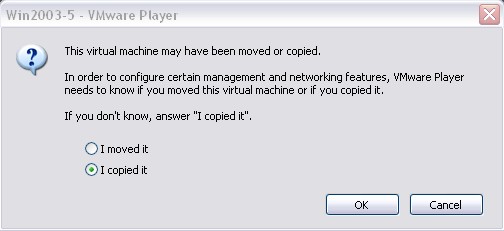
Figure 11.
4. Once the virtual machine has been started, we can log in there. If you want to cancel the network connection, just click on the Player Settings , select the virtual network interface card (NIC) and then uncheck the Connected check box, otherwise we will have to reconfigure the new network connection within the system. Virtual machine so that it uses the same network configuration with this virtual machine PC.
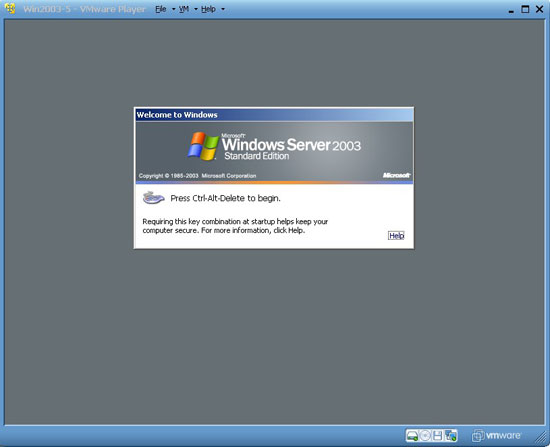
Figure 12.
5. If you don't have an administrator password, you can crack or reset the password with some of the Live CD tools, such as: PC Login Now, Ophcrack, Offline NT Password & Registry Editor. Once you have downloaded and unzipped the ISO file, we can install it into the virtual machine's CD-ROM drive so that the virtual machine boots from the CD-ROM drive instead of the hard drive. Then, when booting the virtual machine, we need to quickly click inside the virtual machine windows and press ESC to display the boot menu and choose to boot from the CD-ROM drive. Alternatively, you can use another Live CD such as the Ultimate Boot CD or Knoppix with support for browsing the file system of the virtual machine. Click here to view the Live CD list.
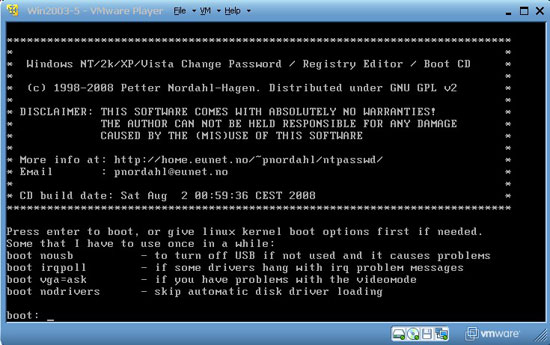
Figure 13.
Now that we have completed what we need to do, this is not a complicated operation when we have grasped the implementation method. It can be said that anyone with appropriate access can steal important data on the virtual machine, which is why the raw .vmdk files need to be carefully protected.
Currently, vSphere does not integrate any .vmdk file encryption tool, however, the .vmdk file encryption tool is integrated in Workstation 7 version, so in the future, vSphere also integrates this tool. . Not all administrators focus on important data, but protecting important data is the best guarantee. Here are some methods that we can protect virtual machines against similar tricks:
1. Protect important data at the operating system or application layer if possible by using an encryption tool. However, this is not the only option and often takes up server resources because the encryption tool must be installed. However, when using this method, even if someone has access to the virtual drive, it is difficult for them to read the data in it.
2. Limit access in vCenter Server to privileges that allow file runs of server data warehouses. We do not need to remove the privilege of Browse Datastore of a functional user, but only need to remove L Level Level Operations to block downloads, copy and change the file name. Not everyone who accesses vCenter Server needs this type of access, so make sure and grant this access only to those who really need it. Restrict full access to the vCenter Sphere for users, using different roles to change user permissions.
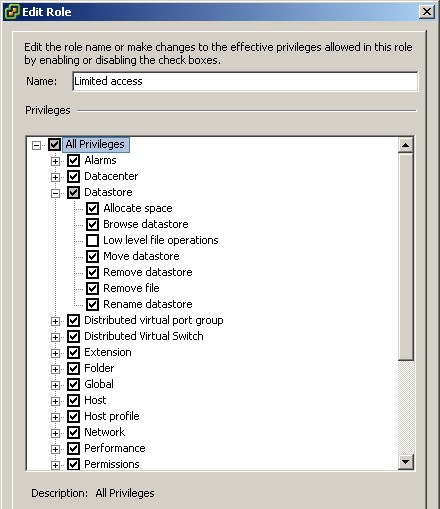
Figure 14.
3. In vCenter Server or ESX does not integrate any logging or control creation tools that help give warnings when vSphere workstations operate files. When we use Datastore Browser, the preferred application is Secure File Transfer Protocol (SFTP), there is some output data in file / var / log / sercure inside the ESX Service Console, but there is no Any data period that provides information about download files.
We might consider deploying a function of the import application like the HyTrust Appliance that can provide very strong access control and a centralized logon device for every server. HyTrust application can create missing records of SCP / SFTP transfer process and advanced programming interface calls (APIs) created when using Datastore Browser as well as blocking access to ESX Service Console and vCenter Server.
4. Only grant access to ESX Service Console for users who really need it. We can use sudo to limit what a user can access and do within the ESX Service Console. For normal processes, there is no need to access the ESX Service Console when everything can be done via the vSphere Client.
In order to ensure that data is secure we must apply multiple security methods on different layers. Protect data, applications, operating systems and physical servers, and ensure that virtualization is protected. When applying security measures, there should not be any errors, even the smallest. Failure to understand and evaluate specific difficulties in securing virtual environments can be an expensive mistake that we do not want to make.
Share by
Jessica Tanner
Update 25 May 2019