How to run macOS on Windows 10 in a virtual machine
Windows 10 is a great operating system. It certainly has many features that are not perfect, but have an operating system that doesn't. However, even if you are a Microsoft and Windows fan, it doesn't mean you can't use another operating system on Windows. And the best way to do that is to use your current operating system and a virtual machine.
In this tutorial, I will show you how to run macOS in virtual machines, create virtual Hackintosh. Hackintosh is a name given to an unsupported system running any Mac operating system.
- The famous Pwn2Own hack contest: Hacker has overcome VMware Workstation virtual machine to hack into the server
- Running Linux on Windows 10 does not require a virtual machine, here are 18 things you should know
- Create clone virtual machine for current Windows hard drive
The things you need to get started
Before starting, you need to download and install a few things. I will show you how to create virtual machines in both Oracle VM VirtualBox Manager (VirtualBox) and VMware Workstation Player (VMware Player).
- VirtualBox - Download the latest version. This tutorial uses version 5.1.22.
- VMware Player - Download the latest version. This tutorial uses version 12.5.5.
We will also need a copy of macOS Sierra. Techsviewer has made the Intel version [Google Drive download] available, and you will find an AMD version via AMD OS X.
Not sure which components create the soul for the system? Press Windows + X key and select System . Check the parameters listed next to "Processor". Once you are sure, download the Intel or AMD version.

Downloading may take a while. After all, it's the entire operating system. When the download is complete, extract the content to a memorable location. This is the Virtual Machine Disk Format (.VMDK) file that contains the operating system.
When ready, move on to the next section.
VirtualBox: Create macOS virtual machine
Open VirtualBox, select New . Type macOS. VirtualBox will detect the operating system as you type. The default is Mac OS X. However, we need to change. In the Version section, select Mac OS X 10.11 El Capitan .

Next, set up the amount of RAM that the virtual operating system can use. I recommend a minimum of 4 GB of RAM, but it is only part of the total available RAM. Finally, we need to assign a hard drive. In this case, we will use an existing virtual hard disk file ( Use an existing virtual hard disk file ).

Select the folder icon and browse to where you extracted the Virtual Machine Disk Format file. Open, make sure you have selected the correct virtual drive, then click Create .

Customize virtual machine settings
To make sure the virtual machine works correctly, we need to customize some settings.
Select Settings , then System. Move Floppy from the boot sequence. Make sure the chipset is set to ICH9 .
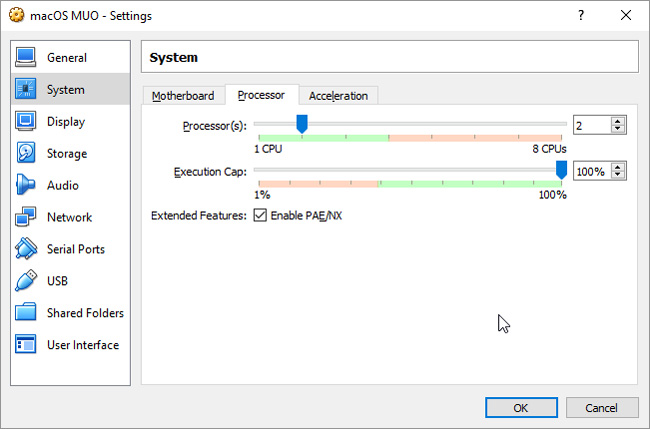
Select the Processor tab. Specify two processors.

In Display options, set Video Memory to 128 MB. Click OK to save the changes. Now you can close VirtualBox completely.
Small edits
Unfortunately, the virtual machine does not work in a straight line. We need to patch VirtualBox before the macOS virtual machine works. This requires us to enter a code number in the Command Prompt. But don't worry, I'll give you a brief guide.
Start by pressing Windows + X key, then select Command Prompt (Admin) from the menu. Next, use the command below to locate the Oracle VirtualBox folder:
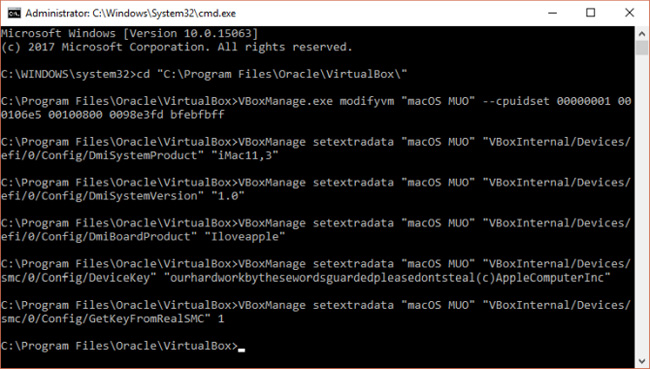
cd "C:Program FilesOracleVirtualBox" Now enter the following commands, one by one. Adjust the command that matches your virtual machine name. For example, my virtual machine name is "macOS MUO". Here is the command:
VBoxManage.exe modifyvm "macOS MUO" --cpuidset 00000001 000106e5 00100800 0098e3fd bfebfbff VBoxManage setextradata "macOS MUO" "VBoxInternal/Devices/efi/0/Config/DmiSystemProduct" "iMac11,3" VBoxManage setextradata "macOS MUO" "VBoxInternal/Devices/efi/0/Config/DmiSystemVersion" "1.0" VBoxManage setextradata "macOS MUO" "VBoxInternal/Devices/efi/0/Config/DmiBoardProduct" "Iloveapple" VBoxManage setextradata "macOS MUO" "VBoxInternal/Devices/smc/0/Config/DeviceKey" "ourhardworkbythesewordsguardedpleasedontsteal(c)AppleComputerInc" VBoxManage setextradata "macOS MUO" "VBoxInternal/Devices/smc/0/Config/GetKeyFromRealSMC" 1 After completing the commands, close the Command Prompt if you do not encounter any errors.

Ready to start
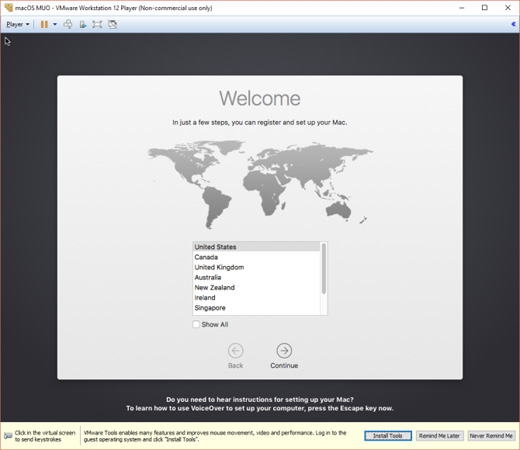
Open again VirtualBox. Double click on the macOS virtual machine to start. You will see a long line of text, with a gray screen background. Gray screens may take a few seconds to clear - but don't worry. When it resolves, you will come to the macOS "Welcome" screen.

From here, you can set up macOS virtual machines when you see fit.
VMware: Patch VMware Workstation Player
Do you like VMware or VirtualBox? We can use the same VMDK file containing the operating system, but the patching process is different. In this case, you will need to download an unlocker (ie a patch). We will use Unlocker created and provided by InsanelyMac.
Download Unlocker and save it anywhere you want. We will need it in a moment.
Browse to the location you downloaded Unlocker about. Extract the content of the archive. This process works best when the same folder is located on a drive (for example, the root of the VMware virtual machine and the extracted files are found in the C: drive drive).
After extracting, make sure VMware is completely closed. Then, right-click on the win-install script and select Run as administrator. The script will open the Command Prompt and the patch script will run. Attention! The script will go through and you need to capture any ' File not found ' messages.

When the patch is complete, reopen VMware.
Create macOS virtual machine
Select Create a New Virtual Machine . Then select I will install the operating system later . On the next screen, select Apple Mac OS X from the drop-down menu. If you do not see the Apple Mac OS X option, it means that this patch has not been installed.

Next, we need to select a name for the virtual machine. Choose a name that is easy to remember, then copy the following path to an easy-to-remember location - we'll need it to make some edits. On the next screen, attach the recommended maximum hard disk size, then select Store virtual disk as a single file . Complete the virtual disk creator.
Now we need to edit the hardware details, as well as tell VMware the location of macOS VMDK.
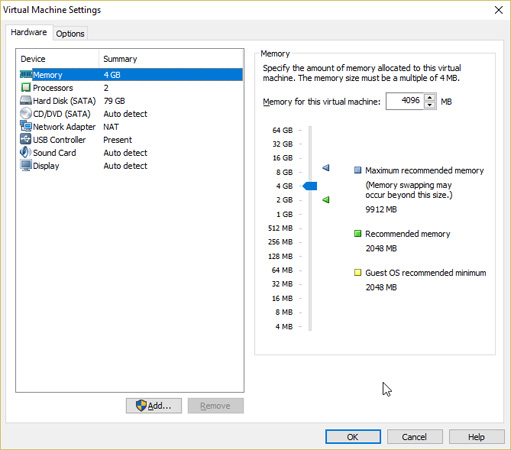
From the main VMware screen, select the macOS virtual machine, right-click and select Settings . Like VirtualBox, macOS occupies at least 4 GB of virtual machine memory. You can allocate more if there is RAM instead.

Next, edit the number of available processors to 2.
Below, remove the hard drive we created. Immediately select Add> Hard Disk> SATA (Recommended) , then select Use an existing virtual disk. .
Browse to the same VMDK used in VirtualBox. Select Open , then Finish . Now close VMware.
Small edits
We have to make a small edit to the individual file now. Go to the location where you save the macOS virtual machine. The default location is:
C:UsersYOURNAMEDocumentsVirtual MachinesYOUR MAC OS X FOLDER Browse to macOS.vmx, right-click and select Open with . , choose Notepad from the 'How do table you want to open this file'. Of course, if you want to use an alternative text editor, use it. Scroll down to the bottom of the configuration file and add the following line:
smc.version = "0" Save and exit Notepad.
Open VMware, select macOS virtual machine and click Play .

Troubleshooting
There are a few things that can (and probably will) go wrong during the installation of the macOS virtual machine in VMware Player Workstation. I will list some and how to fix it quickly.
If you don't see ' Apple Mac OS X ' during the virtual machine builder, you need to review the patch process. Make sure all processes associated with VMware Player are turned off.
If you receive the message ' Mac OS X is not supported with binary translation ' when starting the virtual machine, you need to enable virtualization in the BIOS / UEFI configuration.
If you receive the message ' VMware Player unrecoverable error: (vcpu-0) ' when booting the virtual machine, you need to go back to the macOS.vmx configuration file and make sure you have added additional lines and saved the edit.
Try it now!
Now you have created a macOS virtual machine in VirtualBox or VMware Player. Try macOS before you make the switch from Windows or use it to access some of the most reputable apps Apple provides.
What purpose do you use macOS virtual machine for? Do you prefer using VirtualBox or VMware Player? Let us know by commenting below!
You should read it
- ★ Fix the error of not running VMware virtual machine, VirtualBox on Windows 10
- ★ Instructions for speeding up virtual machines in full set
- ★ How to create a Windows 10 virtual machine with VMware Player and VirtualBox
- ★ Instructions on how to create virtual machines with VirtualBox
- ★ How to convert virtual machines from VMware to VirtualBox and vice versa