Share your wireless home network
How to provide secure guest access to your wireless network for electronic devices such as mobile phones, tablets, game interfaces, ...
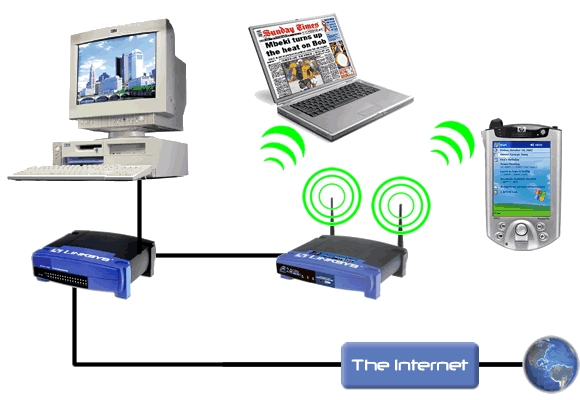
Network administrators - There are more and more electronic devices such as mobile phones, tablets, game interfaces, . can connect to Wi-Fi . So there will be one or more times your friends or family members come to play and want to connect to your home Wi-Fi network to access the Internet. Have you planned a situation like this and how can you protect the safety of your network in such situations, this guide can help you find the answer.
Guest feature on the router
Some wireless routers today have a special feature that is the Guest feature or allows for multiple SSIDs, a feature that enables the router to broadcast virtual Wi-Fi signals with other names and security keys. It allows guest access to connect to the Internet wirelessly but does not allow them access to the private network. Because of this, you don't have to worry about whether they can see or edit some files and have to change the password again after they leave your home.
However, most wireless routers or gateways provided by Internet providers will not have this guest feature, only a limited number of products have it. If you still have the router's documentation, check to see if it has this interesting feature. If accompanied by a router with a instruction CD, insert this CD into the CD-ROM drive and see the user guide. You can also download the manual from the support section of the manufacturer's website.
It should be noted that some products offer multiple SSIDs, which can be used in this situation. Just make sure it can isolate traffic between SSIDs. Some routers may allow you to enable or disable isolation, while some perform this automatically, some without this option.
You can also view router settings and features by entering its IP address into the browser. To find the router's IP address, we can open the connection details in Windows; It is usually the default gateway.
If there is no router with a guest feature or multiple SSIDs, you can choose one of the following products:
- D-Link Xtreme N Gigabit Router (DIR-655)
- TRENDnet 150Mbps Wireless N ADSL 2/2 + Modem Router (TEW-657BRM)
- Linksys Valet Wireless-N Router
- Belkin N + Wireless Router (F5D8235-4)
Provide guests with access password
You can give your friends or family members the password you use to connect to your Wi-Fi. However, these must be people you can trust. One thing to remember is that they can also provide this password to a third person. So to be safe, change your security password as soon as these people disconnect your Wi-Fi.
If you don't want them to be able to view or edit your files, turn off file sharing on computers or share only the files you allow ( See the end ).
You can now provide them with a security key and they can enter this security key when connecting. If there are too many wireless networks and you forget your network name, go to one of the connected computers, then hover over the network icon area in the lower right corner of Windows and you will see the network name.
There are many ways to search for a password if you don't remember the security key or don't want to write it down somewhere.
First, check whether both your router and laptop or wireless device support Wi-Fi Protected Setup (WPS). You can find the WPS button on the router. If the router has this WPS button, check your device to see if it has a hardware button or WPS feature in the software. If these computers use Windows 7, it will have the WPS support included. If both are available, press the router's WPS button and the device's WPS button or try connecting. WPS will then automatically configure the security settings for the laptop or device.
If you have a Windows 7 or Windows Vista computer connected to Wi-Fi, you can open the network properties page to view. Right-click the network icon in the lower right corner of Windows, open the Network and Sharing Center .
If only Windows XP computers use Wi-Fi, you can download and use the program called WirelessKeyView. This program will show you all security keys stored by the website.
If you haven't used Wi-Fi yet, you can still view and change the security key by logging into the router's management interface. If you have a guide, please consult the book. If not, you can look up the router's IP address and enter that address into the web browser. We can find the router's IP address by opening the details section of the network connection in Windows; It is the default gateway.
Use Connectify in Windows 7
If you don't want to provide security keys for guest access, you can use Windows 7's Wireless Hosted Network feature to create a virtual wireless router. This wireless router advertises Wi-Fi signals with other names and security keys.
However, this feature does not isolate users from your private network. Therefore, like when providing security keys, you should verify what to share. The advantage of this feature is that they can use other security keys that you can change easily. Refer to the next section below to check the shared folders then come back here.
Instead of using the commands provided by Windows 7 to manage Wireless Hosted Networks, you can download and use the Connectify application instead. This application will help you create an SSID, WPA2 security key and share your Internet connection.
Check or disable shared folders
If you give guest access security keys or use Connectify, the first thing you need to do is verify what folders you will share with the computers on the network.
To check you can use Computer Management console. To open this interface in Windows XP, click Start > Run , type compmgmt.msc and press Enter . In Windows Vista or Windows 7, click Run , type compmgmt.msc in the search field, and press Enter .
Once in Computer Management console, click System Tools > Shared Folders > Shares .
Ignore all shares whose name ends with a sign ($). These are administrative shares created and used by Windows, users cannot see or access them.
If you see shares that do not want visitors to connect to your private network, adjust the sharing terms to restrict access or disable sharing.
To see who can access the shares and what permissions they have (Full, Change, or Read only), right-click the shared folder, select Properties , and then select the Share Permissions tab.
If you only temporarily disable the sharing of certain folders, you do not need to remove it from the Computer Management console. In Windows XP, open Network Connection Properties and cancel selecting the Printer and File Sharing protocol. In Windows Vista and Windows 7, open the Network and Sharing Center to disable sharing. In Windows Vista, this setting is located on the main window. In Windows 7, click the Change Advanced Sharing Settings link .
- How to set up wireless home network with mobile phones
- 4 steps to set up your home wireless network
- Set up a wireless home network with 4 basic steps
- Basic knowledge to set up a home wireless network
- Learn SSID and wireless network
- 10 best mesh Wi-Fi network systems
- Basically about Wireless Networking
- How to Share an Internet Connection
- The way that 5G will change Internet connection in your home
- Build a wireless network with a broadband router - Part 1: Prepare hardware
- AuthenticateMyWiFi wifi authentication
- Guide to DD-WRT - Part 2: Extending scope with WDS
- DD-WRT Guide - Part 3: Building a Wireless Bridge
- Tutorial on DD-WRT - Part 5: Wireless repeater
- Security when working with Wi-Fi Hotspot
- How to fix a wireless network - Part 1
- Set up an Open-Mesh wireless network for Linux
- 9 mistakes often get caught up in wireless networks
- 4 steps to set up your home wireless network
- The process of setting up a wireless network
-
 Table of common BSOD error codes on Windows 11 and Windows 10
-
5 ways to fix Wi-Fi disconnection issues on Windows 11 laptops.
-
Windows 11 Error Code Table and Most Common Issues When Updating Windows
-
Useful AI features in Windows 11
-
Laptop displaying a blue screen: Causes and effective solutions.
-
How to quickly split the screen on a Windows 10, 11, and macOS laptop.
 Table of common BSOD error codes on Windows 11 and Windows 10
 5 ways to fix Wi-Fi disconnection issues on Windows 11 laptops.
 Windows 11 Error Code Table and Most Common Issues When Updating Windows
 Useful AI features in Windows 11
 Laptop displaying a blue screen: Causes and effective solutions.
 How to quickly split the screen on a Windows 10, 11, and macOS laptop.