49 smart Photoshop tips you need to know (Part 1)
Simple Photoshop tips to save you time and increase efficiency when working with this world's most popular photo editing software.
Undoubtedly, Photoshop is now one of the best and most popular photo editing software for people working in graphic design, digital painting , even even the photographers. For each of these areas, Adobe developers integrate a lot of powerful options in Photoshop for users to easily use.
Working in Photoshop can be time-consuming, but there are some tips and tricks you can use to speed up your workflow. This helps ensure that you take the time to be creative, instead of wasting time doing things in a boring way.
In this article, TipsMake.com will give you 45 simple Photoshop tips when using - useful tips that you may wish you had known for a long time. Some of these are very interesting but not everyone knows because the latest versions, Adobe has improved and added some more advanced features before. However, readers should note that some tips will depend on the version of the software you are using and most will be for those who are using Photoshop CS6 and above.
Because the article is quite long, so we split up into many different parts, you can refer to:
Note : In this article, the main document is a blank page that can be opened by holding down Ctrl + N and the main file is the data that is included in Photoshop for processing.
45 smart Photoshop tips you need to know (Part 1)
- 1. How to make lumped Vector shapes (Vector Shape) editable
- 2. Resize batch images
- 3. End the operation of adding text to images quickly
- 4. How to stack two photos together to create a color effect
- 5. How to remove unwanted objects automatically
- 6. The fastest way to draw a dotted line
- 7. Quickly select a Photoshop layer
- 8. How to fill the Foreground / Background color for a layer
- 9. How to quickly backup and restore
- 10. How to expand Canvas with the Crop tool
- 11. Copy the layer styles in Photoshop
- 12. How to quickly switch between open Documents
- 13. How to select multiple or consecutive layers
- 14. Hide all Photoshop layers except the only one
- 15. How to change text colors without highlighting
1. How to make lumped Vector shapes (Vector Shape) editable
In Photoshop CS6, you can put two or more Vector Shape Layers together and hold them as an Editable Vector by: From the Layer Panel, select those vector layers. , press Cmd / Ctrl + E key combination to merge them quickly.
Previous versions of Photoshop will result in a rasterized layer. However, Adobe has updated the Editable Vector creation function since CS6.

2. Resize batch images
You can easily resize a large number of photos in Photoshop using scripts. (Don't worry, it's not as scary as you think).
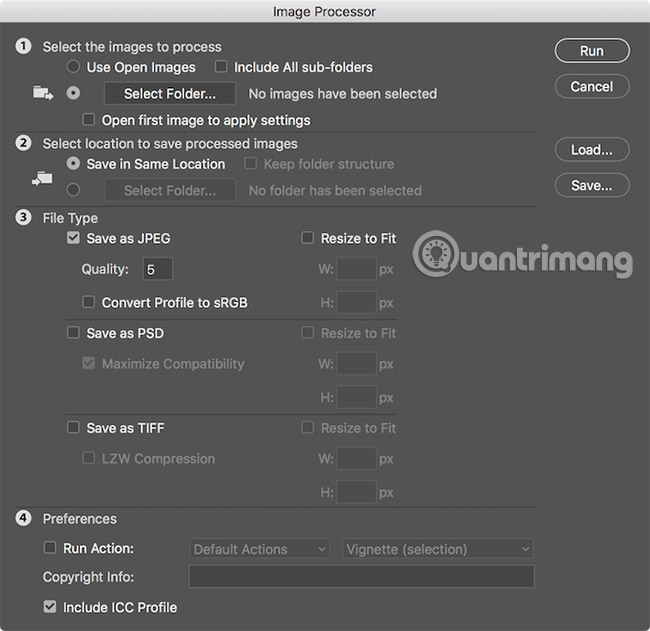
Go to File> Scripts> Image Processor and you'll find a few options available. You can run the script on images you currently open in Photoshop, you can apply the settings to the entire image folder.
You can also choose the location on your computer to save resized images, file types (jpeg, PSD or TIFF) and quality.
Once you have selected your file type, you can select the image size by selecting Resize to Fit . You can choose a specific width or height, depending on the need.
When you have completed your options, click Run.

In addition, you can also resize multiple image files with the Action feature in Adobe Photoshop. For details, please refer to the article: In this way, resizing images in bulk will not take much effort as before.
3. End the operation of adding text to images quickly
When working with text in Photoshop, all shortcuts are not supported. To finish editing the text without moving the mouse, simply press the Cmd / Ctrl + Enter key combination to shift the focus away from the text field, allowing you to select options. Choose another using the usual shortcuts.

4. How to stack two photos together to create a color effect
Want to create a filter similar to your own Instagram? You can do this by combining two photos with Photoshop.
Open a picture with your favorite color palette (photo 1), then open the image you want to edit (photo 2) go to Image => Adjustments => Match Color menu, select picture 1 in the Source section, adjust Luminance ( The brightness of the color displayed on the image) and Color Intensity ( color intensity ) until you are satisfied with the result => Select OK.

5. How to remove unwanted objects automatically
To remove other unwanted people or objects from photos, you can go to File => Scripts => Statistics, choose Median and then, select all the image files you have taken. Photoshop will recognize differences between photos and remove them.

6. The fastest way to draw a dotted line
You can use the Brush tool, tap to mark the first point, then hold down the Shift key to create a straight line. But if you need a dotted line, change the distance value (Space - the distance between the brush strokes) is greater than 100% in the Brush panel .

7. Quickly select a Photoshop layer
If you work with multiple layers, you may have to move through a lot of layers to find the exact layer you are looking for.
There are a few faster ways to go directly to the layer (s) you want to adjust without touching the Layers panel.
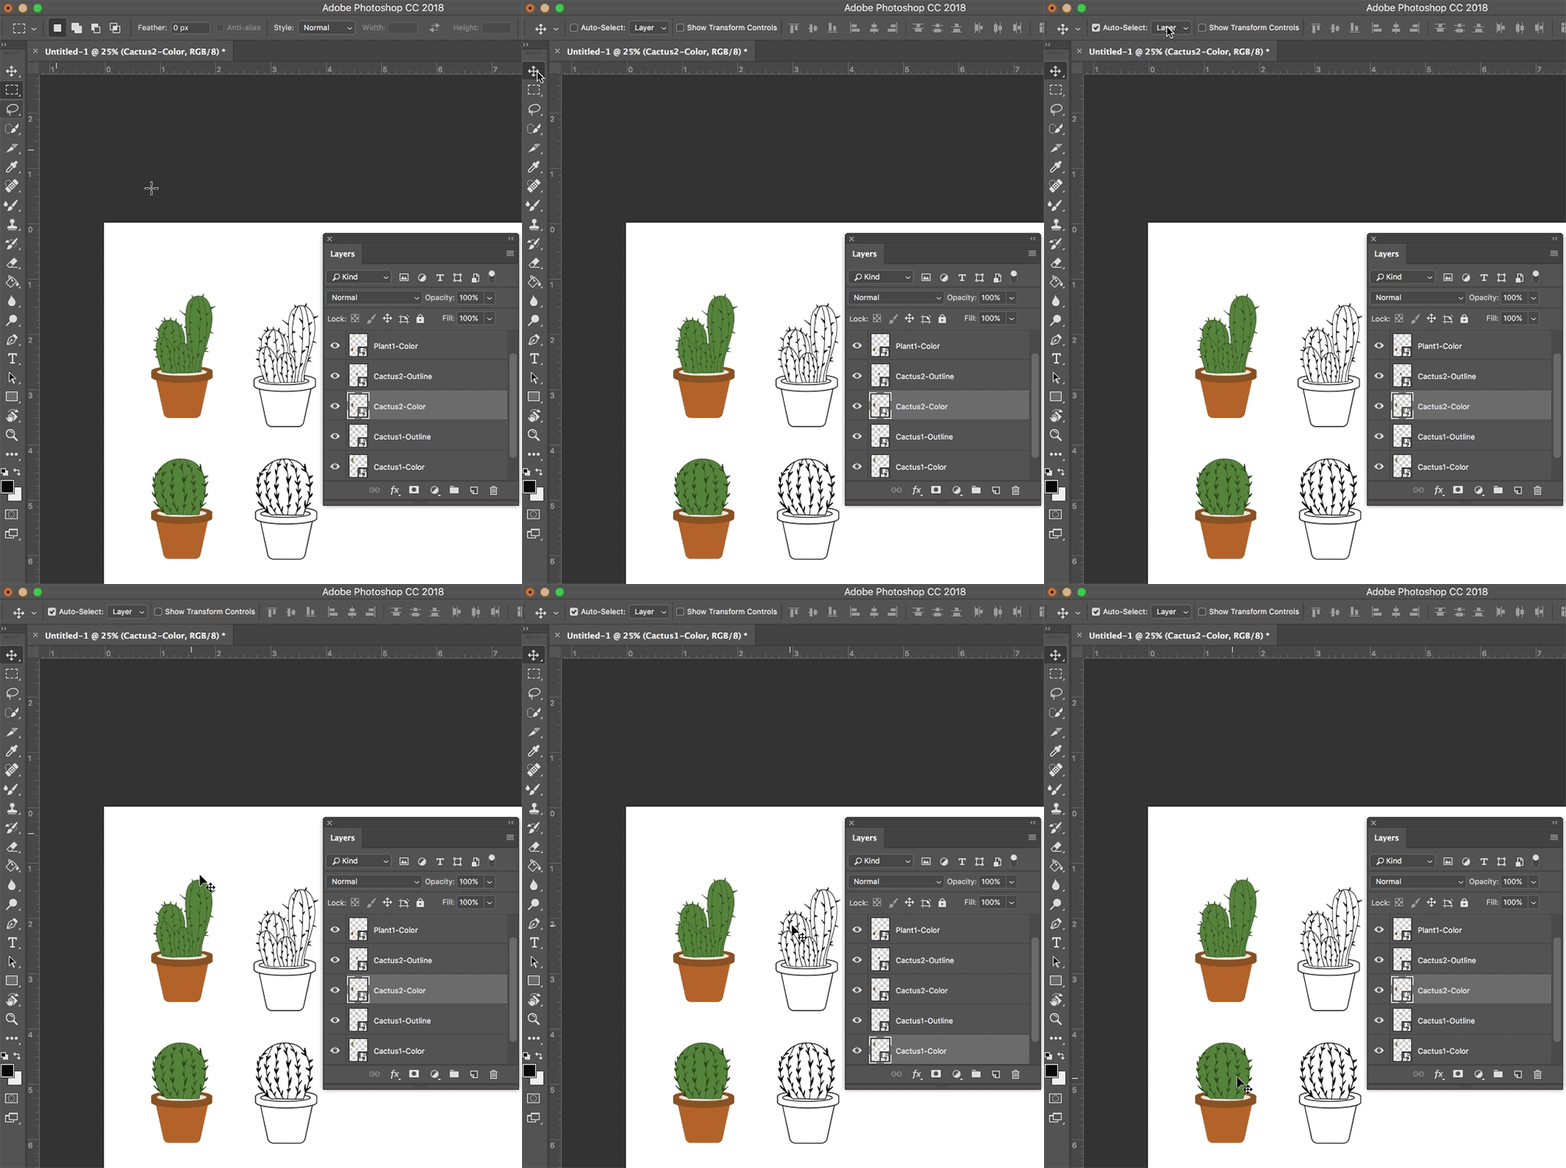
1. Select the Move tool from the Tools menu or use the shortcut V.
2. In the menu at the top of the screen, select Auto-Select and Layer from the drop-down menu.
3. Click the item in the canvas you want to select and now it will be the active layer, selected in the Layers panel .

You can also use this feature to quickly select Groups by selecting Groups from the Auto-Select drop-down menu .
There is another option. With the Move tool selected, press the Ctrl / Cmd button on the keyboard and then click on the layer you want to select.
If you have a canvas with lots of details, you can get the following:
1. With any tool selected, use Ctrl + Cmd + Right click to display the menu table. (Make sure you clicked on the area where the item you want to select is on canvas.)
2. Click on the name of the layer you want to select.

If you want to select all layers at once, use the shortcut Command + Option + A on your Mac or Ctrl + Alt + A on Windows or go to Select> All Layers .
8. How to fill the Foreground / Background color for a layer
Use keyboard shortcut Ctrl + Del to fill the background color for the layer or Alt + Del to color the layer with the foreground color.

9. How to quickly backup and restore
If you need to do a lot of work on a specific image but are not sure what the final result will be, you can use this trick to quickly back them up.
The History palette always has limits on the number of recoverable operations. Here, use the History Snapshot tool to do this.
From the History panel, click on the Camera icon every time you feel you need to save the current result. At this point, a new snapshot will be created and you can return to this step at any time. You can also rename by double clicking on it.

10. How to expand Canvas with the Crop tool
Perhaps you often use Crop to crop images. However, this tool is also used to expand canvas: just drag the small buttons outside the frame and press the Enter key to apply the changes.

11. Copy the layer styles in Photoshop
You have spent a lot of time perfecting your design using layers and styles in Photoshop. Instead of diligently sitting in applying the same styles to each new layer or design, you can copy and paste these styles quickly.
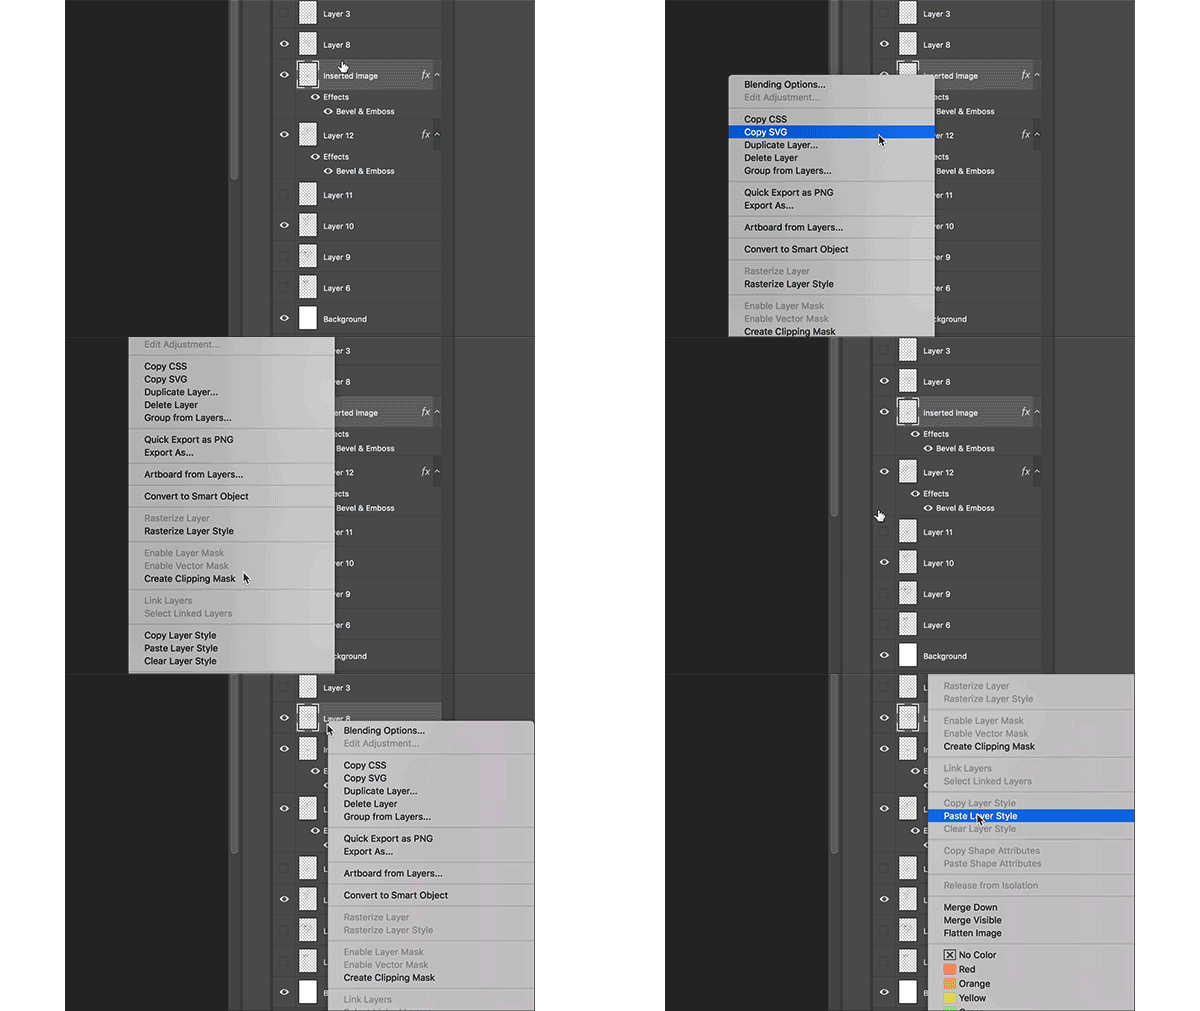
To access the Layer Styles, right-click the layer and choose Blending Options. You can add sketches to your Photoshop design, along with effects if needed.
To quickly copy a style from one layer to another, right-click the layer with the applied styles and click Copy Layer Style.
Click on the layer you want to apply the style to. Right click on that layer and select Paste Layer Style.

You can also drag and drop layer styles in the Layers panel , but this will remove it from the original layer.

12. How to quickly switch between open Documents
If you're working with more than one Document at the same time, press Ctrl + Tab to quickly switch to the desired page.
13. How to select multiple or consecutive layers
From Photoshop CS2 and above, users can select multiple layers by selecting a layer, then selecting another layer and holding down the Shift key. This helps to select all layers between the first two selected layers (select the consecutive layer).
To select non-consecutive layers, such as layers 1, 3 and 6, press the Ctrl key and select the layer you want to select in the layers palette.

14. Hide all Photoshop layers except the only one
Although the article has shown you some easy ways to correctly access the layer you want to work with, Photoshop also provides the option to hide all layers and leave only a single layer. To do this, you'll need to open the Layers panel :
1. If you don't see the Layers panel , go to Windows> Layers to open it.
2. Hold down Alt / Option and click the display icon (eye image) next to the layer you want to continue opening.
3. All other layers will be turned off with the only exception being the layer you clicked.

15. How to change text colors without highlighting
Beginners using Photoshop often change the text color by highlighting (highlighting / selecting) the text and then selecting a new color by double-clicking the foreground color (Foreground). However, you will not be able to track the color change of the text when it is selected.
A simpler way is to select the layer, then select the Type Tool and click on the color square in the options bar ( Options Bar ). This way, you can both change the color of the text and see the changes without highlighting.

Good luck!


 How to create clipping mask in GIMP
  How to create spherical images in GIMP
  How to sign a document with GIMP
  How to create movie posters in GIMP
  How to Color Inside the Lines in FireAlpaca
  How to swap and combine faces in GIMP