49 smart Photoshop tips you need to know (Part 3)
Save time, effort and optimize Photoshop with these 45 clever tricks to create the best products.
In the last part of this 49-smart Photoshop collection , let's TipsMake.com learn some simple tips for adjusting colors, creating filters or applying faster effects to layers. Certainly, they will be very helpful to you.
Note : In this article, the main document is a blank page that can be opened by holding down Ctrl + N and the main file is the data that is included in Photoshop for processing.
49 smart Photoshop tips you need to know (Part 3)
- 31. How to apply the same effect to multiple files
- 33. Ways to create large images without compromising on quality
- Video tutorial Resize photos with Photoshop CC
- 33. How to add Lens Flare to images
- 34. How to create filters (Clouds) clouds with high contrast
- 35. Adjust color in Black & White Adjustment Layer
- 36. How to open a document on 2 windows
- 38. How to customize the Thumbnail size
- 39. Why should Smart Objects be used?
- 40. How to add masks when the Layer has been applied
- 41. How to use Multi-Level Masking
- 42. How to change units of measurement quickly
- 43. Create a crossover effect with Scripted Patterns
- 44. How to automatically insert Placeholder Text
- 45. How to enable Non-Destructive Crop
- 46. Zoom in and out simultaneously
- 47. Automation with actions and scripts
- 48. Create custom Photoshop shortcuts
- 49. Arrange layers in Photoshop
31. How to apply the same effect to multiple files
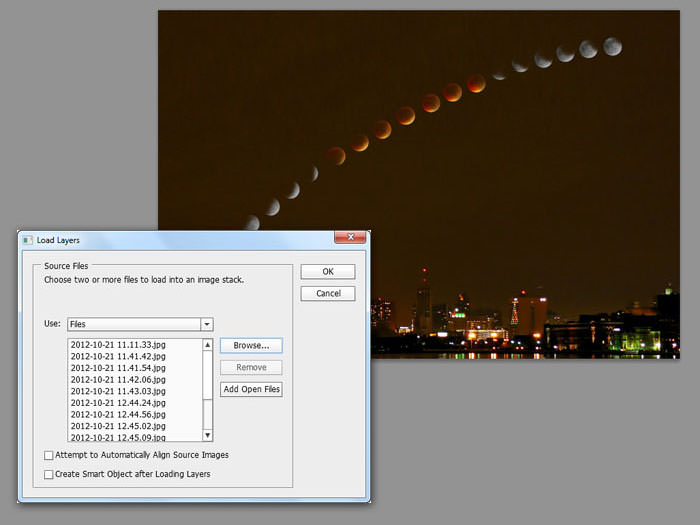
Users can download multiple files into a single Document, then apply a batch effect or select the desired file (you can also use the whole folder). To do this, go to File => Scripts => Load Files into Stack.
A smart example to use this feature is to create Star Trail images from multiple images taken at one location. Simply import all images, select all layers (except the background) and choose Lighten in the Blend Mode.
33. Ways to create large images without compromising on quality
Previously, increasing the image size will cause many details in the image to be blurred or create unwanted "redundant points". Fortunately, Photoshop CC has an interesting feature, allowing you to increase the size of Bitmap with the ability to affect the quality at the lowest level.
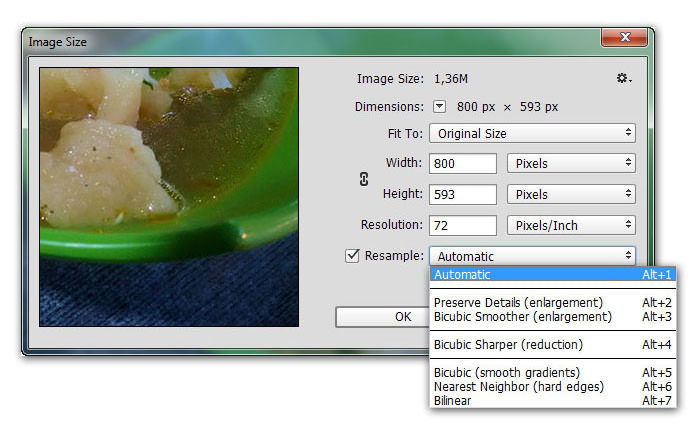
To do this, go to Image => Image Size , notice the Resample option at the bottom of the dialog box. Here, there are quite a few options to adjust the image quality when you increase the size. The video below will help you better understand this procedure.
Video tutorial Resize photos with Photoshop CC
33. How to add Lens Flare to images
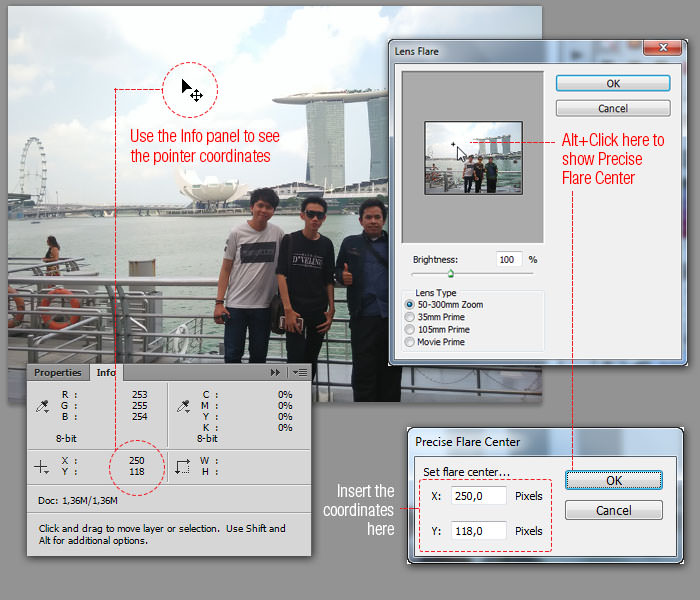
When using the Lens Flare filter, you can open the Precise Flare Center special window to determine the exact location of the beam on the image. To do so, hold down the Alt key while clicking the Preview box and keep track of the coordinates in the control panel. Note that Precise Flare Center uses pixel units so change the unit of the original Document before proceeding.
34. How to create filters (Clouds) clouds with high contrast
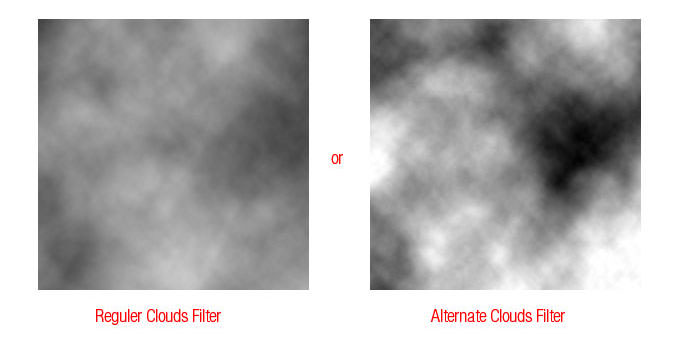
Usually to use the Clouds effect, we will go to Filter => Render => Clouds . But if you hold down the Alt key, then select Filter => Render => Clouds , you will create a high-contrast "cloud" filter instead of the usual effect.
35. Adjust color in Black & White Adjustment Layer
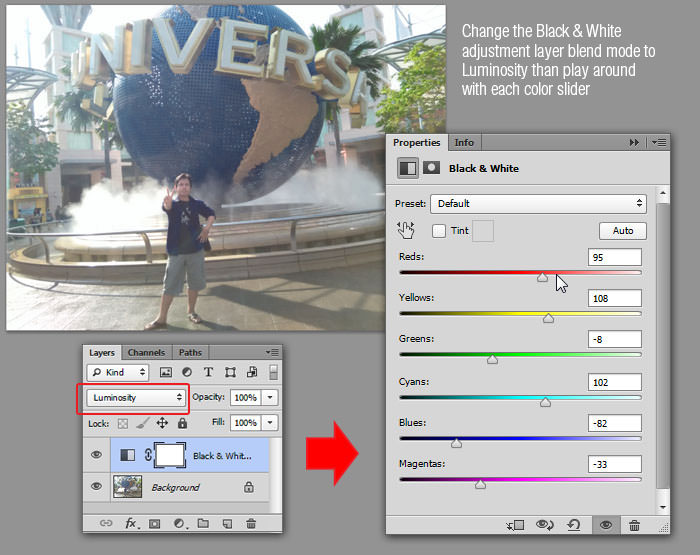
Users can use the Black & White Adjustment Layer (brightness and dark adjustment layer ) to adjust the glare for each specific color in the image. Just open the image, then create a new brightness and dark adjustment layer, change the Blend mode to Luminosity . If you only adjust the Reds value, only the red color will be affected.
36. How to open a document on 2 windows
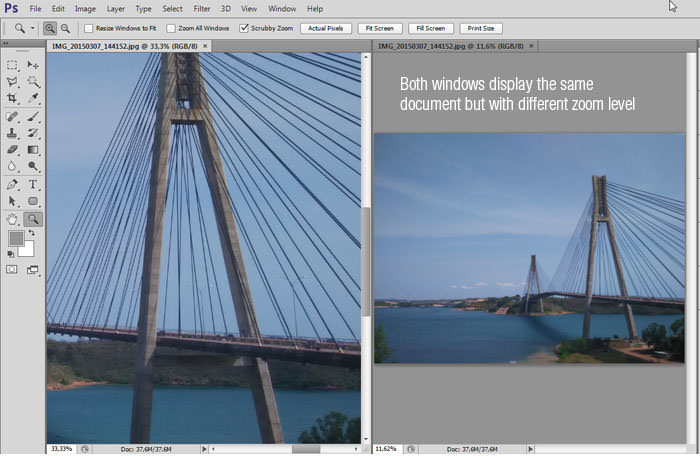
Did you know that Photoshop allows us to open an image on two parallel windows: an enlarged window and a minimized window? To do this, go to Windows => Arrange => New windows for [document name]. Both windows will display the same Document so any action you do will affect them.
38. How to customize the Thumbnail size
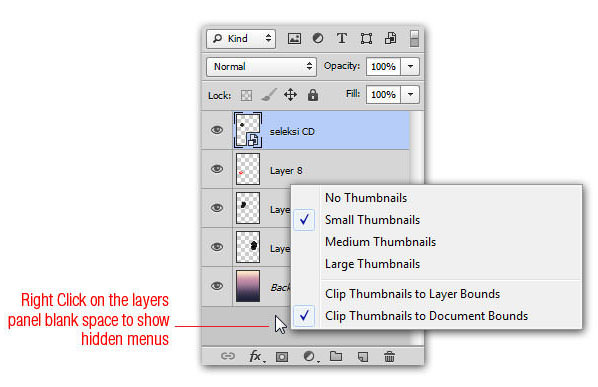
You can customize the thumbnail size in the Layer panel easily whenever you want. Right-click on the Thumbnail Layer , select Clip Thumbnails to Layer Bounds if you just want to see the content of that layer on the thumbnail or use Clip Thumbnails to Document Bounds if you want to see the entire canvas.
In addition, you can also apply these settings to all layers by right-clicking an empty area in the Layer panel and selecting the menu mentioned above.
39. Why should Smart Objects be used?
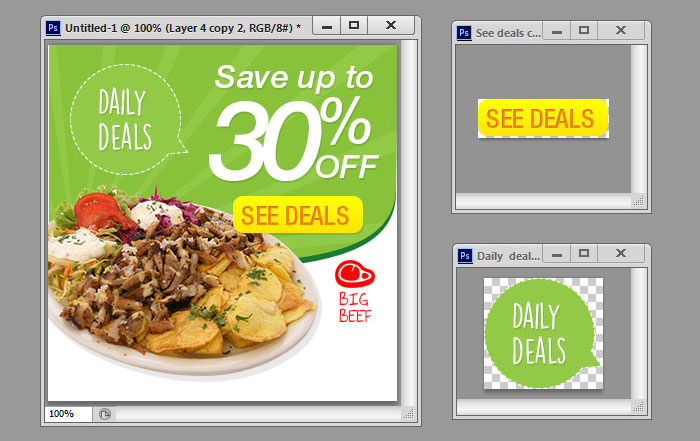
Smart Objects understands simply that smart objects not only keep the original resolution for layers but can also be used to group layers together, helping to organize layers in the most neat way.
40. How to add masks when the Layer has been applied
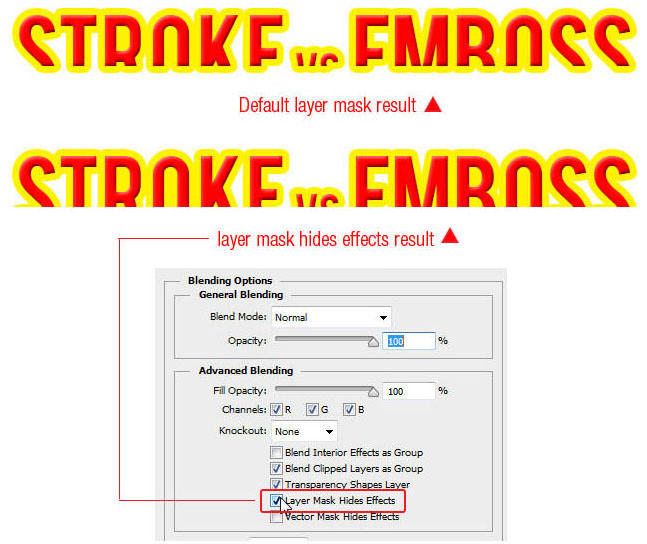
When you create a mask for a layer that has already applied layer styles , the mask does not affect all of those layer styles. This may be beneficial or detrimental depending on the outcome you want to achieve.
In case you want to add a mask to hide the Layer Style, click on the layer, then select Blending , check the Layer Mask Hide Effects box , select OK to apply.
41. How to use Multi-Level Masking
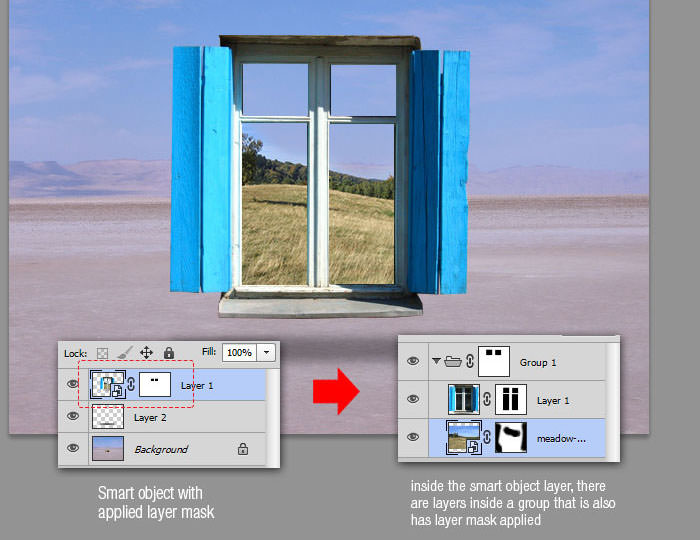
You can apply multiple masks on the same layer, exactly up to 11 layer masks and 11 other Vector masks by grouping the layers with the masks. create them.
You may not need a lot of masks for the same layer, but it is useful to split the mask into different parts, for example, you can split the inside and outside of the edit window into two layer masks.
42. How to change units of measurement quickly
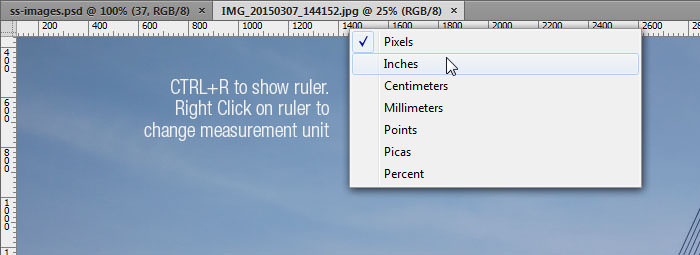
Photoshop allows users to set up units of measurement each time they create a new Document. However, sometimes during a working process, we need to convert to many different units and will usually choose Edit => Preferences => Unit & Rulers.
There is a faster way to right-click the ruler (Cmd / Ctrl + R to display the ruler) and select the new measurement unit you need.
43. Create a crossover effect with Scripted Patterns
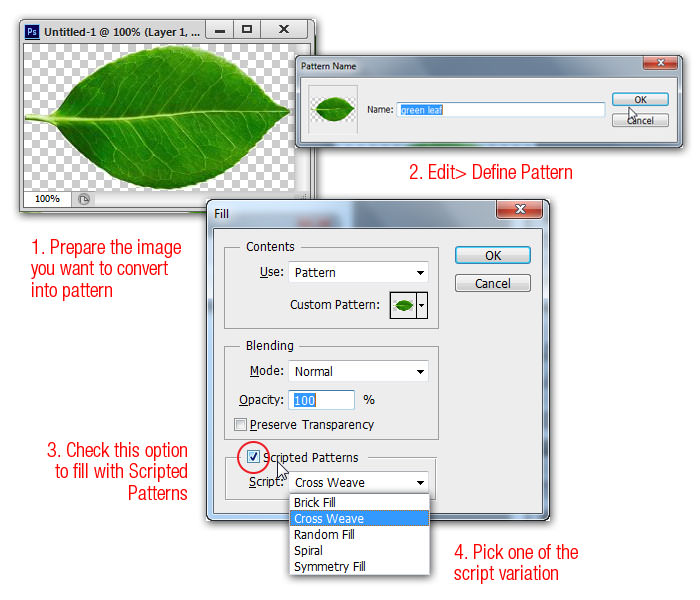
From Photoshop CS6 or later, there is a new Script based option. When finished splitting an object and switching to a transparent background, the object will now become a Pattern (Edit => Define Pattern), switch to the Fill command by going to Edit => Fill or Shift + F5.
Select the desired Pattern, select the object that has been extracted from the Pattern drop-down menu, check Scripted Patterns and select one of the options from the predefined Script. You can also create your own script to use.

44. How to automatically insert Placeholder Text
Photoshop CS6 has a new feature that automatically adds Placeholder Text (Dummy text) to images, saving time when creating mockups in Photoshop. To use it, simply select the text area and drag it out of the selection, then select Type => Paste Lorem Ipsum.
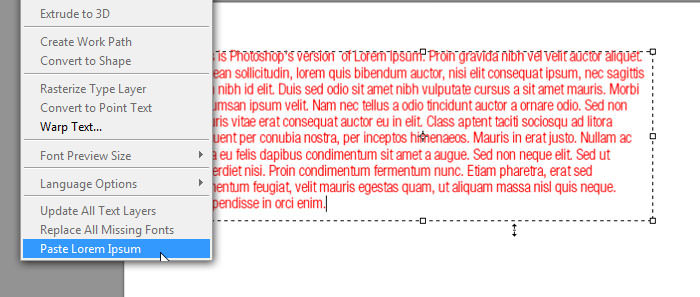
45. How to enable Non-Destructive Crop
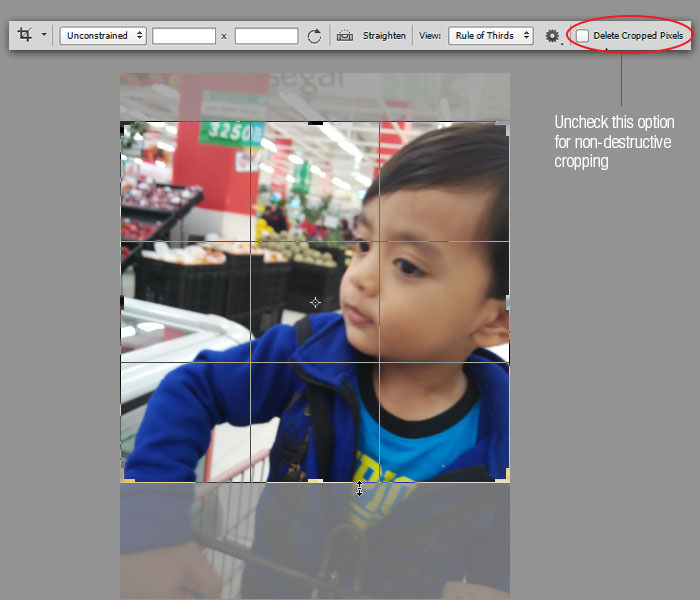
If you select Crop Tool and uncheck the Delete Cropped Pixels option , you can apply the Crop feature to any image without fearing that the cut will disappear. To access the image areas outside the cropped area, simply select the Crop Tool again and adjust the crop size accordingly.
46. Zoom in and out simultaneously
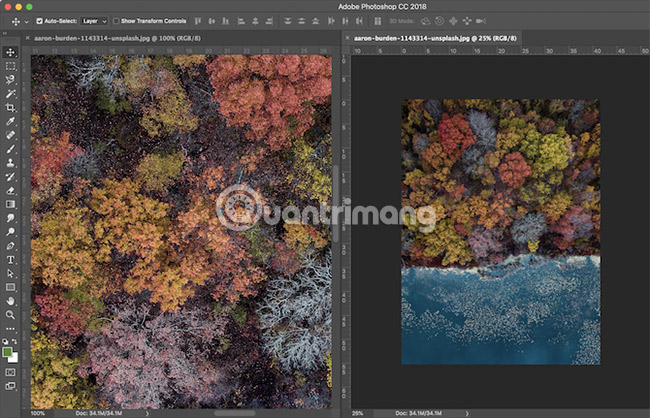
If you work on an image, it may be useful to view the closeup image at the same time with the entire image. This means how you can make minor edits in the detail view and see how they affect the overall image at the same time.
To view an enlarged version simultaneously and a 1: 1 aspect ratio version of the image, do the following:
1. Go to Window> Arrange> New Window for [Name-file.PSD] . This will open the second version of the image in a new tab.
2. Go to Window> Arrange> 2-up Vertical to display both frames side by side.
3. With one of the selected canvases, enlarge it. (You can easily zoom in and out using the shortcut Cmd / Ctrl + and Cmd / Ctrl - ).
47. Automation with actions and scripts
There are many ways to automate your work in Photoshop using a combination of actions and scripts.
Photoshop Actions cuts down your editing time by allowing you to apply similar editing techniques to your photos or images with the click of a button.
You can download Photoshop Actions or create your own Actions in a personalized editing style. You can also use Actions for repetitive tasks such as adding watermarks to your images or creating collages from two or three images together.
And as mentioned, you can use Photoshop Scripts to automate repetitive tasks such as mass resizing.
In addition to Actions and Scripts, you can also use Photoshop filters for quick processing. For example, the filter makes it easy to quickly add realistic tree images to your Photoshop design.
48. Create custom Photoshop shortcuts
You can create shortcuts and custom workspaces that match your own workflow.
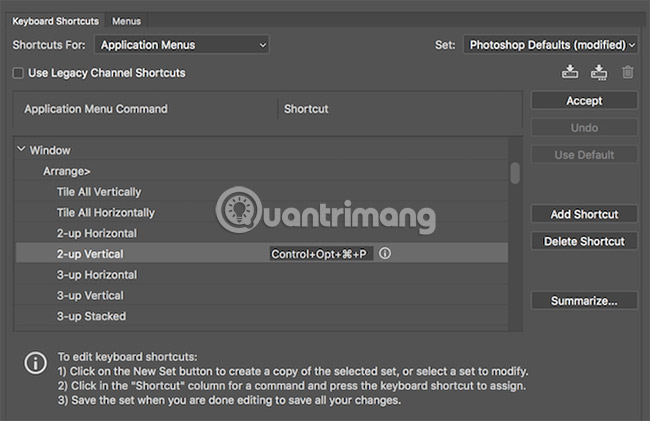
For example, you want to set a shortcut to switch the 2-Up Vertical view used in the fourth tip in this article:
1. Go to Edit> Keyboard Shortcuts or use the keyboard shortcut Option + Shift + Cmd / Ctrl + K.
2. In the control panel that opens, you can set or change the existing shortcuts for Application Menus, Panel Menus and Tools.
3. On the drop-down Shortcuts For menu , select Application Menus.
4. Scroll to Window and click the arrow to expand the selection, then see all the items you have found in the Window menu .
5. Scroll to the desired menu item (in this case, 2-Up Vertical ) and click to select.
6. Enter the shortcut you want to use. If the shortcut has been used for another feature, Photoshop will let you know.
7. Click OK.
To create a custom workspace, open all the control panels you use often, then go to Windows> Workspace> New Workspace to create a custom interface.
49. Arrange layers in Photoshop
Sorting layers can take some time, but in the long run, it can save you a lot of time.
- 3 tips to manage layers in Photoshop
Set the correct name for the layers to make it easier to navigate the Layers panel and select layers with the tips mentioned above.
- To rename a layer, open the Layers panel , then find the layer you want to rename and double click on the layer name. You can then enter a new name.
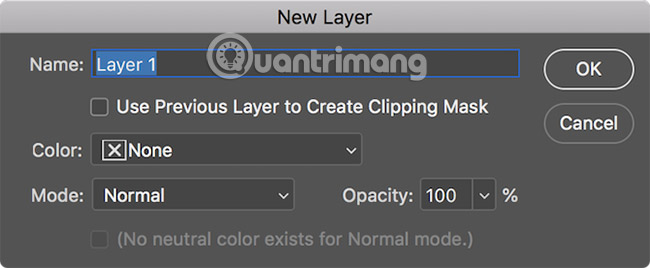
- You can also name your layers when you create them using the Layer> New> Layer menu or use the keyboard shortcut Shift + Cmd / Ctrl + N. Then you can enter the name of the layer before creating.
To add layers to groups, open the Layers panel :
1. To select multiple layers, press and hold Ctrl / Cmd and click on the layers you want to select.
2. Use the Ctrl / Cmd + G shortcut or right-click on the layers and click Group from Layers.
When it comes to organizing layers, you can use any approach that best suits your workflow, but here are some tips if you need a hint on how to start testing his layer:
Group the layers by type. For example, if you create a button, group all the items that make up that button: Shape, text, etc. in a folder.
Position layers in the control panel similar to how they appear on canvas. Place items at the top of the design above the Layers panel .
To quickly navigate between layers, you can use the following shortcuts:
- Select the layer below the selected layer: Alt / Opt + [
- Select the layer on the selected layer: Alt / Opt +]
- Move layer down position of another layer: Cmd / Ctrl + [
- Move the layer to the position of another layer: Cmd / Ctrl +]
The more you use Photoshop, the more you learn about speeding up your workflow. When the features you use most often become prominent, you can find more tips and tricks to speed up your workflow.
If you're still using Photoshop, these tips will help, but first be sure to see everything you need to know to learn the basics of Photoshop.
Good luck!
See more:
- Do you want to learn Adobe Photoshop tips within 1 minute? Take a look at these tutorial videos
- Things Photoshop can do and GMIP does not
- Photoshop: Principles of using filters


 How to create clipping mask in GIMP
  How to create spherical images in GIMP
  How to sign a document with GIMP
  How to create movie posters in GIMP
  How to Color Inside the Lines in FireAlpaca
  How to swap and combine faces in GIMP