Numbering pages in Excel
The article shows you how to number pages in Excel 2007, you can do the same with Excel 2010 and Excel 2013.
Many times you need to print documents in Excel, but fear of mixing up the pages in the right order. You want to add page numbers in Excel spreadsheets to help you easily organize or for a certain purpose.
The article shows you how to number pages in Excel 2007, you can do the same with Excel 2010 and Excel 2013.
Step 1: On the Excel interface, select the Page Layout tab on the toolbar.

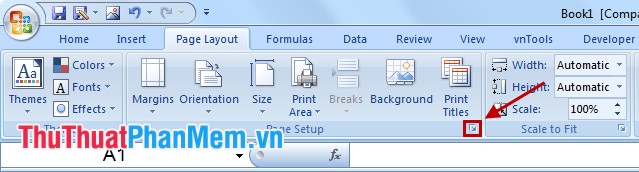
Step 2: In the Page Setup section, select the icon as shown below:
Step 3: In the Page Setup dialog box , select Header / Footer tab -> Custom Footer to page number at the bottom of each page. You can also choose Custom Header if you want to number the page on each page.

Step 4: At Footer, there are 3 positions for page numbering: Left section (left), Center section (middle), Right section (right). Want to number the page where you put your cursor in that position and then select the Insert Page Number icon .

Step 5: Then appear & [Page] in the position you choose, click OK .

Click OK to close Page Setup , so you have the page number for Excel, you can select the Office Button icon -> Print -> Print Priview to see the page number.
So with the simple steps guided in the article, you probably already know how to page numbers for documents in Excel spreadsheets. Good luck!
Was this article helpful?
Your feedback helps us improve.
Related Articles
 How to number pages in all versions Excel (update 2020)4 minutes read
 How to number pages in Excel very quickly and easily4 minutes read
 Page numbering method of type 1/2 in Excel3 minutes read
 The most detailed guide on how to number pages, skipping the first page and starting from any page in Word.6 minutes read
 Page numbering in Excel does not start from 13 minutes read
 Numbering in Excel 20163 minutes read
Reader Comments 0
Sign in with email or Google to join the discussion.