MS Excel - Lesson 9: Protect spreadsheets and Excel files
Excel spreadsheet and file protection features allow document protection and only authorized people can open it.
Excel spreadsheet and file protection features allow document protection and only authorized people can open it. You can set a password and when someone wants to open the document, that password is required.
Set password to open and edit files
- From the File menu, click Save As .
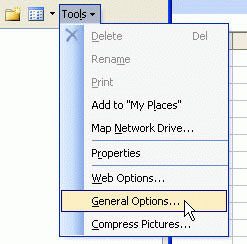
- The Save As dialog box appears, click Tools and from the drop-down menu select General Options .
- Save Options dialog box appears, enter the password in Password to open: With this feature, you must enter the password to open the file.

- If you only enter the password into Password to modify , this is a way to still open and view the document. If the reader wants to edit and save, they must enter the password, if there is no password, they must be saved with another name.
- Click the OK button. You must then re-enter the password to make sure the password is correct.
Attention:
+ Excel's ' Always create backup ' checkbox will create a copy file all the time when saving the file. The file with the extension BAK, the backup file will be saved in the folder as the original file.
+ If the " Read-only recommended " item is accumulated, the following dialog box is displayed when the document is reopened
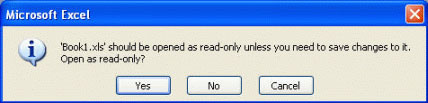
- Click Yes .
- The document will be reopened with 'read-only' read-only feature.
- If there is a change on the file, you cannot save with that file name. So if you want to save it, you need to change the file name
Remove passwords on a file
- Open the file containing the password you want to remove (open by entering the password when required)
- From the File menu, click Save As .
- The Save As dialog box is displayed, select General Options from the Tools drop-down menu
- Save Options dialog box appears, delete the set password
- Click the OK button to close the Save Options dialog box
- Click the Save button to save the file, displaying a dialog box
- Click the Yes button
File protection
- From the Tools menu, select Protection and click Protect Workbook .
- The Protect Workbook dialog box is displayed
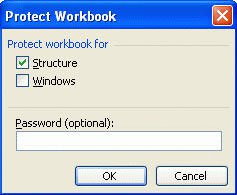
- The Protect Workbook dialog box gives you 2 choices:
Structure Structure Do not allow all file structure changes to be selected. For example, you will not be able to edit, insert, delete, rename, copy, move or hide sheets. Windows does not allow resizing of files. Window size adjustments (close, expand, shrink and restore) will be hidden.
- Enter the password in the Password column. Click OK .
- You must enter your password again to make sure the password is correct
- Click OK .
Remove file protection
- From the Tools menu, select Protection and click Unprotect Workbook .
- Enter the password and click OK .
Spreadsheet protection (sheet)
- From the Tools menu, select Protection and click Protect Sheet .
- The Protect Sheet dialog box is displayed
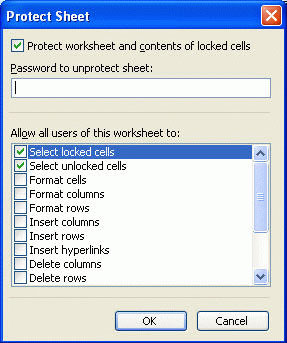
- From the Protect Sheet dialog box, you can check the features in the ' Allow all users of this worksheet to ' section so that no one can change those formats. If any item is not accumulated, others may have changes under that section.
- Enter the password in the Password to unprotect sheet column , click OK
- You must enter your password again to make sure the password is correct
- Click OK .
Remove spreadsheet protection (sheet)
- From the Tools menu, select Protection and click Unprotect Worksheet .
- Enter the password and click OK .
Was this article helpful?
Your feedback helps us improve.
Related Articles
 How to protect spreadsheets in Excel2 minutes read
 Excel 2016 - Lesson 3: How to create new and open existing spreadsheets7 minutes read
 Excel 2016 - Lesson 12: Formatting pages and printing spreadsheets in Excel8 minutes read
 8 Ways to Use Excel Beyond Spreadsheets8 minutes read
 How to open multiple spreadsheets side by side in Excel 20133 minutes read
 Guide to cleaning up Excel data tables3 minutes read
Reader Comments 0
Sign in with email or Google to join the discussion.