Table of Contents
Macromedia Flash - Customize Cursor: Step covers the essential facts behind the topic, including what changed, why it mattered, and how it affected users.
Step Overview
Step 1 Open a new flash file. Go to Document Properties ( Ctrl + J ) and set the Width and Height of the file. Set the Frame rate set to 22fps.
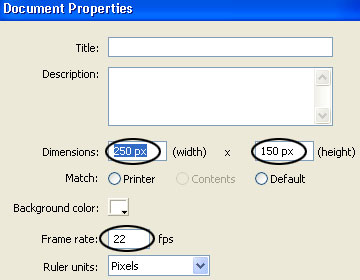
Step 2 Double click on layer 1 and rename its name to background.
Step 3 Press Ctrl + R ( Import to Stage ) to put the background image into the file.

Step 4 Name a new layer and name it cursor.
Step 5 Select the cursor layer and draw any shape on that layer to replace the default cursor. May be the picture as below.
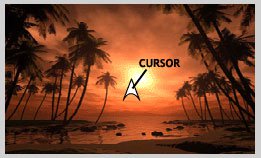
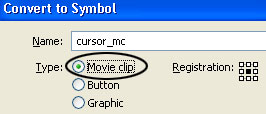
Step 6 Select the pointer and press F8 key (or go to Modify -> Convert to Symbol ) to convert it into a Movie Clip. See the picture below
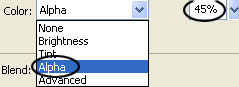
Step 7 Open the Properties Panel ( Ctrl + F3 ), in the Color section choose Alpha and the value is 45%.
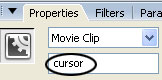
Step 8 Still in the Properties Panel, under the Movie Clip section, enter the cursor name (as shown below).
Step 9 Add a new layer and name it action
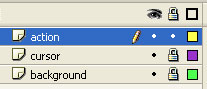
Step 10 Select the new layer just now, click on the first frame and open the Action Script Panel (F9), then enter the following script:
_root. Cursor. SwapDepths (1000); _root. OnEnterFrame = function () { Mouse. Hide (); cursor._x = _root._xmouse; cursor._y = _root._ymouse; };
FAQ
What happened in Macromedia Flash - Customize Cursor: Step?
Macromedia Flash - Customize Cursor: Step covers the essential facts behind the topic, including what changed, why it mattered, and how it affected users.
What factors influenced Step?
Step Overview Step 1 Open a new flash file.
What was the practical impact on users?
Go to Document Properties ( Ctrl + J ) and set the Width and Height of the file.
Related Articles
 Macromedia Flash - Push Objects Away from the Cursor: Step3 minutes read
 Macromedia Flash - Dynamic Cursor Object: Step3 minutes read
 Macromedia Flash - Move Objects: Step3 minutes read
 Macromedia Flash - Effects of Lighting on Photos4 minutes read
 Macromedia Flash - an Attractive Photo Appearance Effect4 minutes read
 Macromedia Flash - Falling Text Effect: Falling Letters3 minutes read
Reader Comments 0
Sign in with email or Google to join the discussion.