Instructions on how to draw diagrams in Word
The use of drawing models in Word content will help readers more generalize and better understand the content, as well as increase the content of the content.
Table of Contents
Flowchart (also known as flow diagrams, block diagrams or flowcharts) are powerful visual thinking tools, often overlooked for non-technical tasks. Perhaps because the initial flowchart was purely a technical skill and often appeared in drafts of industrial planners. With computer programming, it became more popular.
But in fact, flowchart is not just for engineering. With a little imagination, users can simplify both their work or life. One of the easiest tools available to create quick flowchart is Microsoft Word.
In the presentation of content on Word, in addition to drawing tables, draw diagrams, drawing pictures is also basic operation. In addition to the need to draw diagrams in the lesson, besides, the use of drawings or models is a good way of presenting content, helping readers better understand the content of the article. However, if you are new to the Word editing tool and do not know how to draw pictures in Word, please refer to our tutorial below.
Here are the different ways to create flowchart in Word.
What is flowchart?
Frank Gilbreth, an engineer thought to have created the first ' Process Flow Charts ' in 1921.
Flowchart is an easy-to-understand diagram of any process, using simple graphics to represent start, end, and different stages that follow a logical order. Each step in the process is represented by a unique symbol with a short name of each step in the process. The symbols in flowchart are linked together by arrows indicating the direction of the process.
As can be seen from the diagram below, each icon is standardized for a specific process.

Because standard icons illustrate the steps, it's easy to figure out how all elements link together. Flowchart can be customized for any process task. That's why there are so many types of flowchart, but they are basically the same.
Uses of flowchart
The beauty of flowchart lies in their simplicity. Users can use basic symbols to map out any task and flowchart can be used for different situations. You can easily create flowchart manually or use the best charting tools.
When the flowchart is completed, you will have an overall view and know the whole process. The flowchart drawing process helps understand problem logic and provides detailed information to make things better.
In short, flowchart has uses such as:
- Check any process.
- Communicate the steps in a process for others.
- Organize processes by eliminating redundant steps.
- Identify and fix potential problems.
- Improve the process.
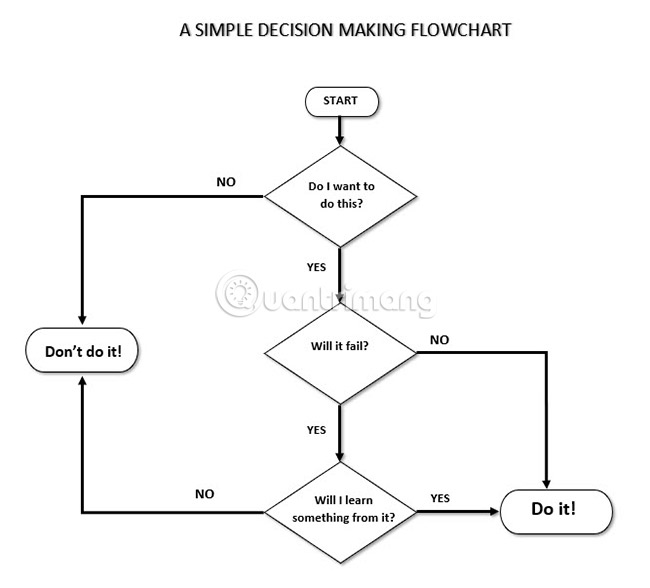
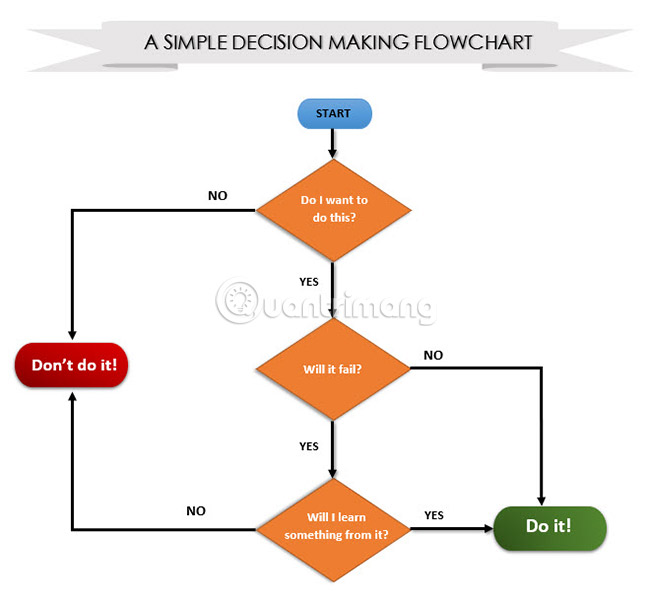
Basic flowchart
Flowchart has many different shapes and sizes. Here is an example of the basic flowchart that can be used to make simple decisions:
How to create flowchart in Microsoft Word 2013, 2016 and 2019
All the tools needed to create flowchart in Microsoft Word 2013, 2016 or 2019 in Drawing Tools. But first take the following three preliminary steps:
Maximize the page area. Shorten the Ribbon by clicking on the small arrow pointing up (or pressing Ctrl + F1 ) in the far right to display only the tab name.
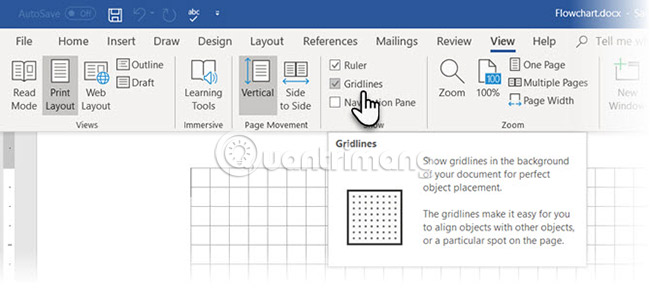
Display Grid. Click the View tab and click Gridlines. The Grid tool helps align and resize accurately symbols in flowchart when users attach them to gridlines.
Users can also customize these gridlines by going to Page Layout> Arrange> Align> Grid Settings .
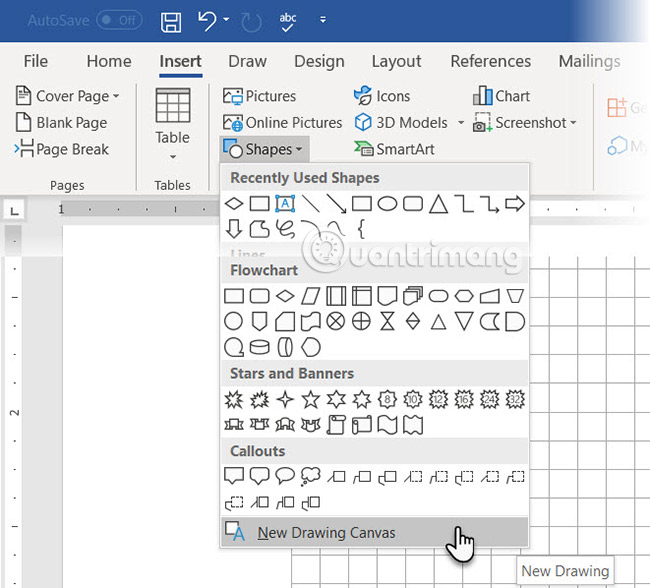
Use Drawing Canvas. Inserting any shape or drawing in a Word document will automatically create a drawing canvas. The user will have to resize the canvas so that the entire diagram fits within the frame.
Microsoft's support page says that using different shapes (like in flowchart) is particularly useful. In addition, users can customize drawing frames to create attractive backdrops for their flowchart.
Now, let's start with the meticulous work of inserting shapes and connecting them all together. It is better if the user outlines it on paper first, then uses Microsoft Word to give it a complete interface. A rough sketch that better visualizes the flowchart layout on Word. This process is very simple and giving some preliminary sketches will save a lot of time.
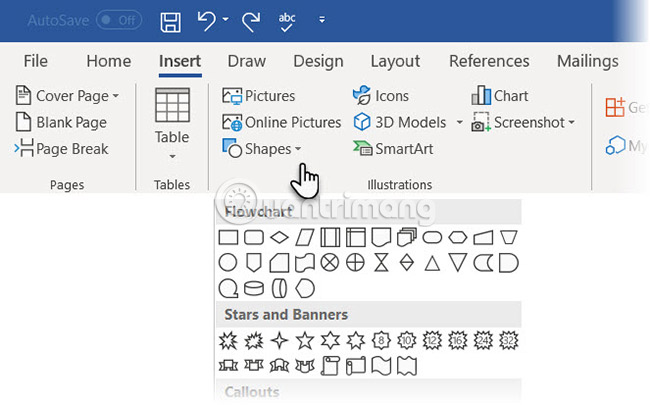
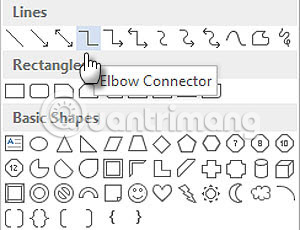
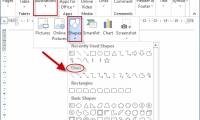
All necessary icons can be found on the Insert tab > Shapes . Click the drop-down menu in Shapes.
1. The icons are neatly arranged in the Flowchart group .
2. Select the shape. For example, ovals can represent 'Start'.
3. Click on the canvas area, hold down the left mouse button and drag to add the shape. Users can also double click any shape to automatically add it to the canvas. Then move and change the size of the shape.

4. Add text by clicking on the shape and adding the label to the text box.
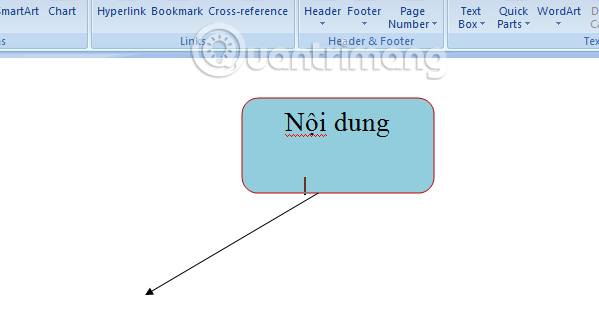
5. Connect the two shapes / symbols with the arrow or connector. There are two basic types of hyphens available in the Shapes drop-down list: Elbow and Curved.
Note : hyphens only work between images placed on the canvas.
For example, users can manually move hyphens to any connection point (indicated by small blue dots on the shape). The connection points anchor the hyphens into place and users can move the images without losing the connectors. This gives users the flexibility to modify the flowchart by moving everything around at will.
You can add additional words to branched hyphens (such as from Yes or No in the areas that need to be decided) by inserting text boxes along the hyphen of the hyphen. Users can also use the rotate handle to rotate the text box.
Instructions for drawing pictures in Word 2007
The following article is done on Word 2007, we do the same with the other versions of Word.
Step 1:
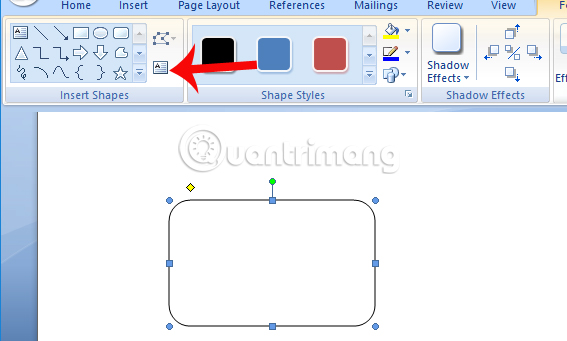
To proceed with drawing images in Word, click on the Insert tab and click on the Shapes section. In the Shapes section, select the shape you want to use in the content.

After that, you click on the cube and then hover over the Word page to create a drawing. Here, the user can adjust the size of the drawing by clicking on the blue dots as shown in the picture.
Step 2:
Next to enter the content in the newly created drawing, double click on the cube and click on the Add text icon above the ribbon bar.
Step 3:
You enter the text into the frame as usual. Then highlight the text and appear to adjust the font size, font, color for the text.
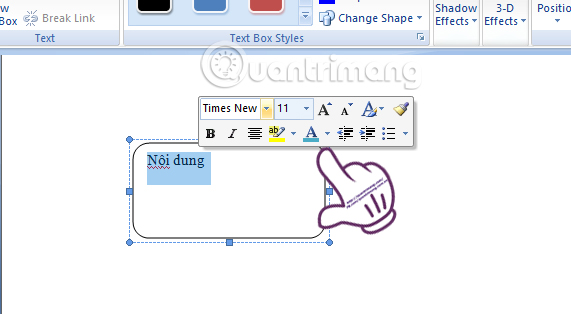
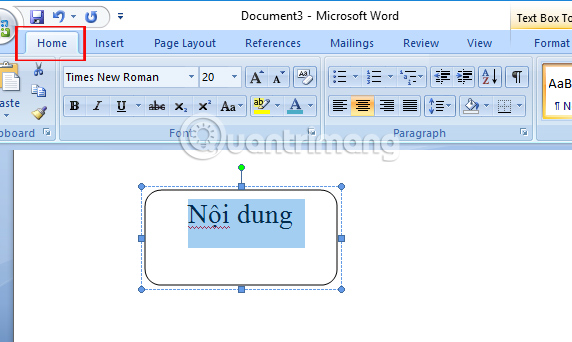
Or we can use text adjustment frames in the Home tab on the Ribbon.
Step 4:
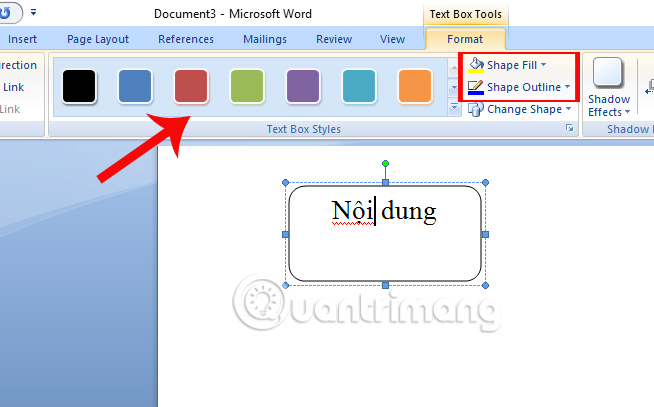
In addition, you can also adjust the color of the shapes when choosing the border color, main color or using the available design. The user clicks on the drawing in the content and sees Text Box Tools at the top of the Word interface. Click on Text Box Tools and will see a list of colors.
Here, we have the Shape Fill option to select the main color for the drawing, the Shape Outline to select the border color for the drawing or color strip to select the available design.
Step 5:
After completing a drawing in the content, we perform the same operations as above to draw another block in the lesson. If you use the next cube similar to the original shape, just click on the first image, press and hold Ctrl and drag the mouse to the white content. A similar shape will be created shortly after.
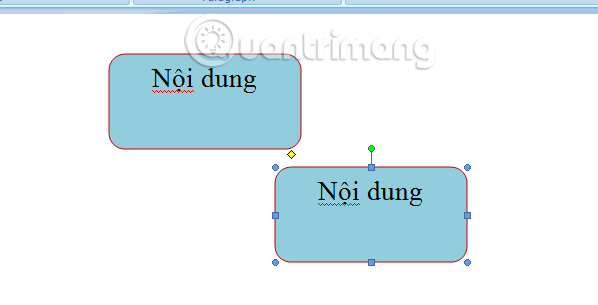
The rest is that you complete the cube diagram required by Word content.
Tips for aligning shapes
There are several ways to do that.
1. The recommended way is to do it right the first time. Use gridlines and draw them with equal width when placed on the canvas.
2. Click on each individual shape and drag them to the new location. If there are many shapes, this can be very time consuming. Gridlines help keep them in place.
3. Select all shapes to align. On the Format tab , click the drop-down menu Align. Select Align Selected Objects and use the alignment tool to align the shapes automatically.
Tips for aligning flowchart
After the diagram has been arranged, users can align the diagram to fit the page.
1. Group all the shapes and the sign of the connection. Select all shapes and hyphens. On the Format tab , click the drop-down Group menu and select Group.
2. In Align, check whether the Align to Margin item is selected. Then, click Align Center and / or Align Middle.
3. (Optional) Resize the canvas by dragging corners or edges.
Create a great flowchart in Word
The colorful flowchart that you read above is simply a more formatted flowchart only. The flowchart format in Word must be the final stage after inserting, connecting and labeling all boxes. And it is better to apply in bulk rather than formatting some individual shapes in the flowchart. So, choose many shapes and format them together.
It all depends on the creativity of each person and the basic tools on the Format tab on the Ribbon or more detailed options available on the sub-panel.
Open the sub-panel by right-clicking on the image and selecting Format Shape.
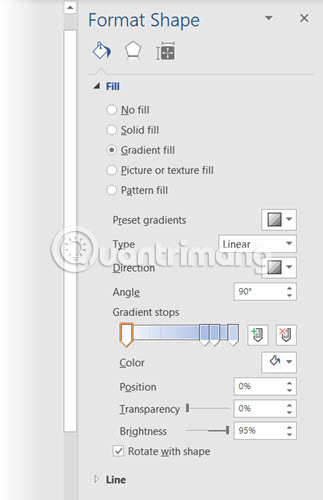
There are many options available to design shapes and hyphens:
- Shape Styles: A quick way to add color or color to shapes.
- Shape Fills: Use color or gradient options (color palette). Do not use too many color schemes.
- Shape Outlines: Set image properties for limited lines. Also, use it to make the hyphens thicker or thinner as you like.
- Effects: Create depth for shapes with 3D effects, shadows, etc.
As can be seen, there are many options for completing 'appearance' for a basic flowchart. This is not easy but if your success flowchart will look extremely professional.
Users can also start with a flowchart template and customize it according to needs.
There are many ways to create flowchart, from 'humble' pen and paper tools to specialized applications like Visio by SmartDraw and Microsoft. Users also have the option to use the LucidChart add-in in Microsoft Word 2013, 2016 or 2019. It is available on Microsoft Office Store and is free to install but may also be charged.
Currently, users often spend a lot of time to use Microsoft Office. Therefore, knowing all of its 'power' is extremely important.
Above is a tutorial on how to draw cubes and block diagrams on Word tools. In the figure diagram on Word, we can combine color creation to increase the animation of the graphics as well as the entire content.
Hope you are succesful.
Refer to the following articles:
- Simple way to convert PDF files to Word
- Summary of common shortcuts in Microsoft Word
- Create a quick dot (……………) line in Microsoft Word
Was this article helpful?
Your feedback helps us improve.
Related Articles
 How to draw diagrams in Word5 minutes read
 How to draw arrows in Word2 minutes read
 Instructions for drawing straight lines in Word4 minutes read
 How to draw pictures and diagrams in Word5 minutes read
 Instructions for drawing arrows in Microsoft Word7 minutes read
 How to import Lucidchart diagrams to Microsoft Word and Excel5 minutes read
Reader Comments 0
Sign in with email or Google to join the discussion.