Removing the first Exchange 2003 server (Part I)
Deactivating an old Exchange 2003 server is a fairly easy process. But you will need to add some steps if it is the first server installed in an administrative group. The reason is because the first Exchange server is in & oacu
What to watch out for when removing the first Exchange 2003 server installed in the administrative group.
Introduce
Deactivating an old Exchange 2003 server is a fairly easy process. But you will need to add some steps if it is the first server installed in an administrative group. The reason is that the first Exchange server in the administrative group holds specific configuration elements or additional roles may not switch to another Exchange server in the same administrative group. Take some time to verify that additional roles have been delivered correctly and successfully to the new Exchange server, you can help yourself avoid many headaches later when you want to deactivate servers. Other Exchange.
Additional configuration or role elements can be identified as:
-
System directory, such as a folder that holds the free / busy information calendar.
-
Recipient Update Service (RUS) - Service to update recipient information.
-
Routing Group Master Role - The role of host group orientation.
-
Any Exchange connector used for home or an endpoint, the server is down.
In part one of this two-part series, we will look at copying the system folders to the new server, removing them from the old server and updating the RUS. In part two we will continue to look at the topic of server-oriented role transmission and any connectors you may have installed. At the same time we will also mention the common errors you encountered when trying to remove Exchange.
For ease of understanding, in this article we assume only two Exchange servers in a single administrative group. But as you know, the technique we discuss here is effective for both multi-admin groups. We will also assume that the option to display administrative groups within Exchange System Manager is enabled. In the example below, the first server in the administrative group is intended to be deactivated named DCEX1. The new server is called EX2.
You may have created public folders of users on the new server. But if you haven't done so yet, the technique below can help you. You need to make sure all user public folder data has been copied to the new server and that all copies are transferred before they are stopped working with the old server. You also need to make sure that all user mailboxes have been transferred safely.
Copy the system directory
The first important step in the process of deactivating the first Exchange 2003 server in the administrative group is to copy and "move new" to the system folders. These directories include:
-
Schedule + Free / Busy (Calendar + Busy / Free)
-
Offline Address Book (Offline address list)
-
Organizational Forms (Organized Forms)
If you've ever copied a shared user directory to a new server, you'll understand in detail how the replication process works. However, here I will detail the whole step by step to make sure the system folders are copied and no copies are left on the old server.
1. Run the Exchange System Manager snap-in.
2. Expand the admin group, then Folders .
3. Right-click Public Folders , select View System Folders on the context menu (illustrated in Figure 1). Now expand the Public Folders component, you will see the Exchange system folders rather than the user's general folders.
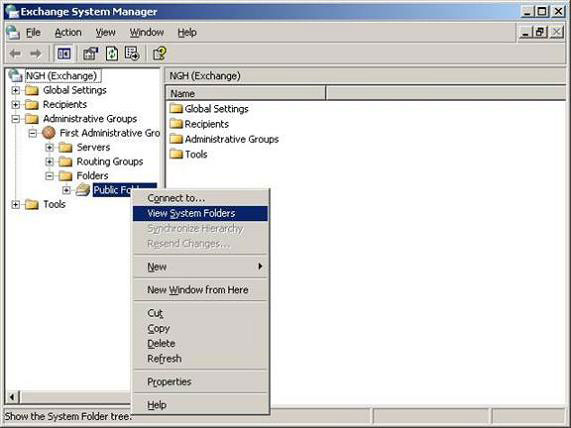
Figure 1 : Representing system folders
4. Locate the SCHEDULE + FREE BUSY system folder and expand it. Below you will find another folder with the same name as EX: / o = organization name / ou = administrative group name . In our example, its name is EX: / o = NGH / ou = First Administrative Group . Note that, on systems with multiple administrative groups, you will see that each group has a directory. For simplicity, turn those folders into a free / busy format. Right-click on the free / busy folder and select Properties from the context menu.
5. In the Properties section of this folder, select the Replication tab. You will see that only one server is included in the list containing the copy of this directory. That is the old server you are transferring the copy to, in this case, DCEX1 (illustrated in Figure 2).

Figure 2: Copies of Free / Busy system folders
6. Click the Add button and in the Select a Public Store window, select the new server you recently moved the user mailbox to and select OK from all windows. In our case, server EX2 is added to list the copies. This means that the server will now receive a copy of the free / busy system directory.
7. Repeat the above process for all subdirectories below (if any). You can do this quickly by right-clicking on the free / busy folder, selecting All Tasks in the context menu, and then choosing Manage Settings . This option will not work if the directory you are executing has no subdirectories. If you are using Exchange 2003 Service Pack 2, this option will open the Manage Public Folder Settings Wizard . This component allows you to send copy changes to subdirectories. With the older Exchange version, the Propagate Folder Settings window will appear. In this window, select the Replicas check box and click OK. This ensures that the copies you configure for this folder will be applied to all subdirectories.
8. Next is the OFFLINE ADDRESS BOOK folder. You can find this folder in Public Folders component similar to SCHEDULE + FREE BUSY above. Below OFFLINE ADDRESS BOOK you will find another folder with the same name / o = organization name / cn = addrlists / cn = oabs / cn = Default Offline Address List . In our example, the name of this directory is / o = NGH / cn = addrlists / cn = oabs / cn = Default Offline Address List (illustrated in Figure 3). For simplicity, let's turn this directory into an offline address list directory. Notice that the subdirectories are also named OAB Version X. Right-click on the offline address list folder and select Properties from the context menu.

Figure 3 : System directory Offline Address Book (offline address list)
9. The process is now the same as above. That is to add a new server to receive a copy of the system directory. Make sure that all OAB Version X subdirectories of the offline address list folder have been copied.
10. The last system directory to copy is the Forms Oranization libraries (if any). Similarly, you will also find this component in Public Folders. Under the EFORMS REGISTRY folder , you may see some organizational forms folders created with custom names. Note that no new directories have been built in Exchange 2003, in a new Exchange. If you have no folders in EFORMS REGISTRY, you cannot copy any organizational forms.
11. Now you need to wait for the public folder replication process to take place. How long it takes depends on settings such as the copy schedule of the free / busy directory. Make sure you allow enough time for the process to take place. How to know which folders have been copied completely? One way we use it is to allow large amounts of time to be associated with checking the shared folder store sessions of the second server added to receive copies. For example, Figure 4 shows the common folder instances used to store on server EX2, now there is a copy of the free / busy system directory. Also, the total amount of data shown in the size column (1 KB) attached indicates what is visible on the shared storage area of the DCEX1 server. Admittedly in this example, the total is too small, because this is just a test system. That is not the exact scientific number. You may need to add some details after carefully monitoring the event logs to really check if the copy process works as expected. You can alternatively right-click on the system folder, select Properties , and return to the Replication tab. We will see a Details button, click it and check if the Replication Status column shows In Sync information.
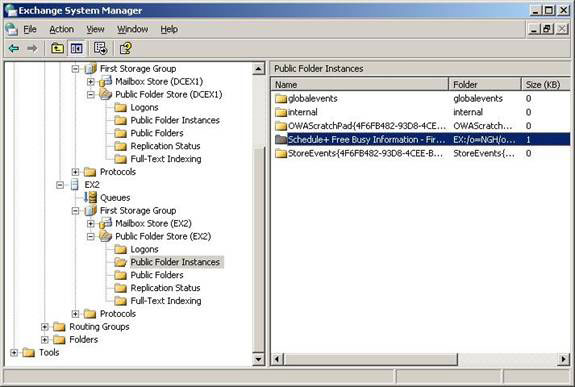
Figure 4 : Public Store Instances
12. Now, all system folders have been copied to the new server, you need to continue removing them from the old server so that the server will stop working then. To remove all copies from the old server, in this case DCEX1, right-click on each system folder you edited above, go to Properties , select the Replicatio n tab, go to the old server and Click Remove (illustrate Figure 5). You must do this for all system folders, including subfolders.
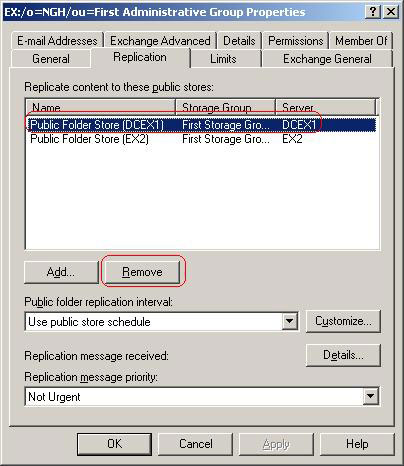
Figure 5 : Remove the old system folder copies
Offline Address List Server
The Offline Address List component that you copied earlier is created daily by an Exchange server. By default this will be the first server in the administrative group. To transfer it to the new Exchange server, follow these steps:
1. Run the Exchange System Manager snap-in.
2. Expand the Recipients component and select Offline Address Lists .
3. In the right pane, you will see the Default Offline Address List component . Right-click it and select Properties from the context menu. The result is similar to Figure 6.
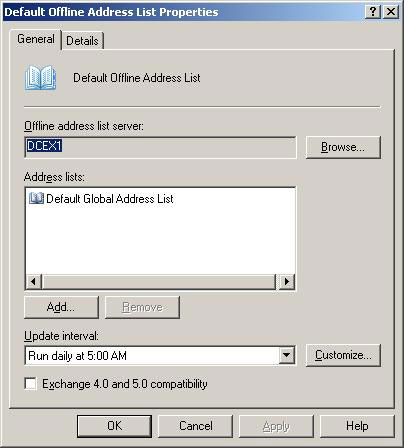
Figure 6 : Default Offline Address List Server (Server list of addresses offline by default)
4. Note that the Offline address list server field is set for the old server (DCEX1). To change this, click on the Browser button next to it.
5. In the Select Exchange Server window, type the new server name and select Check Names .
6. Assuming the new server has been found, its name will now be underlined. Click OK and check to see if the new server name has been added to the list in the Properties of Default Offline Address List. Click OK again to exit the window and confirm the changes.
Summary
In this article we discussed how to copy some important system directories to the new Exchange server and how to ensure the Offline Address List component is created in the new server. This is just the information for part one of this two-part series. In Part 2, I will show you all the rest, questions, and errors that are often encountered when moving the first Exchange server in the administrative group.
Please follow the second part.
Was this article helpful?
Your feedback helps us improve.
Related Articles
 Removing the first Exchange 2003 server (Part II)10 minutes read
 Transfer from Linux Mail Server to Exchange Server 2007 (Part 1)10 minutes read
 Discover EMC in Exchange Server 2010 (Part 2)4 minutes read
 Transfer Exchange 2003 to Exchange 2007 (Part 2)9 minutes read
 Switch from Exchange 2000/2003 to Exchange Server 2007 (part 1)14 minutes read
 Mobile communications with Exchange Server 2007 - Part 1: New device features and improvements10 minutes read
Reader Comments 0
Sign in with email or Google to join the discussion.