Transfer Exchange 2003 to Exchange 2007 (Part 3)
In the previous two sections, we installed the first Exchange 2007 servers, combining Hub Transport and Client Access Servers in an Exchange 2003 environment.
Network Administration - In the previous two sections, we installed the first Exchange 2007 servers, combining Hub Transport and Client Access Servers in an Exchange 2003 environment. We also did some initial preparation. for Clustered Continuous Replication (CCR) environment. In this third part we will continue to install this CCR environment.
>> Transfer Exchange 2003 to Exchange 2007 (Part 1)
>> Transfer Exchange 2003 to Exchange 2007 (Part 2)
Cluster configuration
Once we have created the Cluster, we will configure it. First we will configure the Cluster Network Usage . To do this, access the Cluster Administrator hierarchy of the Networks object in the Cluster Configuration . Then open the properties window of the Private network, select the Internal cluster communications only (private network) option - only communicate with the internal cluster (private network) for the Private network as shown in Figure 1. And select the option Select All communications (mixed network) - All network communication (mixed network ) for the Public network.
Next, you need to make sure that these networks are sorted in the right order by right-clicking on the Cluster name, CLUSTER1 , at the top of the hierarchy in Cluster Administrator and then selecting Properties from the context menu. After that, the properties window of this Cluster will appear, select Network Priority tab. Here, you put the Private network at the top of the list by clicking on the network and clicking the Move Up button as shown in Figure 2.
Microsoft suggests that users should configure multiple settings to control tolerances for the Cluster communication to be interrupted. To do this, simply use the cluster.exe command interface and run the following two commands:
Configure File Share Witness
Install CMS
CCR and Public Folder
Complete installation of CMS
>> Transfer Exchange 2003 to Exchange 2007 (Part 1)
>> Transfer Exchange 2003 to Exchange 2007 (Part 2)
Cluster configuration
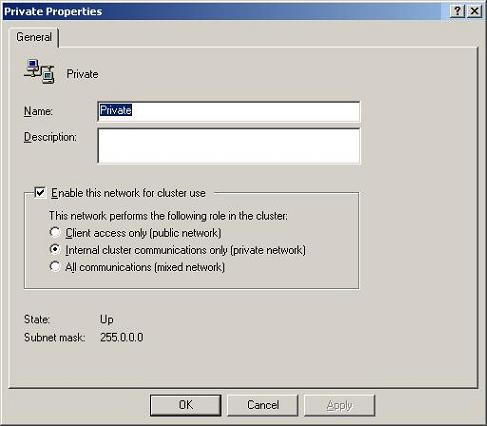
Once we have created the Cluster, we will configure it. First we will configure the Cluster Network Usage . To do this, access the Cluster Administrator hierarchy of the Networks object in the Cluster Configuration . Then open the properties window of the Private network, select the Internal cluster communications only (private network) option - only communicate with the internal cluster (private network) for the Private network as shown in Figure 1. And select the option Select All communications (mixed network) - All network communication (mixed network ) for the Public network.
Figure 1: Configuration for Private network.
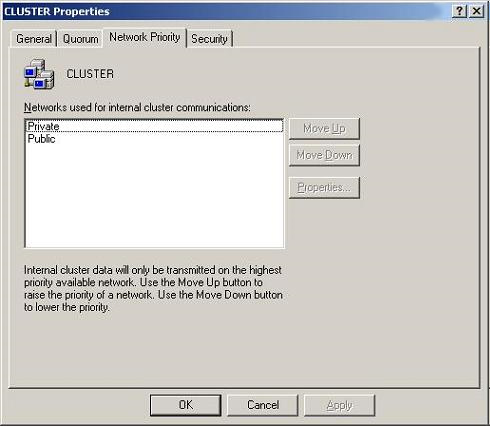
Next, you need to make sure that these networks are sorted in the right order by right-clicking on the Cluster name, CLUSTER1 , at the top of the hierarchy in Cluster Administrator and then selecting Properties from the context menu. After that, the properties window of this Cluster will appear, select Network Priority tab. Here, you put the Private network at the top of the list by clicking on the network and clicking the Move Up button as shown in Figure 2.
Figure 2: Configure network priority for Cluster.
Microsoft suggests that users should configure multiple settings to control tolerances for the Cluster communication to be interrupted. To do this, simply use the cluster.exe command interface and run the following two commands:
cluster.exe CLUSTER1 / priv HeartBeatLostInterfaceTicks = 10: DWORDAfter changing these settings, the Cluster service will be stopped and restarted on each node to ensure these changes are applied. Of course, you must also pay attention to moving Cluster resources between nodes before stopping the service so that the node is stopped and restarted as a passive node at that time.
cluster.exe CLUSTER1 / priv HeartBeatLostNodeTicks = 10: DWORD
Configure File Share Witness
In this step we have not completed the configuration on Hub Transport servers because these servers contain File Share Witness (Microsoft recommends placing File Share Witness on Hub Transport servers). Of course you can use any server capable of executing file sharing on it, but because the Hub Transport server is always within the control of the administrators in most Exchange systems, these servers is the best choice.
In normal systems, you only need to use a File Share Witness so you only need to select the HUBCAS1 server to perform this function. However, the HUBCAS2 server has also created a File Share Witness beforehand in case the HUBCAS1 server fails. Below is the process of creating File Share Witness on the server HUBCAS1 :
1. In D: drive, create a folder named MNS_FSW_DIR_EX2007 . Name this folder just because Microsoft suggested using MNS_FSW_DIR_ in front of the CMS name. In this case, CMS stands for Majority Node Set , FSW stands for File Share Witness and DIR indicates that this is the name of a directory. You can create this folder anywhere but in this example we will create it right in drive D: for this installation. We will then create other folders in the main Exchange directory so that they are part of the Exchange installation structure.
2. Next, share the folder created in step 1 using the shared name MNS_FSW_EX2007 . This shared name format is Microsoft's proposed format for shared names. In addition, the Cluster service account is given full access to the newly created folder. You can perform this operation with a single command, which has the following syntax:
net share mns_fsw_ex2007 = d: mns_fsw_dir_ex2007 / grant: neilhobsonexcluster, full
3. Then additional sharing rights are given to the Cluster service account and administrators by the command:
cacls d: mns_fsw_dir_ex2007 / g builtinadministrators: f neilhobsonexcluster: f
4. Finally Majority resource Node Set of Cluster is configured by running cluster.exe command-line utility:
Cluster cluster1 res 'Majority Node Set' / priv MNSFileShare = HUBCAS1MNS_FSW_EX2007
Note that in step 4 the UNC path includes the host name HUBCAS1 . In the past, Microsoft changed its ability to recover in case the server containing File Share Witness failed. Previously, this method of server recovery was using DNS CNAME records , while the new method used the Cluster Quorum method.
Install CMS
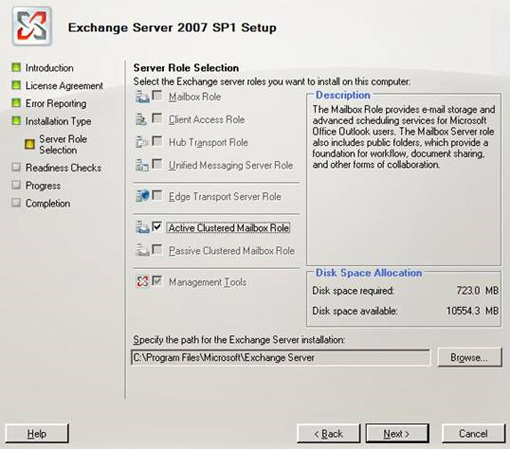
The Cluster has now been installed and configured correctly, along with the File Share Witness feature, then CMS will automatically be created by installing the Active Clustered Mailbox Role of Exchange 2007 SP1 on the Cluster Node called NODE1 . You can do this by running the Exchange 2007 setup.exe installation program and following the instructions of the installation wizard. Need to choose a Custom installation because the Typical installation does not allow installing CMS. At the Server Role page of the installation wizard, select the Active Clustered Mailbox Role option as shown in Figure 3.
Figure 3: Installing Active Clustered Mailbox Role.
On the next page of the installation wizard - the Cluster Settings page, install Cluster Continuous Replication for the Cluster type option. Please enter the CMS name as EX2007 because this is the name of the Exchange server that the Outlook client will connect to, then select an appropriate IP address for CMS. Remember this IP address is engraved with the IP address of the previously used Cluster.
CCR and Public Folder
You can choose the option to create a Public Folder database on the CCR environment in the CMS installer wizard. Although the CCR environment can store Public Folders. Use this method to create a very simple Public Folder database due to the data in the Public Folder displayed as the mailbox data.
However, Public Folder databases have their own mechanism for copying data, sometimes even this method of copying data and the method of copying data in CCR environment does not adapt to each other. But because I installed the CCR environment into my existing Exchange 2003 system, there are two Public Folder databases available, which means that the ability to copy data is also enabled in addition to the CCR replication method. Microsoft states that in such cases, if the CCR environment is suddenly stopped, the Public Folder database will not be inserted into the new active node until it can connect to the original active node.
Deciding to deploy a database in a CCR system that coexists with other servers containing a Public Folder database will minimize the problem that may arise with that configuration. If you copy or store data in Public Folder on Exchange 2007 and delete the Public Folder database from Exchange 2003, the problem with the configuration will no longer exist. If too much risk arises, use a dedicated Public Folder server to use Exchange 2007.
Complete installation of CMS
Once the CMS has been installed, that node will restart according to the instructions of the installation wizard. When the active node has been resumed it will be completely started, the installation of the passive node, in this case NODE2, will be started. This process is much easier than the active node installation process because you only need to select the Passive Clustered Mailbox Role check box under the Active Clustered Mailbox Role check box (Figure 3). You will then have to restart this server before using.
After NODE2 has been restarted, you need to apply the same Update Rollup to both Cluster Nodes because we have not installed Update Rollup when installing the server. This process is quite simple. You just need to move the updated Node Cluster and then apply the desired update to this node - passive node. Once completed, move this resource to the updated Cluster Node and then use the update for the current passive node. Remember to use the Move-ClusteredMailboxServer command to move the CMS between Cluster Nodes. In this example, the migration command has the following syntax:
After NODE2 has been restarted, you need to apply the same Update Rollup to both Cluster Nodes because we have not installed Update Rollup when installing the server. This process is quite simple. You just need to move the updated Node Cluster and then apply the desired update to this node - passive node. Once completed, move this resource to the updated Cluster Node and then use the update for the current passive node. Remember to use the Move-ClusteredMailboxServer command to move the CMS between Cluster Nodes. In this example, the migration command has the following syntax:
Move-ClusteredMailboxServer EX2007 –TargetMachine NODE2 –MoveReason 'Apply Update Rollup 3'Conclude
In this third part, we have worked with the CCR environment with existing Hub Transport and Client Access Servers on Exchange 2007 and Exchange 2003. Before installing the Exchange 2007 mailbox on the Cluster Node, you need to configure the real Cluster. careful. In the next section, we will proceed with installing the Edge Transport Server Role.
Was this article helpful?
Your feedback helps us improve.
Related Articles
 Transfer Exchange 2003 to Exchange 2007 (Part 2)9 minutes read
 Transfer from Linux Mail Server to Exchange Server 2007 (Part 1)10 minutes read
 Transfer mailboxes in Exchange 2007 through Exchange Management Console (Part 2)10 minutes read
 Transfer Exchange 2003 to Exchange 2007 (Part 1)8 minutes read
 Transfer MDaemon to Exchange 2007/2003 (Part 2)10 minutes read
 Installing Exchange 2007 (Part I)9 minutes read
Reader Comments 0
Sign in with email or Google to join the discussion.