Instructions for creating a website using Dreamweaver CC - Part 8: Publishing a website
In the eighth and final part of this series, we will learn how to set up a remote site to publish the site.
Design website with Dreamweaver CC part 8
- Introduce
- Learn about remote sites
- Identify a remote server
- Connect using FTP
- Connect using SFTP
- Connect using FTPS (FTP over SSL / TLS)
- Root Directory setting and Web URL
- Set advanced options
- Download local file
- (Optional) Troubleshoot remote server setup problems
Introduce
Welcome to the eighth part and the final part of the tutorial series for creating websites with Dreamweaver. In this section, you will be taught how to set up a remote site in Dreamweaver. A remote site is usually a web server on a remote computer that contains copies of your local files. Users access the site remotely when they view your pages in the browser.
This tutorial covers a wide example of connecting to a remote server. It contains troubleshooting tips, but largely depends on how to configure your remote server.
Learn about remote sites
After creating a website, the next step is to publish it by uploading files to a remote server. This is where you store your files for testing, production, collaboration and publishing.
Before proceeding, you must have access to the remote web server, such as the hosting company's server, the server owned by the customer you are working with or the intranet server in the company. yours. In addition, some Internet service providers provide access to free web space as part of an Internet connection contract. If you do not have access to one of these servers, contact your service provider, customer, system administrator, or one of the companies that provide web hosting packages. Some hosting packages are free, but often insert ads into your site. Some packages without ads can cost only a few hundred thousand a month. You also need a local site (local site) to be determined before proceeding to publish the site.
Identify a remote server
Manage the Dreamweaver website based on the principle that your local files are the exact copy of the web page directly on the Internet. Therefore, index.html in your bayside directory becomes the front page of the remote site. If you already have a live website and don't want to overwrite, use the site's control panel to create a folder called bayside to download Bayside Beat files.
Step 1 . In Dreamweaver, select Site> Manage Sites .
Step 2 . In the Manage Sites dialog box, select the Bayside Responsive website.
If you don't specify a Bayside Responsive page, create a local directory for the site before you continue.
Step 3 . Click on the Edit icon at the bottom left of the Manage Sites dialog box.

Step 4. In the Site Setup dialog box, click on Servers to open the additional control panel for your server definition.

Dreamweaver CC allows you to set up multiple server definitions for both remote and test servers. However, you can only activate one server at a given time.
Step 5 . Click the plus ( + ) button at the bottom left of the control panel to add the remote server definition. This will open a new control panel for you to enter server details.

Step 6 . In the Server Name text box, enter a name for the server. Dreamweaver uses this name internally to identify the server, so you can choose any name you like. For example, you can create a definition for the server to download the file for client approval and another server for the site directly. If there is only one server, call it Remote Server.
Step 7 . From the Connect using pop-up menu, select the method you want to use to connect to the server.
The most common methods to connect to servers on the Internet are FTP, SFTP and FTP over SSL / TLS (also known as FTPS). Because the abbreviation of each method is very similar, it is easy to confuse. If you're not sure what to choose, ask your hosting company or server administrator. You will be limited to the supported remote server options. After selecting the method, follow the instructions in the relevant sections.
Connect using FTP
FTP stands for File Transfer Protocol - File transfer protocol. This is the most basic way to connect to a remote server. However, it is less secure than other protocols, so you should only use it if your remote server does not support SFTP or FTPS.
Step 1 . Enter the FTP address of the server (eg ftp.yourdomain.com) into the appropriate field.
Step 2 . The default port for FTP is 21. Only change the value in the Port field if required by the administrator of the remote server to do so.
Step 3 . Enter your username and password in the appropriate fields.
Step 4 . Click Test to check the connection.
If the connection fails, check your username and password. Passwords are usually case sensitive, so make sure Caps Lock is not enabled. If the problem is not resolved, please refer to the troubleshooting section at the end of this article.
Step 5 . Dreamweaver automatically selects the Save Password option. If you choose not to save the password, you will have to enter the password every time Dreamweaver connects to the server.
Step 6 . Fill in the Root Directory and Web URL details as described near the end of this article.
Connect using SFTP
SFTP stands for Secure File Transfer Protocol. It works like FTP, but using an encrypted connection to the server, is safer. With SFTP, Dreamweaver provides the option to log in to the remote server using a separate username and password or key file.
Step 1. Select SFTP from the Connect Using drop-down menu.
Step 2 . Enter the FTP address of the server (eg ftp.yourdomain.com) into the appropriate field.
Step 3 . The default port for SFTP is 22. Only change the value in the Port field if instructed by the administrator of the remote server to do so.
Step 4 . The default authentication method is to use a username and password. Enter the values in the appropriate fields.
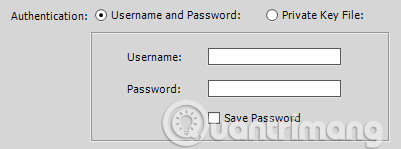
Step 5 . If you select Private Key File , the options will change as shown below.
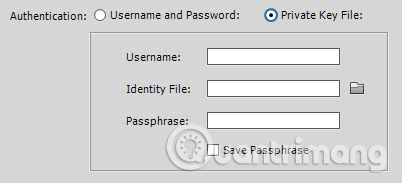
If your server supports connecting with its own key file, enter your username in the Username field, then click the folder icon to the right of the Identity File field to browse the local version of your own key file. friend.
Some servers also require a password. If necessary, enter it in the appropriate field. Dreamweaver automatically selects the Save Passphrase option. If you uncheck this option, you will be asked to enter your password every time Dreamweaver connects to the server.
Step 6 . Click on Test to ensure successful connection with the remote server.
If the connection is not successful, make sure you wrote everything correctly. Passwords are often case sensitive. Make sure Caps Lock is not turned on.
Step 7 . Enter the details for Root Directory and Web URL as described below this article.
Connect using FTPS (FTP over SSL / TLS)
FTPS is a newer, safer standard than SFTP. It connects to the remote server using Secure Sockets Layer (SSL) or Transport Layer Security (TLS). It provides additional security for authentication of server login information. In other words, it ensures you are connecting to a known server by checking the server's security certificate.
Step 1. From the Connect using drop-down menu, select FTP over SSL / TLS . There are two options:
- Implicit encryption : The server disconnects if it does not receive a security request.
- Explicit encryption : If the server does not receive a security request, it can choose to conduct unsafe transactions or terminate / limit connections. It connects on port 21.
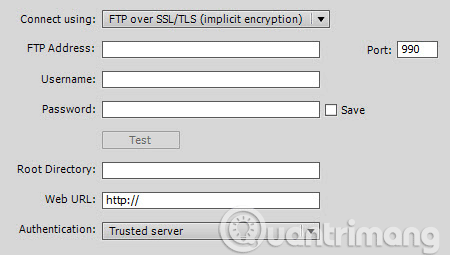
Step 2 . Enter the FTP address of the server (eg ftp.yourdomain.com) into the appropriate field.
Step 3 . Implicit encryption is connected on port 990, while Explicit encryption uses port 21. Only change the value in the Port field if the administrator of the remote server is required to do so.
Step 4. Enter your username and password in the appropriate fields.
Step 5 . Select the server's security certificate check method from the Authentication drop-down menu. There are two options:
- Trusted server: Use this option if the server's certificate is issued by a trusted certificate authority.
- None : Use this option if the server has a self-signed certificate. You are shown a certificate when you first connect. If you accept the login information, the certificate will be added to Dreamweaver's trusted website certificate store.
Step 6 . Click Test to check the connection.
If the connection fails, verify that you entered the correct username and password. Passwords are usually case sensitive, so make sure Caps Lock is not enabled. If that doesn't solve the problem, refer to the troubleshooting section at the end of this article.
Step 7 . Dreamweaver automatically selects Save Password . If you uncheck this option, you will be prompted to enter a password every time Dreamweaver connects to the server.
Step 8 . Fill in the details for Root Directory and Web URL as described in the next section.
Root Directory setting and Web URL
Because hosting companies and server administrators have different policies, it is difficult to give detailed instructions about the value to enter in the Root Directory section. The value of the Root Directory must be the path you need to enter after logging into the server to get the directory you want to install index.html.
If you want the Bayside Beat home page to be the front page of the site, then this is the link to the root directory of the remote server. On some servers, that's public_html. On other machines, you can use www, wwwroot, or even nothing. If in doubt, ask your hosting company or server administrator.
If you want the Bayside Beat home page to be located in a subfolder called bayside, you need to enter the path to that folder.
The Web URL field must contain the URL for the directory you specified as the Root Directory. For example: http://www.example.com/ or http://www.example.com/bayside/. Dreamweaver will try to guess the correct value, but that is only a guess so you should not accept the default value, need to check carefully.
If you are connecting using SFTP, your settings will look like the image below.
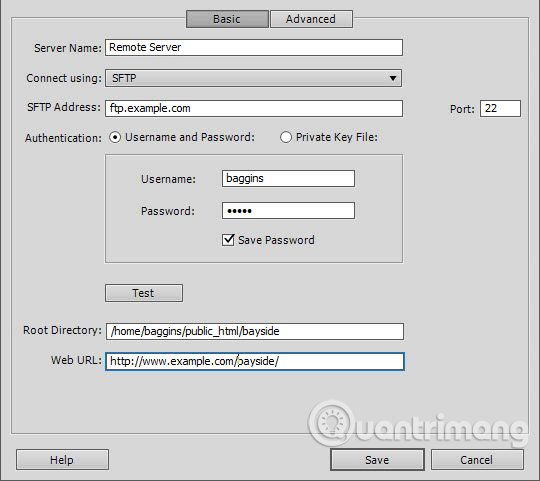
Set advanced options
In most cases, there is no need to change advanced options for the server, but take a quick look at them before saving the server definition.
Step 1 . Click the Advanced button at the top of the table to display the advanced options.
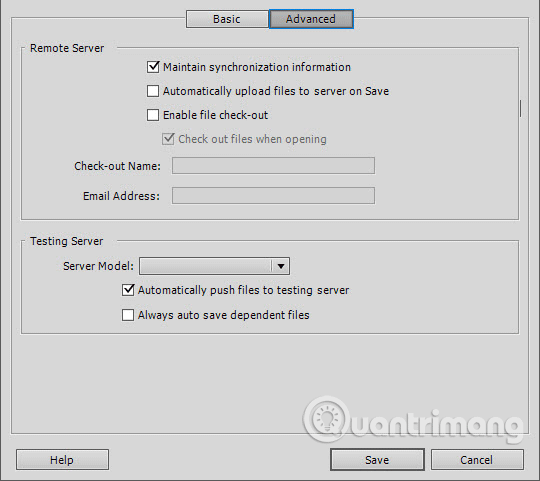
Step 2 . Choose one of the options in Remote Server:
- Maintain option of synchronization information is selected by default to monitor when the files on the remote server are last updated and allow you to use the Site Synchronization feature.
- Automatically upload files option to the server on Save is rarely used. If it is, it overwrites your direct file. If you make a mistake, it will show up immediately on your remote site for everyone to see.
- The option Enable file check-out is used for group environments. It only allows one person at a given time to edit the page.
Step 3 . The options in the Testing Server section only apply when determining the test server for the site using server-side technology such as PHP, ASP.NET or ColdFusion.
Step 4. Click Save to register your server definition. This brings you back to the Servers table of the Site Setup dialog box, listing the server definition.
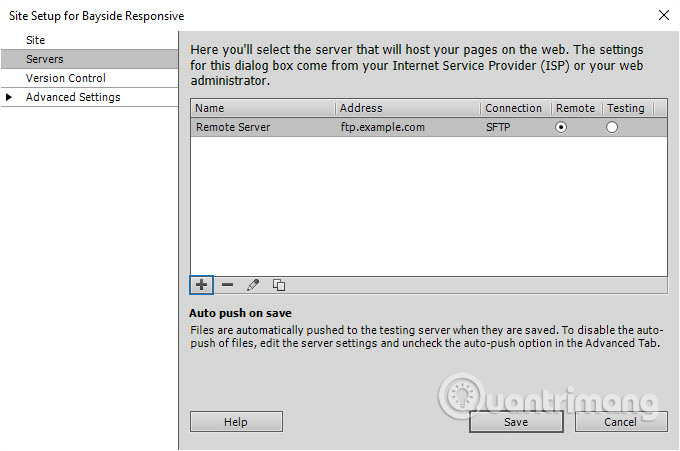
Dreamweaver automatically selects Remote . The icons at the bottom of the Server table allow you to add another server or delete, edit or create a copy of the selected server definition. You should create a copy if you just need to change some details to connect to another server.
You can define multiple remote servers for a site, but can only connect to one server by selecting the button in the Remote column.
Step 7 . Click Save to close the Site Setup dialog box, then click Done to close the Manage Sites dialog box.
Download local file
Now you can download your files from the local directory to the remote web server so that everyone can access your site.
Step 1. The quick way to download all files in the current page is to select the local root of the page at the top of the Files panel. However, the Bayside Responsive website contains text content in Microsoft Word and rich text format, as well as web display folders at each stage of development. Hold down Ctrl (Windows) or Cmd (Mac) key and select the following folders and files:
- images
- js
- styles
- index.html
- sights.html
Step 2. Click the Put Files icon (up arrow) in the Files panel toolbar.

Step 3 . When Dreamweaver connects to the server, it will display a dialog box asking if you want to add dependent files during the transfer process.
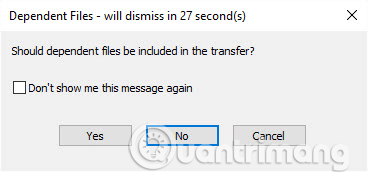
The default is No. If not changed, the dialog box will close and only upload the files selected in the Files panel.
Some people find the option to add dependency files conveniently because that means all the files associated with the selected files will be uploaded automatically. Think carefully before choosing Yes . You may be making changes to the style sheet, but are not ready to upload it yet. Clicking Yes will overwrite the style sheet on your live website if it is linked to any file you are uploading.
If you choose Don't show me this message again , only the files selected in the Files panel will be uploaded. You can change this by changing the options in the Dreamweaver Preferences Site list.
Step 4. Open your remote site in the browser to make sure all files are uploaded correctly. So you have an online website.
If the Bayside Responsive website is not published successfully, it means that the Root Directory value in your remote server definition does not point to the correct directory on the server.
(Optional) Troubleshoot remote server setup problems
If you need to edit the remote server settings, go to Site> Manage Sites , select the page from the list, then click the pencil icon to open the Site Setup dialog box. Then select Servers from the list on the left, select the server you want to edit and click on the Edit existing server icon icon .

A web server can be configured in many ways. The following list provides information on some common problems you may encounter when setting up remote servers and how to resolve them:
-
Dreamweaver FTP deployment may not work properly with some proxy servers, multi-level firewalls and other indirect server access forms.
-
To deploy Dreamweaver FTP, you must connect to the root of the remote system. (In many applications, you can connect to any remote directory, then navigate through the remote file system to find the folder you want.) Make sure you only root the system Remote (or bayside subdirectory) is the Root Directory. If you have trouble connecting and have specified the server directory using a slash (/), you may need to specify a relative path from the directory you are connecting to and the root directory far. For example, if the remote root directory is a higher-level directory, you may need to use ././ to specify the server directory.
-
File and folder names contain spaces and special characters that often cause problems when transferred to a remote site. Use underscores instead of spaces and avoid special characters. Colons (:), slashes (/), periods (.) And single quotes (') are not allowed to be used in file or directory names.
-
Many servers use symbolic links (Unix), shortcuts (Windows) or aliases (Mac) to connect a folder on a part of the server disk to another folder elsewhere. For example: the public_html subdirectory of the main directory on the server may be a link to another part of the server. In most cases, such aliases do not affect your ability to connect to your directory. However, if you can connect to a part of the server but not connect to another part, there may be differences due to aliases.
-
If you get an error message, such as " cannot put file ", your remote directory may run out of space. For more information, see the FTP log. In general, when there is a problem with FTP, check the FTP log by selecting Site> Advanced> FTP Log .
See more:
- Instructions for creating websites with Dreamweaver CC part 1
- Instructions for creating websites with Dreamweaver CC part 2
- Instructions for creating websites with Dreamweaver CC part 3
- Instructions for creating websites with Dreamweaver CC part 4
- Instructions for creating websites with Dreamweaver CC part 5
- Instructions for creating websites with Dreamweaver CC part 6
- Instructions for creating websites with Dreamweaver CC part 7
You should read it
- ★ Invite to download WebSite X5 Start 15, website creation tool for $ 19.95, free of charge
- ★ How to use Weebly to create a website on your phone
- ★ 4 tools to help build a website for beginners
- ★ How to design profile photos on Profile Pic Maker for free
- ★ Design website with Adobe Dreamweaver CS5 software - Part 2