Guide to connecting MCP Github Local Dev with Claude AI: Step-by-step instructions for beginners.
MCP Github helps Claude manage repositories, create issues, and push code directly. Detailed step-by-step configuration instructions are provided..
In an era where AI is gradually changing the way we work, integrating and connecting AI platforms with supporting tools is essential. Here, we have Claude AI with Github via MCP (Model Context Protocol), ushering in a new era for developers. Instead of constantly switching between the editor, terminal, and Github browser, you can now ask Claude to create issues, push code, search repositories, and manage the entire Github workflow—all using natural language directly within the chat interface.
This article will guide you step-by-step on how to set up a GitHub MCP connection with Claude Desktop, from creating a Personal Access Token to configuring the config file and verifying a successful connection. Whether you are a new or experienced developer, this guide is written to be as easy to understand and follow as possible.
Preparation is required before starting.
To successfully establish an MCP Github connection, you will need to prepare the following:
- Claude Desktop App:MCP currently only works on the Claude Desktop version (Windows or macOS), and is not yet supported on Web or Mobile. Download it at: https://claude.ai/download
- Github account: You need an active Github account. If you don't have one, sign up for free at github.com
- Node.js and the NPM:MCP Github server run on Node.js. Install Node.js version 16 or later from Node.js — Run JavaScript Everywhere. Select Get Node.js, then wait for the installer files to download and install. Installing Node.js is very simple.
- File system access permissions: You need to know how to open and edit JSON files on your computer (using Notepad, VS Code, or any text editor).
Step 1: Create a Github Personal Access Token to link with Claude.
In programming, Local Dev means running source code, software, or tools directly on your personal computer (PC/Laptop), rather than on a cloud server or remote website.
A GitHub Personal Access Token (PAT) is an authentication code that allows a third-party application (in this case, Claude via MCP) to access your GitHub account without a password. This is the most important step in the setup process.
Detailed steps to create a Personal Access Token
GitHub
Step 1.1: Log in to Github using the link above and access Settings. Click on your avatar in the upper right corner, then select "Settings" from the dropdown menu.
Step 1.2: In the left sidebar, scroll to the bottom and select "Developer settings".
Step 1.3: In the Developer settings menu, select "Personal access tokens" > "Tokens (classic)".
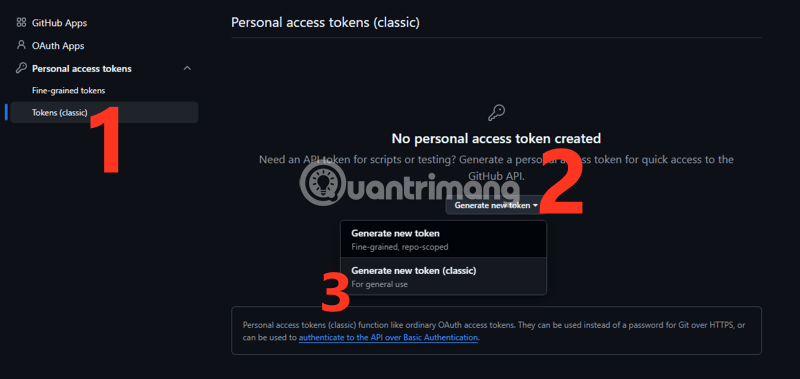
Step 1.4: Click the "Generate new token" button > "Generate new token (classic)".
Step 1.5: Confirm your GitHub password or the verification code in the email account you previously linked to GitHub, if prompted.
Step 1.6: Fill in the token information:
- Note: Use a descriptive name like "Claude MCP Github" or "MCP Server Access" for easy identification later.
- Expiration: Choose the term (recommended "90 days" or "No expiration" if you want to use it long-term)
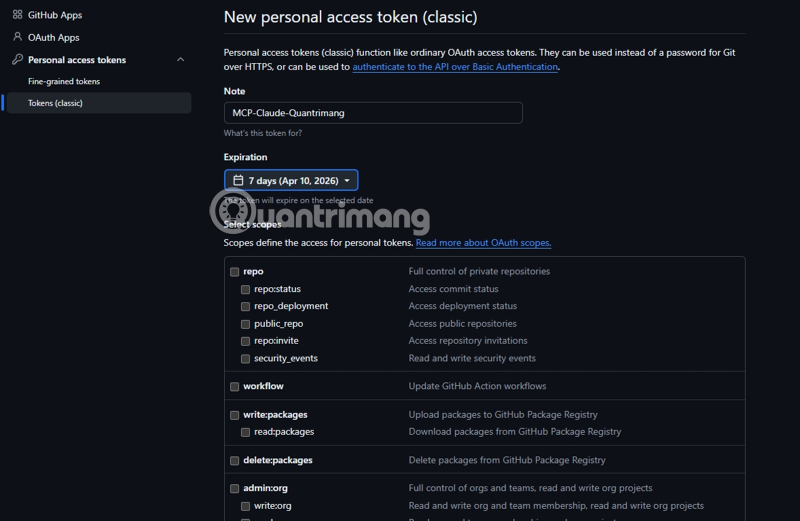
Step 1.7: Select the necessary scopes. This is an important part - you need to check the following scopes:
- repo (Full control of private repositories) - Required
- workflow (Update GitHub Action workflows) - Check this box if you work with GitHub Actions
- admin:org (if you want to manage the organization)
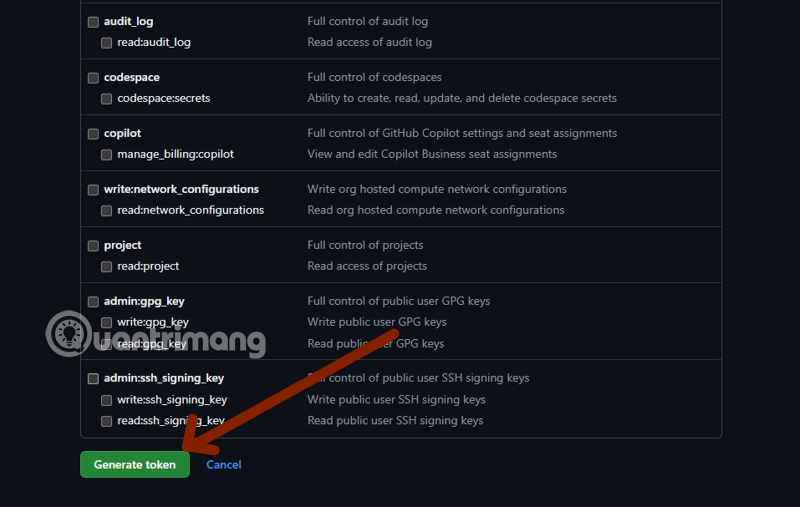
Step 1.8: Scroll to the bottom of the page and click the blue "Generate token" button.
Step 1.9: IMPORTANT - Copy the token immediately! The token will be in the format "ghp_xxxxxxxxxxxxxxxxxxxx". Click the copy icon or select all the text and copy (Ctrl+C / Cmd+C). Save this token in a safe place (e.g., password manager) because Github will ONLY DISPLAY IT ONCE. If you lose the token, you will have to create a new one.
Step 2: Configure the Claude Desktop Config file.
After obtaining the Personal Access Token, the next step is to configure the Claude Desktop config file to connect to the MCP Github server.
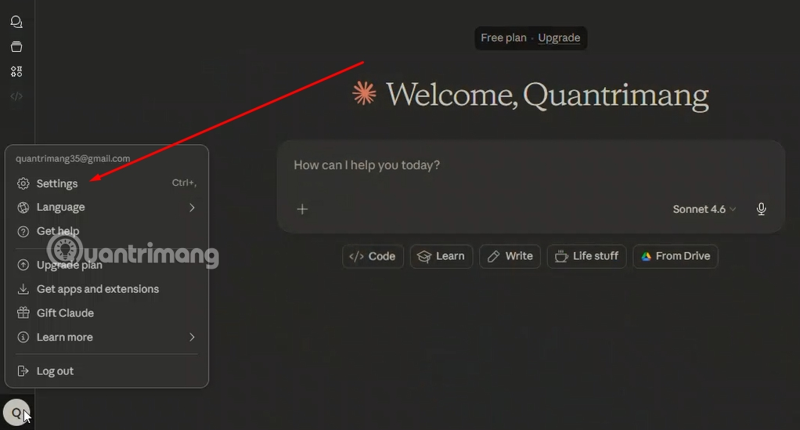
Step 2.1: Open the Claude Desktop App, tap your avatar/email in the upper left corner, and select "Settings".
Step 2.2: In the left sidebar, select "Developer"
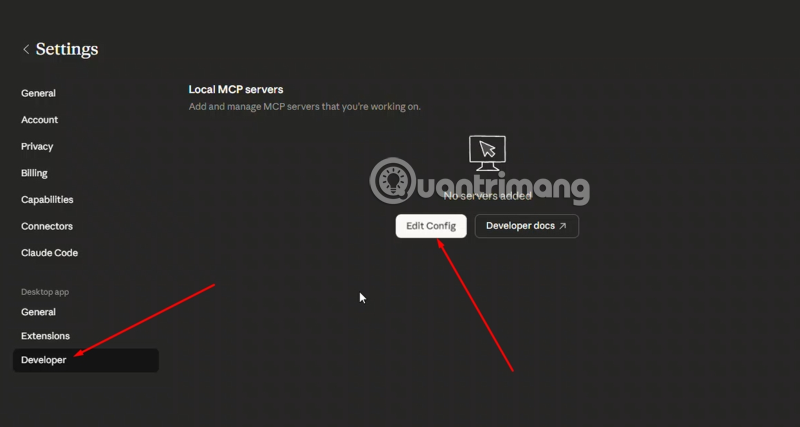
Step 2.3: Click the "Edit Config" button - The file will automatically open in Notepad or your default text editor. You can open it with Notepad to edit it.
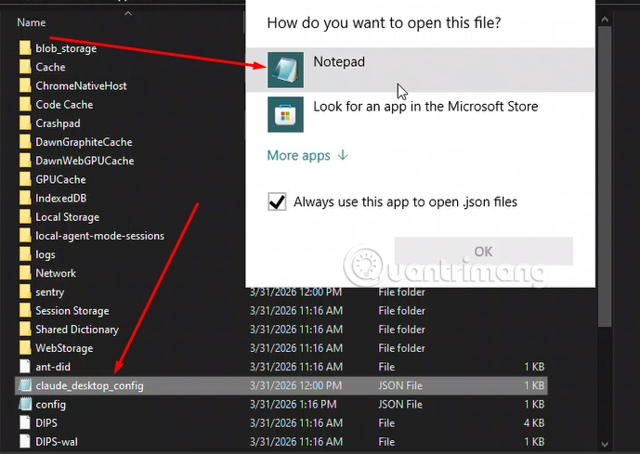
Find and open the configuration file.
The configuration file is named `classe_desktop_config.json` and its location varies depending on the operating system:
On Windows:
%APPDATA%Claudeclaude_desktop_config.json
The full path is usually:
C:Users[TenNguoiDung]AppDataRoamingClaudeclaude_desktop_config.json
On macOS:
~/Library/Application Support/Claude/claude_desktop_config.json
The quickest way to find a file on Windows:
Standard config file structure
When you open the file for the first time, it might be empty or just contain curly braces {}. You need to add the MCP server configuration according to the following JSON structure:
{ "mcpServers": { "github": { "command": "npx", "args": [ "-y", "@modelcontextprotocol/server-github" ], "env": { "GITHUB_PERSONAL_ACCESS_TOKEN": "ghp_xxxxxxxxxxxx" } } } }
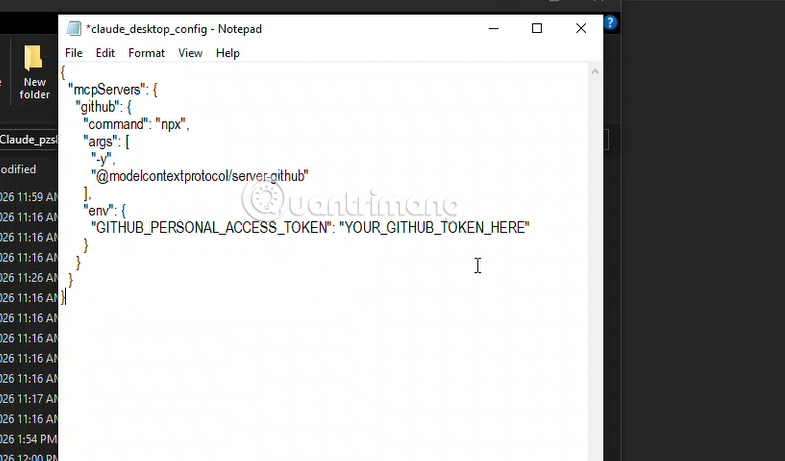
Explanation of each important part:
- mcpServers: This object contains all the MCP servers you want to connect to. You can add multiple different servers here.
- "github": This is the identifier for this server. You can use a different name, but it's recommended to keep "github" for easy identification.
- "command": "npx": This command runs the server. NPX is a Node.js tool that allows you to run packages without needing to install them globally.
- " args": Parameters for the npx command:
- "-y": Automatically confirm package installation
- "@modelcontextprotocol/server-github": The official package name of the MCP Github server
- "env": Environment variables for the server:
- "GITHUB_PERSONAL_ACCESS_TOKEN": Replace "ghp_YOUR_TOKEN_HERE" with the token you created on Github in Step 1.
Important notes when editing JSON files:
- Make sure to use double quotes (") and not single quotes (').
- Every line (except the last line in an object) must end with a comma.
- Check that the number of opening and closing curly braces { and } are equal.
- You can use JSONLint.com to check if your JSON syntax is valid.
Save the file and restart Claude.
- After you have finished editing, press Ctrl+S ( Windows ) or Cmd+S (macOS) to save the file.
- Completely exit the Claude Desktop App (not just close the window, but quit/exit the application). It's best to close it in Task Manager .
- Reopening Claude Desktop will allow the application to read the new configuration file and automatically launch the MCP Github server.
Step 3: Activate and test the connection
Enable GitHub MCP in chat.
After restarting Claude Desktop, the MCP Github server is ready but not yet activated in chat. To use it, you need to enable it for each conversation:
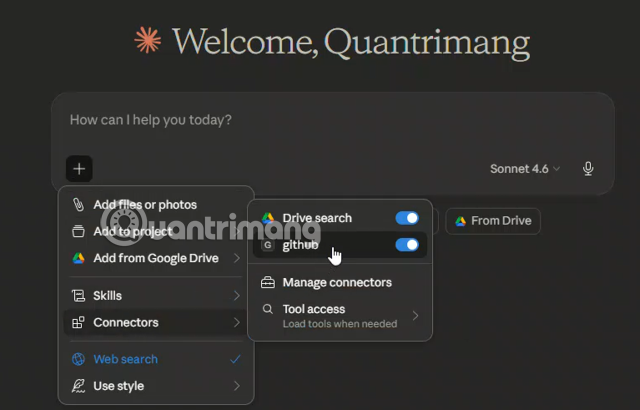
Method 1 - Using the "+" button:
- In the chat interface, tap the "+" button in the bottom left corner.
- In the displayed menu, find the "Connectors" item.
- Turn on the switch next to "github" to activate it.
- You will see a black "G" icon or the name "github" appear in the toolbar, indicating that the connector has been enabled.
Method 2 - Using the "/" shortcut:
- Type "/" in the chat box.
- Select "Connectors" from the menu.
- Turn on "github"
Check the connection and tool permissions.
When you activate the GitHub MCP for the first time, Claude will display a list of tools that this connector provides, along with permission options:
Authorization status:
- Needs approval: By default, all tools will be in this mode. Every time Claude wants to use a tool, you must manually confirm it.
- Allow once (hand icon): Allows the tool to be used only once for the current action.
- Always allow (thumbs up icon): Always allow Claude to use this tool without asking.
- Block (ban icon): Completely prohibits the use of this tool.
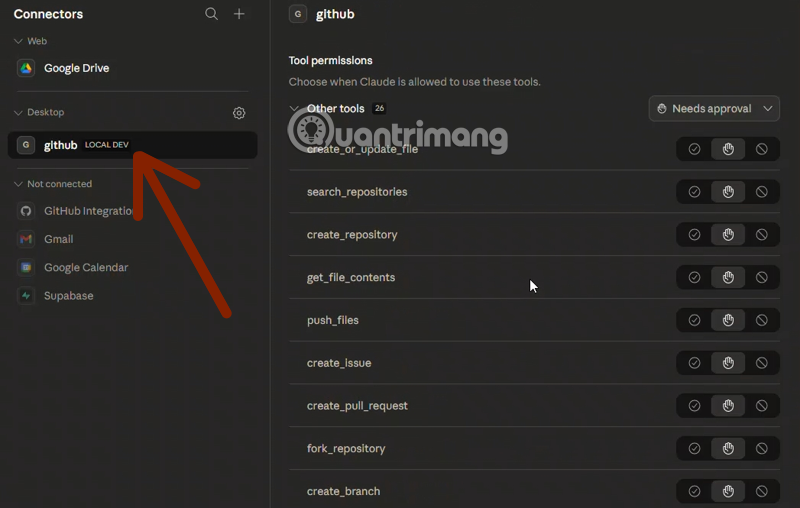
Recommendations for secure access control:
Read-only tools (safe): You can set it to "Always allow" for convenience.
- search_repositories
- get_file_contents
Change recording/modification tools (caution required): It's advisable to keep "Needs approval" or "Allow once" enabled.
- create_or_update_file
- push_files
- create_issue
- create_pull_request
- create_repository
Test functionality using simple commands.
To ensure everything works, try these commands:
Test 1 - Finding the repository:
"Find my public repositories on Github"
Test 2 - Read the file content:
"Read the contents of the README.md file in my repository [repo-name]"
Test 3 - Create an issue (if permission has been granted):
"Create a test issue in repository [repo-name] with the title 'Test MCP Connection' and the content 'This is a test issue to check the MCP Github connection'"
If Claude can perform these tasks and return the results from your Github, congratulations - you've set it up successfully!
Practical example of using MCP Github
Once successfully set up, here are some practical workflows you can follow:
Workflow 1: Find bugs and create issues automatically.
You: "Read the src/auth/login.js file in the my-web-app repository and look for potential security issues."
Claude: [Use get_file_contents to read the file] → Analyze the code → Detect hardcoded password
You: "Create an issue on this topic with high priority"
Claude: [Use create_issue] → Create an issue with title, detailed description, and labels "security" and "high-priority"
Workflow 2: Refactor code and push to the new branch
You: "Read the utils/helper.js file, refactor it to use async/await instead of callbacks, then push it to the feature/async-refactor branch."
Claude: [Read file] → Refactor code → [Create new branch] → [Push refactored file] → Confirm success
Workflow 3: Searching and comparing code between repositories
You: "Compare the authentication implementation between my project-a and project-b repo."
Claude: [Search repositories] → [Read authentication files from both repositories] → Compare and point out the differences, advantages and disadvantages of each approach.
Managing and optimizing MCP on GitHub
View server status in Settings
You can check the status of the MCP Github server at any time:
- Open Settings in Claude Desktop
- Select "Developer" in the sidebar.
- The "Local MCP servers" section will display:
- Server name: "github"
- Status: "running" (green) if operating normally.
- Command: npx
- Arguments: -y @modelcontextprotocol/server-github
- Click "View Logs" to see detailed logs if there are any errors.
Tool access modes - Performance optimization
If you have many connectors (more than 5-10), loading all of them at once can slow down Claude. Adjust the loading mode:
- In the "+" or "/" menu, select "Connectors"
- Click "Tool access" at the bottom of the menu.
- Choose the appropriate mode:
- Auto (Recommended): The system will automatically decide.
- Load tools only when needed: Only load when you actually need them, saving resources.
Token security and best practices
Do not commit the config file to Git: The `class_desktop_config.json` file contains sensitive tokens. If you work with dot files or configuration backups, add this file to your `.gitignore`.
Use tokens with limited scope: Only grant "repo" permissions if you only work with the repository. Do not grant admin:org permissions unless absolutely necessary.
Set an expiration date for the token: Instead of "No expiration," set a 90-day period and renew it periodically to enhance security.
Revoke old tokens: When creating new tokens or no longer using MCP Github, go to Github Settings > Developer settings > Personal access tokens and revoke unused tokens.
Secure configuration backup: If you need to back up the configuration file, encrypt it or save it to a password manager instead of saving it as plain text.
What is MCP Github and why should you use it?
MCP (Model Context Protocol) is a standard protocol developed by Anthropic to enable AI models like Claude to connect and interact with external tools and services securely and in a structured manner. Simply put, MCP acts as a bridge between Claude and other applications.
The MCP Github connector is a dedicated MCP server that allows Claude to access and manipulate your Github repositories. When activated, this connector provides Claude with the tools to perform a range of complex tasks on Github without requiring manual intervention from you.
Main functions of MCP Github
Once successfully connected, Claude can run over 26 different tools on your Github, including:
- Repository management:
- Search for repositories (search_repositories)
- Create a new repository (create_repository)
- Fork repository (fork_repository)
- Code and file management:
- Read file contents (get_file_contents)
- Create or update a file (create_or_update_file)
- Push multiple files at once (push_files)
- Manage issues and pull requests:
- Create a new issue (create_issue)
- Create pull request (create_pull_request)
- Create a new branch (create_branch)
Practical benefit: Instead of having to open the terminal, type git commands, and switch to a browser to create an issue or PR, you just tell Claude: "Create an issue about the login bug in the my-app repo" or "Push this index.js file to the feature/login branch." Claude will automatically perform all the necessary steps.
Conclusion: Boost your productivity with MCP Github
Connecting MCP Github with Claude AI is more than just adding another tool – it's a fundamental shift in how developers interact with code and manage projects. Instead of constantly switching between terminals, IDEs, browsers, and Github, you now have an intelligent AI assistant that can understand requests in natural language and automatically perform complex tasks.
From searching repositories, reading and analyzing code, creating issues, pushing changes, to managing pull requests—all can be done simply by chatting with Claude. This not only saves time but also minimizes errors due to context switching and allows you to focus on more creative work.
Most importantly: Remember that the GitHub MCP is just one of many connectors that can integrate with Claude. Once you've mastered setting up and using this connector, you can expand your ecosystem with other MCP servers – from database management and API interaction to DevOps workflow automation.
Start today and experience the power of an AI-powered development workflow.
Troubleshooting
Error 1: Server does not appear in Connectors
Symptom: After configuring the config file and restarting Claude, you don't see "github" in the Connectors list.
Causes and solutions:
- JSON syntax error: Check the configuration file using a tool like JSONLint.com. Common errors:
- Missing or extra commas
- Use single quotes ' instead of double quotes "
- Do not enclose in curly braces {} or square brackets []
- Incorrect file path: Make sure you are editing the correct `class_desktop_config.json` file in the correct location (use the "Edit Config" button in Settings to confirm).
- Not a complete restart: Make sure you have completely quit Claude Desktop, not just closed the window.
Error 2: Server appears but status is not "running"
Symptom: "github" appears in Settings > Developer > Local MCP servers but has no "running" status or displays an error.
Causes and solutions:
- Node.js or NPX not installed:
- Open Terminal (macOS/Linux) or Command Prompt (Windows)
- Type: node --version
- Type: npx --version
- If you get the error "command not found", install Node.js from nodejs.org.
- Package failed to load: Try running it manually in the terminal:
npx -y @modelcontextprotocol/server-github
If you encounter network errors, check your internet connection or proxy/firewall.
- View detailed logs: Tap "View Logs" in Settings > Developer to see specific error messages.
Error 3: Connector works, but Claude reports an error when performing the task.
Symptom: Claude displays an "Authentication failed" or "Permission denied" error when you request to create an issue, push a file, etc.
Causes and solutions:
- Invalid token:
- Verify that the token starts with "ghp_" and has no extra spaces.
- Go to Github Settings > Developer settings > Personal access tokens and check if the token is still active.
If the token expires, create a new token and update the config file.
- Lack of scopes:
- Ensure the token has "repo" (full control) permissions.
- If working with an organization, you need to add the "admin:org" permission.
- Recreate the token with all necessary permissions.
- The repository does not exist or is inaccessible:
- Check if the repository name is correct (case-sensitive).
- Make sure you have write/admin permissions for that repository.
Error 4: Claude doesn't understand the command related to Github.
Symptom: Claude gives vague answers instead of using MCP Github tools.
Causes and solutions:
- The connector for this chat is not enabled: Check if the "G" or "github" icon is displayed in the toolbar. If not, enable the connector via the "+" menu > Connectors.
- The statement is unclear: Be more specific. Instead of "find code," say "find the index.js file in the my-app repository." The more detailed you are, the easier it will be for Claude to understand and use the correct tool.