How to use Photoshop CS5 - Part 21: Create water ripple effect in photos
In the next part of the tutorial series on Photoshop, we will learn and practice the basic steps to create a photo with the water surface moving and wavy. In fact, Photoshop already has a number of filters available to create the same effect ...
In fact, Photoshop already has a number of filters available to create the above effect, but users will not be able to guess from the filter's name (not Ripple or Ocean Ripple ) if not refer to the article below.
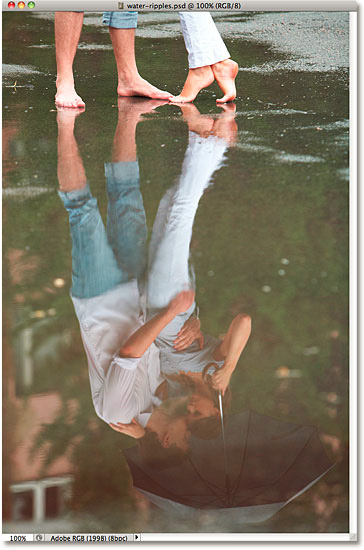
Sample images are used in this test
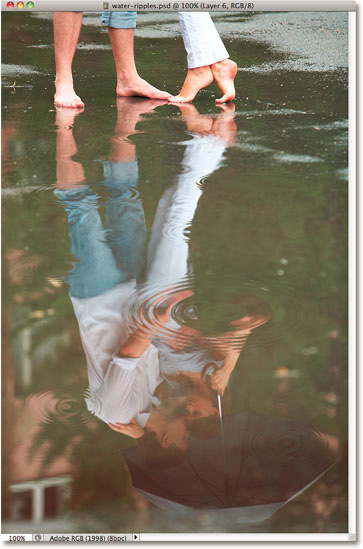
And this is the result after we finish:
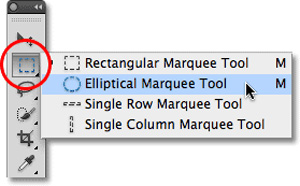
First, we will draw any area on the image, where water ripples will appear. Select the Elliptical Marquee Tool in the menu bar or press the M key twice:
Then move this selection into the appropriate position of the image, depending on the object and the components that appear, we will have different choices. Example here:

Keep this selection intact, press Ctrl + J (Windows) or Command + J (Mac) 2 times to create 2 different copies:

To continue, we need to hide the top layer (here is Layer 1 copy ) by clicking the eye icon on the left:

And work with the class right below:

Continue, hold down Ctrl (Windows) or Command (Mac) and select the layer to be manipulated (here is Layer 1 ):

This process will create another selection area around the main part of Layer 1, which means that the outer selection you just drawn in the previous step will return. The reason why we have to do this before applying the filter effect is because if we do the opposite, Photoshop will apply the entire effect to all the original layers and images:

And this is the main part of this process, which is to apply the effect reasonably. To achieve the desired effect, we need to use a filter called ZigZag (not Ripple or Ocean Ripple ). You select Filter> Distort> ZigZag in the displayed list:

This filter works by turning details in a selection into water ripples. At the bottom of the control panel is the Style section - the corresponding ways to customize the effect of Photoshop. There are 3 main options: Around Center, Out From Center and Pond Ripples (default), which corresponds to 3 different effects, and depends on the area of the selection that the user will give the option. apply their own best:

The Amount control part that changes the 'intensity' of the water ripple will appear, while the Ridges parameter directly affects the amount of water ripple. Pay attention and rely on your own sense of intuition to decide which option is most appropriate (the effect will not be applied until you press the OK button). In this test, we applied ZigZag twice with the Ridges 12 parameter , Amount 70 and Style as Pond Ripples:

Click OK , and we will get the following result:

Then we will show the top layer again (here is Layer 1 copy ) to proceed to the next step:

Here, we will apply the ZigZag filter again. Press the shortcut Ctrl + Alt + F (Windows) or Command + Option + F (Mac) to use the most recently used filter set. Specifically this time the effect area will be the center of the 'puddle' just created in the previous step, so switch the Style to Out From Center, Ridges to 4 and Amount to 100 :

Click OK to apply the change and close the ZigZag window. We will get the same result as the image below:

Then, select the Select> Transform Selection menu :

This Transform Selection feature is similar to Photoshop 's Free Transform except the process affects the outer selection. Hold Shift + Alt (Windows) or Shift + Option (Mac) and select the upper left corner of the selection area (in the form of a rectangle), then drag it to the center of the image until the area remains around 50-60% of the original size. Press Enter (Windows) or Return (Mac) to apply the change:

Continue, select Select> Inverse menu or use Shift + Ctrl + I (Windows) or Shift + Command + I (Mac) :

This process will reverse the selection, when we reach this step, we press Backspace (Windows) or Delete (Mac) to erase all the components around the center of that pool. Press Ctrl + D (Windows) or Command + D (Mac) to remove the selection:

Next, select menu Layer> Merge Down or press shortcut Ctrl + E (Windows) or Command + E (Mac):

And then, we will have a new layer just created:

However, applying the effect of the upper ZigZag filter creates wavy details with many sawtooth images, so the image will not look natural. Make these "soft" parts with Gaussian Blur ( Filter> Blur> Gaussian Blur ):

Photoshop's Gaussian Blur panel displays, adjusting the Radius value to 0.4:

Click OK, and the image will look like the following:

Depending on each photo and specific details, you can be flexible in creating more water ripples and applying ZigZag effect so that it is really effective. And below is our result after performing the above process:

Besides, you can refer to video tutorials in other forms here:
Good luck!
Was this article helpful?
Your feedback helps us improve.
Related Articles
 How to use Photoshop CS5 - Part 13: Create a reflection effect from the water7 minutes read
 How to use Photoshop CS5 - Part 29: Create a zoom effect in a photo5 minutes read
 How to Create an Orton Effect in Photoshop3 minutes read
 How to use Photoshop CS6 (Part 4): Create a fading effect9 minutes read
 How to create poster effect for photos in Photoshop11 minutes read
 How to use Photoshop CS6 (Part 2): Create fashion collage images23 minutes read
Reader Comments 0
Sign in with email or Google to join the discussion.