How to use Photoshop CS5 - Part 29: Create a zoom effect in a photo
Use Photoshop's Radial Blur filter, along with some tips for the Layer Mask and Gradient Tool to create an image enlargement effect
TipsMake.com - In the next article in the tutorial series on Photoshop, we will guide you some basic operations to create a zoom effect with any photo. Specifically, we'll use Photoshop's Radial Blur filter, and some tricks with the Layer Mask and Gradient Tool.
- Photoshop shortcuts
- How to use Photoshop CS5 - Part 1: Toolbox
- Download Photoshop
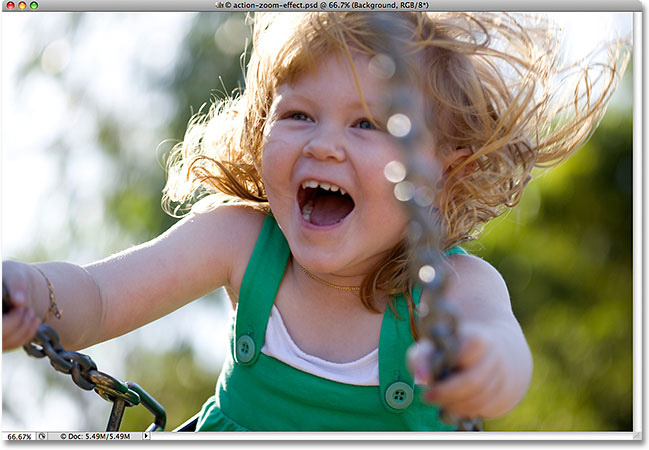
Sample images used in our test:
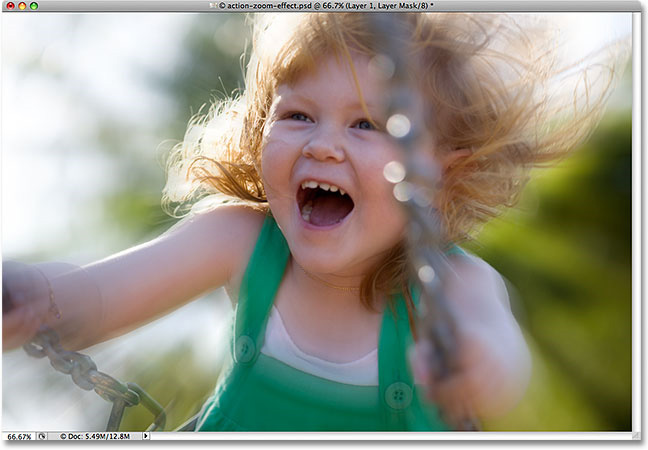
and results obtained after application:
First, you have to duplicate the original Layer layer of the image, so that the following operations are applied on a separate layer. Select the Layer menu and New> Layer via Copy , or use the shortcut Ctrl + J (Windows) / Command + J (Mac) on the keyboard:

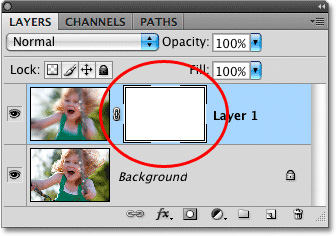
When looking at the main control panel, we will see two layers: one below (Original Layer) and Layer 1 (create new) above:

Select Layer 1 and open Filter> Blur> Radial Blur menu :

The Radial Blur control window of Photoshop displays with 2 main options in the Blur Method section of Spin and Zoom. Here, we will use Zoom with the Amount value of 50 and Quality - Best:
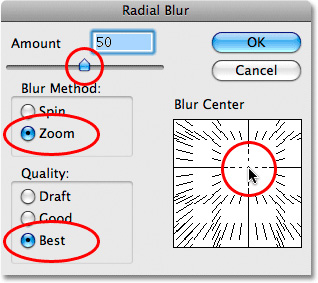
Click OK to apply the effect and close this window, we will have the temporary work as follows:

Depending on the computer configuration and other settings, this application process will be quick or slow
If you are not satisfied with this result, use the Undo Radial Blur function in the Edit section or press the shortcut Ctrl + Z (Windows) / Command + Z (Mac):

Then, apply the effect again with the key combination Ctrl + Alt + F (Windows) or Command + Option + F (Mac) , select another Amount value, change the position in the Blur Center box . done These steps until you feel satisfied.
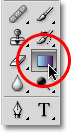
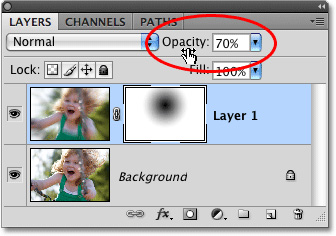
However, the main problem when we use this effect is that Blur has covered the entire image, not really in line with the idea of the experiment. Specifically, here, we need to clarify the face of the baby, not all scenes. Still select Layer 1, click on the Layer Mask icon under the system tray:

When looking at the main picture, people will not see what happens. But in the main control window of the Layer, you will see a white rectangle next to it, that has successfully created the Layer Mask layer:
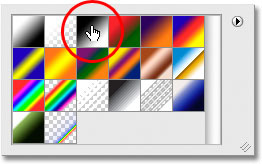
Next, select the Gradient Tool from the Tools panel or press the G button on the keyboard:
After that, right-click in Windows or Control + click (Mac) anywhere on the image to display the Gradient Picker table, here you select the Black to White section (ranked 3rd from left to right, row on top of):
To make the face clearly visible, we will have to drag the mouse from the middle to the outside. Specifically, here the nose is selected as the central part, slowly drag the mouse from here to the left (as shown below):
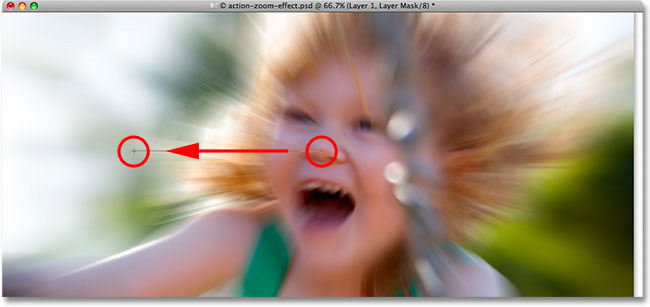
Since this operation is performed on the Layer Mask, there will be no changes on Layer 1. Instead, this result will be displayed directly on the newly created Layer Mask:

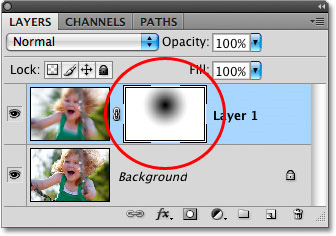
Although we cannot see the Gradient part in the main window, it is very clear through the Layer Mask. The inner black area is hidden, and these gradient elements become brighter about the corners, and the whole white part is what we're seeing:
In case this Blur effect is too 'strong', reduce Layer 1's Opacity to the appropriate level. Specifically here, we change to 70%:
And this is our perfect result:

Good luck!
Was this article helpful?
Your feedback helps us improve.
Related Articles
 How to use Photoshop CS5 - Part 21: Create water ripple effect in photos6 minutes read
 How to create Picture in Picture effect in Photoshop12 minutes read
 How to create poster effect for photos in Photoshop11 minutes read
 How to use Photoshop CS6 (Part 4): Create a fading effect9 minutes read
 How to use Photoshop CS6 (Part 3) - Create Manipulation artwork with exposure effect14 minutes read
 Tutorial to create a photo-crumbling image in Photoshop2 minutes read
Reader Comments 0
Sign in with email or Google to join the discussion.