How to Use PowerPoint as Image Editing Software
Many image editing and graphics programs are complicated and costly. If you already have PowerPoint installed on your computer, it can be useful for images, too. This tutorial will show you how to use PowerPoint as an image editing...
Table of Contents
Part 1 of 8:
Adding a Picture
-
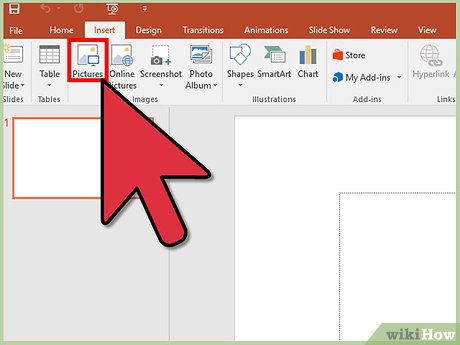 Insert a picture. You can use copy-paste or the Insert menu option. Just click Insert, and then Photo, and Picture from File. Find your file, and click insert.
 -
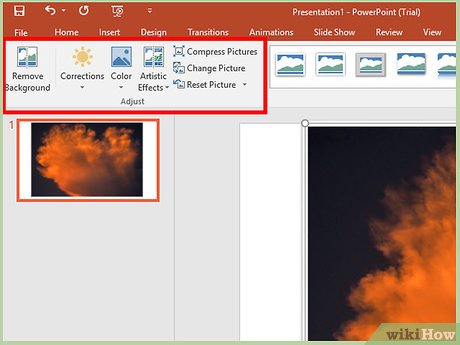 Use the image settings to change image features like brightness and contrast. The settings won't be as precise as on dedicated image editing software, but they still give you a range of options for customizing your image.
- To change these settings, right-click on the image and select Format Picture. From that menu, you can adjust brightness, sharpness, color, and more. Just click OK when you're done.
Part 2 of 8:
Adding Text
-
 Use WordArt. Click Insert and WordArt to open up the menu. Type whatever you want.
- Use the settings in the WordArt banner to change the text effect as you'd like.
- You can change styles or font by selection of text.
- You can use Text Effects for a fancier text.
Part 3 of 8:
Adding a Background from Your Clipboard
-
 Copy an image.
 -
 Right-click on a empty space on the slide. Then select Format Background.
 -
 Select and paste. Click Picture or Texture Fill on the Fill tab then select Clipboard.
Part 4 of 8:
Adding a Background from a File
-
 Right-click on a empty space on the slide. Then select Format Background.
- Select and paste. Click Picture or Texture Fill on the Fill tab then select File.
-
 Pick a image.
Part 5 of 8:
Adding a Background from Clip Art
-
 Right-click on a empty space on the slide. Then select Format Background.
 -
 Select and paste. Click Picture or Texture Fill on the Fill tab then select Clip Art.
 -
 Select. Select a clipart and click OK.
Part 6 of 8:
Adding a Background by Theme
-
 Go to the Design tab.
 -
 Pick a theme.
- The theme may change your text and shape color if the color is from the theme colors.
Part 7 of 8:
Setting the Image Orientation
-
 Go to the Design tab.
 -
 Pick a slide orientation.
Part 8 of 8:
Saving the Image
-
 Open the Office menu.
 -
 Save. Pick Save if unsaved, or pick Save As if replaced parts.
 -
 Pick the format as JPG, PNG, or GIF. Name it then save it.
 -
 A dialog will appear. Choose any of them.
- "Every slide" will make a folder in the location.
- "Current slide only" will make a picture of the current slide.
Was this article helpful?
Your feedback helps us improve.
Related Articles
 PowerPoint 2019 (Part 15): Image Formatting5 minutes read
 How to edit photos on Fotophire software7 minutes read
 The best free photo editing software on your computer16 minutes read
 6 best free photo editing software on computer8 minutes read
 How to skew images in PowerPoint2 minutes read
 How to insert a picture below another picture in PowerPoint2 minutes read
Reader Comments 0
Sign in with email or Google to join the discussion.