How to take screenshots of Dell computers you need to know
Want to take a screenshot of your Dell computer but don't know how? These are ways that you can quickly refer to and apply..
In the process of using a computer, there will be times when you need to take a screenshot of the screen you are using. However, you do not know how to capture the computer screen quickly. This will be a guide to help you easily capture the screen on your Dell computer.
Use keyboard shortcuts to take screenshots of Dell computers
The simplest and most widely used way is to capture the computer screen via keyboard shortcuts. You do the following:
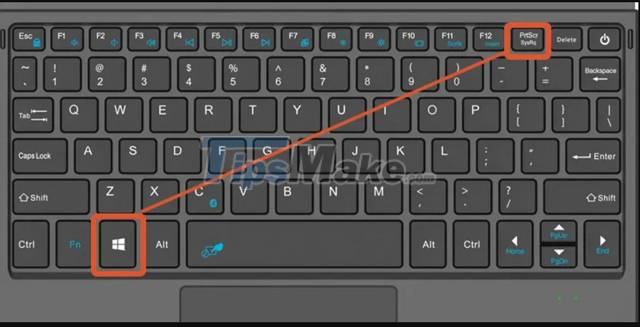
Step 1: Press the key combination Fn + Prnt Scrn or Alt + PrtSc to capture the entire computer screen.

Step 2: Open the Paint application .
Step 3: Press Ctrl + V to paste the photo into Paint.
Step 4 : Go to File > Save > Save as type and select JPEG > Save format .


In addition, you can also press Ctrl + S to save quickly.
Take and save screenshots of Dell machines directly
This way is somewhat more convenient than the above method because you will not need to save the image with Paint.
Step 1: Press the Windows + Prnt Scrn key combination to take a screenshot and save the image directly.
As soon as you press this key combination, you will see the screen turn dark within 1 second, which means that the computer screen capture has been completed.
Step 2: Go to This PC > Picture > Access the Screenshot folder to get the captured screenshot.

Capture part of the screen with keyboard shortcuts
In addition to taking a picture of the entire screen with a keyboard shortcut, you can also capture a certain part of the screen. How to do this:
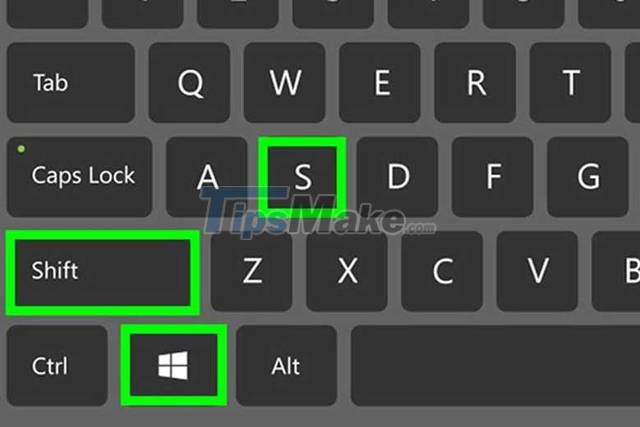
Step 1: Press Windows + Shift + S key combination.
Step 2: Your mouse turns into a + symbol . Proceed to hold and move the mouse from the starting point you want to capture to the end point, then release the hand.
Step 3: Access Paint and press Ctrl + V to paste the image.
Step 4: Select File > Save > choose a folder to save the image.
So you can now capture part of the screen via keyboard shortcuts.
Take screenshots of Dell computers with Snipping Tool
In addition to using the physical keystrokes available on the machine, you can refer to the Snipping Tool. This is a built-in tool in Windows 10 and 11. For lower Windows models you can download this application using the link below.
Download Snipping Tool here
Step 1: Access the Snipping Tool.
- For Windows XP: You access the installed Snipping Tool.exe extension file.
- For Windows 10, 11: Go to Start Menu > type Snipping Tool > Click on the application's scissors icon .

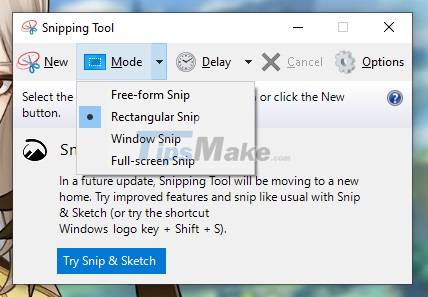
Step 2: Select shooting mode.
After accessing the application, there will be many screen capture modes for you to choose from. Click on the inverted triangle icon next to the Mode item, you will see 4 screen capture modes. Consists of:
- Free-form Snip: This option allows you to use the mouse to draw any shape. The area inside the image will be captured as a screenshot.
- Rectangular Snip: This is the default shape, and allows you to draw a rectangle of any ratio as a screenshot.
- Window Snip: This option takes a screenshot of a specific window, just like holding Alt and pressing Print Screen. You can select the window you want to use.
- Full-screen Snip: This option takes a picture of the entire screen, but does not display the Snipping Tool window.
Step 3: Take a screenshot.
Once you've selected the shooting mode that suits your needs, it's time to take a screenshot. Click New > left click on the starting point you want to capture and hold and move the mouse to the end point and then release.
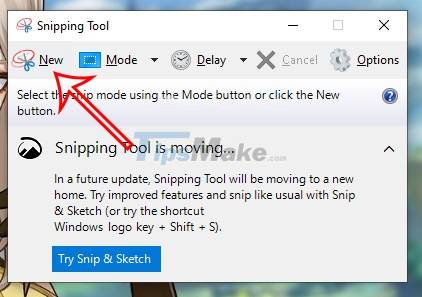
You have completed the shooting process.
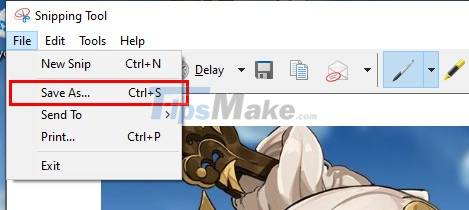
Step 4: Save the screenshot.
After taking a screenshot, the captured content will appear in the application. To save, choose File > Save as > Choose a folder to save the image and click Save.
Use the Game Bar to take a screenshot of a Dell computer
Game Bar is a feature that only appears on Windows 10 and has been integrated with the Xbox application allowing users to take pictures, record videos and then share them on the Xbox system.
Step 1: Press Windows + G key combination.
Step 2: The Game Bar section appears. Tap the camera icon to take a screenshot.
Step 3: A screen capture message appears, if you want to review the image, you can click the See my captures line.
Above are the Dell computer screen capture methods that Tipsmake would like to introduce to you. Hope you can do this easily.