BIOS - Basic information for beginners
Probably not very often when you think about computer troubleshooting tools as long as the trouble happens to you. Your computer has its own troubleshooting center, which is BIOS (Basic I / O system). Without the instruction set from the BIOS, your operating system will not boot.
Table of Contents
Probably not very often when you think about computer troubleshooting tools as long as the trouble happens to you. Your computer has its own troubleshooting center, which is BIOS (Basic I / O system). Without the instruction set from the BIOS, your operating system will not boot.
When you turn on the computer, BIOS immediately works. BIOS is considered a firmware (firmware) - is a type of software integrated with hardware. An older type of BIOS is usually integrated into a ROM chip and attaches the board to the system. Flash BIOS is a newer type of BIOS and is stored in a flash memory chip that you can delete and reprogram.
You can understand that the BIOS is a pre-operating program, which helps a computer to do anything it can without accessing the software from a drive. The code written in this firmware is responsible for controlling things like drives; identify the presence of major system components (such as processors and memory capacities); communicate with monitors, keyboards, mice, and other peripherals, etc. It starts the system, checks all essential configurations so that the system can let the operating system launch. When the operating system runs, it considers the BIOS role to validate and control peripheral devices.
Are all Bios the same?
Incorrect. There are several companies that produce BIOSes, so different versions have different codes. Leading BIOS manufacturers include AMI ( http://www.ami.com ), Phoenix Technologies ( http://www.phoenix.com ), IBM ( http://www.ibm.com ) and Intel ( http://www.intel.com ). Some BIOS manufacturers also produce the entire system, while other manufacturers focus on components, such as processors and motherboards.
How to determine which BIOS version you have?
Windows 10, Windows 8, Windows 7, Windows Vista and Windows XP
The BIOS version number is not something you need to keep up to date. The main reason you want to check the BIOS version is to know if there are any new updates.
Like almost everything in the technology world, motherboard software (BIOS) is sometimes updated, sometimes to fix bugs and sometimes to add new features.
As part of a number of hardware troubleshooting processes, especially RAM-related or new CPU processes that don't work correctly, updating the BIOS to the latest version is a good option.
Here are 5 different methods to check the BIOS version installed on your motherboard:
- Methods 1 and 2 are the best solution if your computer is not working properly. They are independent of the operating system.
- Methods 3, 4 and 5 are more convenient ways to check the BIOS version, requiring your computer to work and is only applicable in Windows 10, Windows 8, Windows 7, Windows Vista and Windows XP.
Method 1: Restart the computer and pay attention
The "traditional" way to check the BIOS version on your computer is to see the note that appears on the screen during the POST process when your computer starts booting.
1. Restart your computer normally (assuming it still works well to do that). If not, turn off the power manually and then restart the computer.
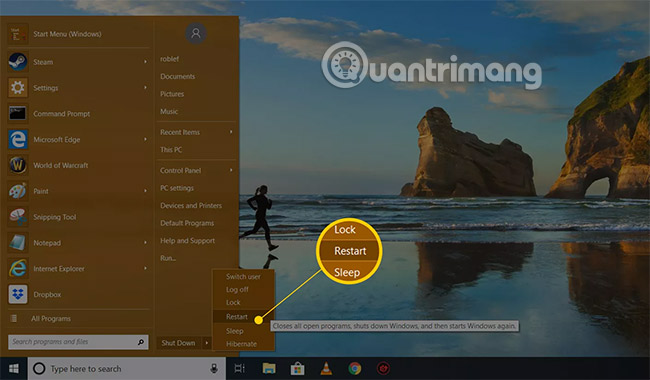
2. If your computer is turned off immediately, powering on will also work normally.
Tips:
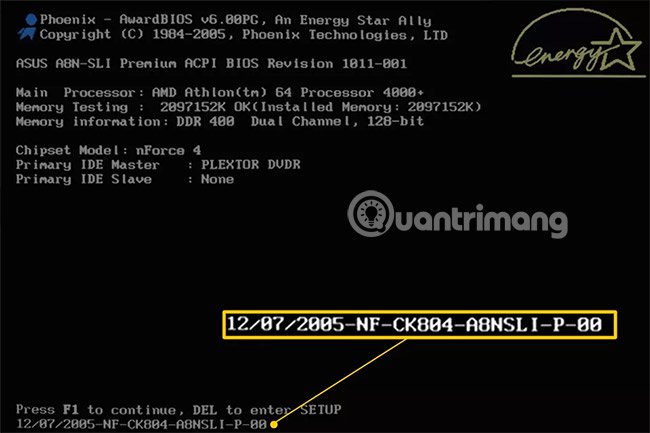
Carefully consider when the computer starts and note the BIOS version displayed on the screen.
Some computers, especially computers manufactured by major manufacturers, display computer logo screens instead of POST results. That's where the BIOS version number is located. Press Esc or Tab usually delete the logo screen and display POST information behind it.
If the POST results screen disappears too quickly, try pressing the Pause key on the keyboard. Most motherboards will pause the boot process, giving the user plenty of time to read the BIOS version number.
If the pause does not work, raise your smartphone on the computer screen and return to the video about the POST results that appear on the screen. Most cameras record images at a rate of 60 fps or higher, helping you capture the BIOS version of your computer.
3. Write down the BIOS version number as shown on the screen. The BIOS version number is not always easy to see, so write down any possible information.
Tips:
Take a picture! If you can pause the boot process at the POST results screen, take a picture with your phone. This will store specific information for future reference.
4. You will now have your BIOS version number.
The reboot method is great when your computer is inactive and you cannot apply one of the more convenient methods below.
However, restarting your computer can be frustrating, if you look at the lack of BIOS version notation. The POST results screen is usually very fast, especially when the computer runs fast and reduces boot time.
Method 2: Let the BIOS update tool tell you
Updating the BIOS is not something you can do manually. In most cases, you will use the special BIOS update tool provided by the computer or motherboard manufacturer to do this.
Normally, this tool will clearly display the current BIOS version that is installed, so even if you are not ready to update the BIOS, or are not sure if you need to do it, BIOS update tool (public) BIOS update tool) can be used to check the current version.
First, you need to identify online support from your computer or motherboard manufacturer, then download and run the tool. You do not need to update anything, so skip the following steps in any of the instructions provided.
Note : This method works when your computer does not boot properly while the BIOS update tool for the motherboard is bootable. In other words, if the BIOS update program only works in Windows, you'll be forced to use method 1.
Method 3: Use Microsoft System Information (MSINFO32)
An easier way to check the BIOS version running on your computer's motherboard is through a program called Microsoft System Information .
This method does not require restarting the computer. It is already included in Windows (meaning you don't have to download and install anything).
Here's how to check the BIOS version with Microsoft System Information:
1. In Windows 10 and Windows 8.1, right-click or press and hold the Start button and select Run .
In Windows 8.0, access Run from the Apps screen . In Windows 7 and earlier Windows versions, click Start and then select Run.
2. In the Run window or search box, enter the following exact phrase:
msinfo32
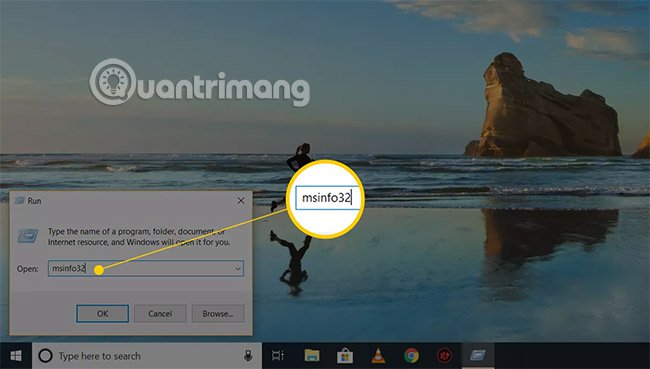
A window with the System Information title will appear on the screen.
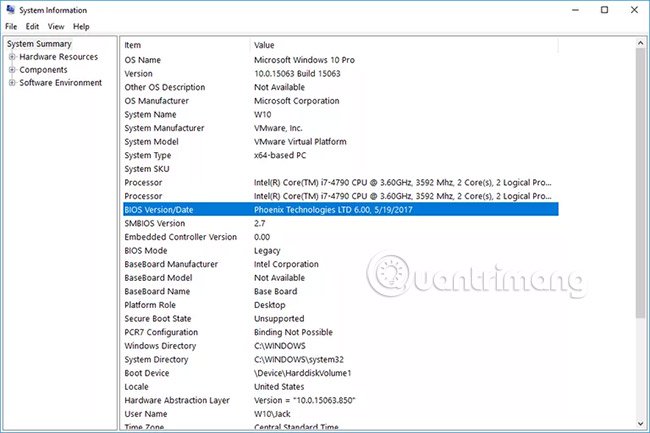
3. Click on System Summary, if it is not highlighted.
4. On the right, under the Item column, find the entry named BIOS Version / Date.

Note : In some cases, you may also need to know what the manufacturer and motherboard model is. If that information is reported to Windows, you will find those values in BaseBoard Manufacturer items , BaseBoard Model and BaseBoard Name.
Record the BIOS version as reported here. You can also export the results of this report to TXT file in File > Export . in the System Information menu .
Microsoft System Information is a great tool, but it does not always report the BIOS version number. If your computer falls into this category, a similar third-party program is the next thing you should try.
Method 4: Use tools to provide 3rd party system information
If Microsoft System Information does not contain the BIOS version data you need, there are a number of alternative system information tools available online that you can try. Many tools also provide more detailed information than MSINFO32.
Here's how:
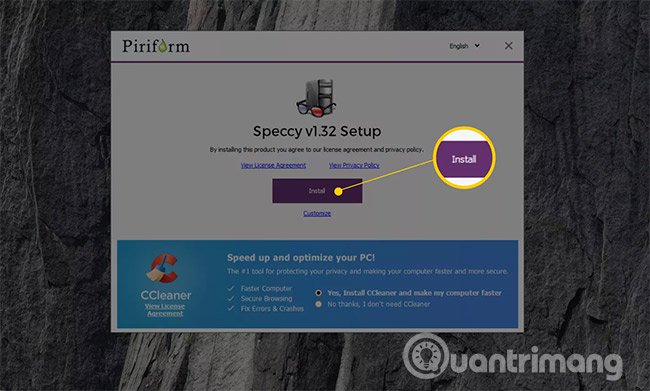
1. Download Speccy, a completely free system information tool for Windows.
Note : There are some tools that provide really good system information, but Speccy is a favorite choice for many users. It's free, has a portable version and tends to show more information about your computer, than similar tools.
2. Install and run Speccy if you choose the installable version or unzip and then run Speccy.exe or Speccy64.exe if you choose the portable version.
See the article: Difference between 32-bit and 64-bit Windows? If you are not sure which file to run.
3. Wait for Speccy to scan your computer. This process usually takes a few seconds to a few minutes, depending on the speed of your computer.
4. Select Motherboard from the menu on the left.
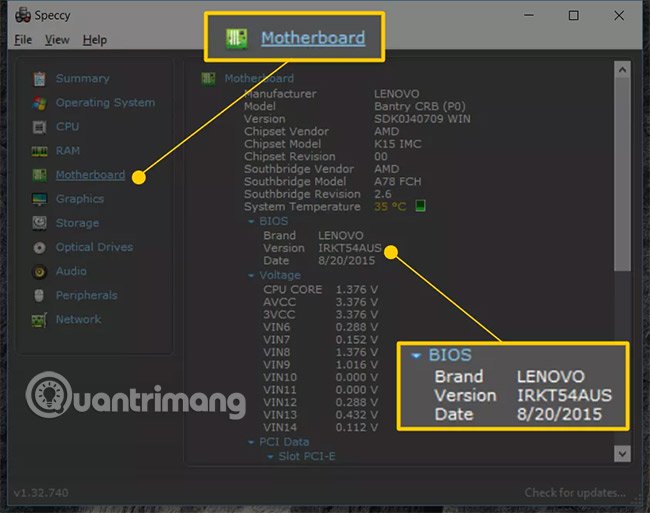
5. Note the version listed in the BIOS subcategory on the right. This is the BIOS version you are using.
Tip : Trademarks listed under the BIOS are usually not valuable information. The BIOS update tool and the data file you need will come from your computer or motherboard manufacturer, listed as Manufacturer and will be specific to your motherboard model, listed in Manufacturer section .
If Speccy or another "sysinfo" tool doesn't work in your case, or you don't want to download and install any software, you still have a last resort to check the BIOS version of your computer.
Method 5: Exploit in the Windows Registry
Last but not least, and perhaps not surprisingly for those who already know, lots of information about the BIOS can be found in the Windows Registry.
Not only is the BIOS version usually listed clearly in the registry, but there is also information about the manufacturer and your motherboard model.
This is the place to find it:
Note : No changes have been made to the registry key in the steps below, but if you are afraid you might accidentally change this important part of Windows, you can always back up the registry at any time. Come on.
1. Open Registry Editor.
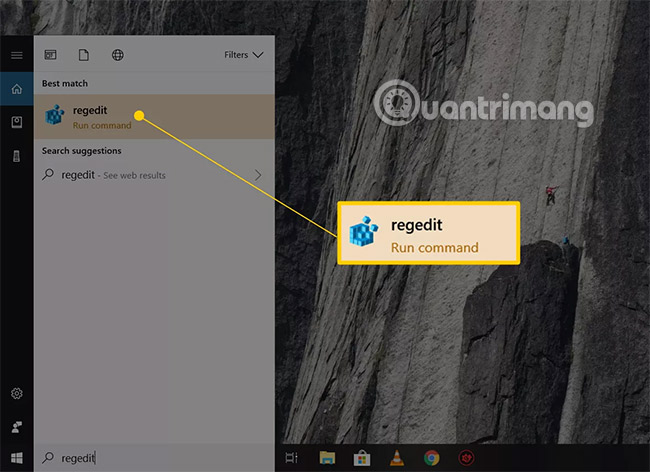
2. From the registry hive list on the left, expand HKEY_LOCAL_MACHINE.
3. Continue going inside HKEY_LOCAL_MACHINE, first with HARDWARE, then DESCRIPTION, and finally System.
4. With the System section expanded, press or click the BIOS.
5. On the right, in the list of registry values, locate a value named BIOSVersion. The right value is the installed BIOS version you need.
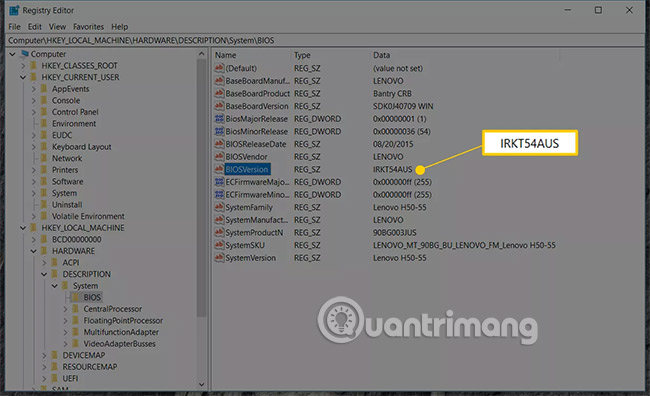
Note : The BIOS version may be written as SystemBiosVersion in some older versions of Windows.
6. Rewrite the BIOS version, as well as the BaseBoardManufacturer and BaseBoardProduct values somewhere, if you need them.
The Windows Registry looks scary but as long as you don't change anything, it's completely harmless when you need to exploit the information in it.
Windows 98 or earlier
If you have an older computer, such as a machine that is installing Windows 98 or a previous version, you can see your BIOS identifier string - a long string of numbers and letters-on the start screen when You start the system. However, on newer systems, your BIOS can be configured to perform a quieter boot process, which means that you will not see the results of the POST process (self-test when enabled. machine) that BIOS does when your system is turned on. So you will need to find your BIOS version somewhere else.
Try finding your BIOS version in the System Information process, part of Windows in the Start menu. In Windows XP, click Start, All Programs, Accessories, System Tools and System Information. The information you need is listed under System Summary.
Under the Start menu, open the System Information tool to find your BIOS version and manufacturer. In the right pane, next to the BIOS Version / Date section, you will see the BIOS manufacturer name, version and the date it was created. Of course, this information does not help you access the BIOS but it is the information you should know. In fact, you should copy this data to a piece of paper and keep it in a safe place, especially if you plan to modify your current BIOS or upgrade to a newer version.
Another option is to consult the computer user manual. It can provide information about both the BIOS version and how to access it.
Finally, you can visit your computer manufacturer's website. There, you can know not only your BIOS type but also how to upgrade it. You only need to perform a simple search with the keyword 'BIOS versions' or 'access the BIOS' to get to the place you need on the site. You can also narrow your search results by adding your PC brand to your search terms.
For example, IBM ThinkPad users can visit a page on the IBM web site dedicated to them at http://www.pc.ibm.com/us/thinkpad/community.html . How To Access The BIOS page is intended for ThinkPad users running the minimum version of Win98 SE. Click the Detect BIOS Version button to scan through your system and your BIOS version will be displayed in a pop-up window. You can also check a table on this page for specific instructions on how to access the BIOS on your system.
How to open BIOS?
This is not a common, unified process. BIOS access methods are often different for each computer manufacturer, if not different for each system model. Because tweaking the BIOS is often not a necessary job and is often more harmful than beneficial if you don't know what you are doing, some computer manufacturers often hide them. Just like with the Windows Registry, you should not mess up the BIOS unless you are sure you know what you are doing and that is essential.
Perhaps you will be very fortunate to have a system that reveals to you the key combination to open the BIOS when you start your computer. For example, on the Gateway PC running WinXP, after turning on the power, the first screen we see has a message that we can access our BIOS settings by pressing F2.
If the boot screen doesn't give any information, follow the method we just mentioned above to discover your BIOS identifier string. Your system manufacturer or notebook will be able to tell you how to get into the BIOS.
When you dig into the BIOS, you can see the abbreviation CMOS (Additional metal oxide semiconductor), especially when you have an old system. This is a type of RAM chip on your system board and is a very important place to store all your system configurations. However, BIOS will take care of checking this configuration information every time you start your computer and, when necessary, update the settings on the CMOS chip. Because Bios and CMOS are closely interconnected, your BIOS interface can be labeled as CMOS Setup Utility or something similar but technically they are not one.
What settings can you change in BIOS?
Your BIOS may be organized differently from ours, although it may be different only in how to label sections. However, here are the highlights of the content of a typical new BIOS. We chose to describe features grouped on different screens in our BIOS (manufactured by Intel).
Main
On this introduction screen, you will have a picture of the structure of your system components: BIOS version, processor type and speed, memory speed and system bus, RAM cache and Total memory capacity. Obviously, you can't change these numbers unless you have to change your PC.
The only settings that you can change on the main screen are language, date and time. You use the up and down arrow keys of the keyboard to go to the appropriate field and if you need to include new data, press Enter. Although you can change the date and time of the system in BIOS, you can also change these parameters more easily via the Windows interface.
Advanced
We will now explore the central part of BIOS settings. The values entered here, if true, will keep your system in good working order. If not, they can cause the system to malfunction, so be careful when you go here. A very good experience is to thoroughly examine this setting of the BIOS whenever you upgrade the system with new hardware, whether internal components or peripherals, to see the settings below. Whether it suits your new components or not.
1. Peripheral Configuration (Peripheral Configuration)
Use this screen to enable or disable parallel and sequential ports, plus change many other specific settings. In DOS systems, there are 4 supported serial communication ports: COM1, COM2, COM3 and COM4. Only two requests to interrupt IRQ3 and IRQ 4 are available for these four ports to allow communication between devices and processors. When you add a new peripheral, you will have to specify which IRQ it can use. Plug-and-Play technology usually handles these settings automatically, but if a problem arises, you now know where to go in the BIOS to handle it.
2. Drive Configuration (Drive configuration)
If you are going to install a new hard drive, you will want to check this section to make sure the new settings are recorded. For example, in our BIOS, we have several options for setting up Advanced Technology Attachment (Integrated Technology Electronics) ATA / IDE. ATA is a hard drive specification in which the data controller - a chip is used to communicate with peripheral devices - is located on the drive. ATA is based on IDE technology.
Also on this screen is a list of detected and undiscovered IDE devices. When the BIOS works, it looks for the presence of IDE devices installed or attached. If a device is detected, you can tweak one or two settings, but modifying these settings will not affect the performance of your IDE drives; This implementation is controlled by your IDE and operating system drivers.
3. Floppy Configuration
If you install a new floppy drive, you will probably need to modify certain settings here. You will be able to choose the size of the newly installed drive, such as a 3.5-inch, 2.88MB size drive. You can also enable or disable an write protection feature for this drive.
4. Event Log Configuration (Configuring event log)
Your system may contain a DMI event log (screen management interface). A DMI log keeps track of changes made to a system, such as program installation. This screen gives you the option to turn on and off the log and then view the log contents, delete it and mark it as read.
5. USB Configuration (USB configuration)
USB (Universal Serial Bus) ports provide fast connections to peripheral devices such as mice. USB standards are available in two versions: USB 1.1 (12Mbit / s) and USB 2.0 (also known as Hi-Speed USB; 480Mbit / s). Consider this setting of the BIOS to make sure that the appropriate USB version is available based on your installed drivers. If your BIOS does not support USB, you will need to update it before upgrading to a USB peripheral. Power. These are power management settings based on ACPI (Advanced Configuration and Power Interface) specifications. ACPI settings let you know how much system power has been spent on each peripheral device. If you are in unused mode, a computer can turn off a device to save system resources. You can also enable and disable a type of 'after power failure' setting, which determines how your system reacts in the event of a power failure.
With some other BIOS settings, these power management settings are usually handled without any problems by your operating system.
Boot
Your choices here include a mix of startup-related settings. For starters, you can determine the order in which your system boots its drives and removable devices. You can also enable or disable the silent boot feature. In addition, you can turn on and off detection alerts for system components, such as your drives, keyboards, and mice. If these alerts are turned on, your computer will notify you with a loud beep if it cannot detect a device. Exit the BIOS safely
Your BIOS may contain an Exit screen that allows you to safely get rid of this firmware. You can save the changes you made in CMOS and exit the BIOS or save nothing and exit.
Your BIOS may also have another built-in safety feature. If you choose to exit the BIOS by pressing the Esc button, you will be asked if you want or do not want to save the changes before you exit. This safety feature will prevent you from keeping a change you accidentally made.
Don't think that such errors will not happen. Because moving in the BIOS requires keystrokes instead of familiar clicks, it is very easy to accidentally change a setting.
And as we have warned, even a false setting in the BIOS can change your reality from 'the whole operating system' to 'damaged system'.
How to upgrade BIOS?
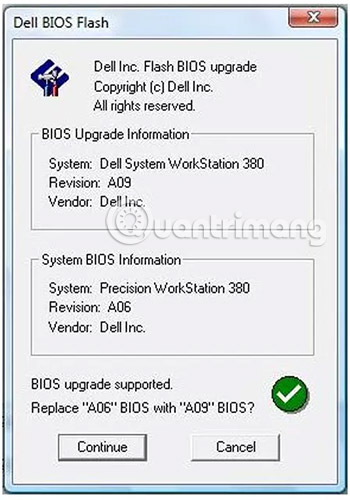
Mr.Bios ( http://www.mrbios.com ) is a very good address to find an online BIOS upgrade, especially if you have a BIOS produced by the companies listed in the image. take this screenshot.
In general, manufacturers release updates for BIOS versions for one of two reasons? The following: to fix a bug in the BIOS or to add support for new hardware or features. Similarly, the best reason to upgrade your BIOS is when you have just upgraded the main hardware components, such as a processor, hard drive or video card.
To find an updated version of the BIOS for your system, first visit your BIOS manufacturer's web site. If an upgrade is available on this site, it will provide you with step-by-step instructions on how to download and install this file. Of course, this process will change for each site. Having a site requires you to fill out a form or allow the site to scan through your system before you can download the appropriate upgrade file. Save the file to the hard drive, extract it and save it to a floppy disk. Then, insert the disk into the floppy drive and let the executable file in the disk perform its task.
On the other hand, some BIOS upgrade sites often choose to send you a floppy with updated files and installation instructions.
Another option is to go to a BIOS upgrade site, such as eSupport ( http://www.esupport.com ). Web site này cung cấp các bản nâng cấp cho một số nhà sản xuất Bios hàng đầu. Nó cung cấp cho bạn một số phương pháp để có được một Bios mới. Ngoài ra bạn cũng có thể vào BIOS-Drivers.com ( http://www.bios-drivers.com ), một web site cung cấp các kết nối tới hầu như tất cả các nhà sản xuất Bios hiện nay.
See more:
- Instructions for entering BIOS on different computers
- Cách thiết lập BIOS để boot từ USB/CD/DVD, ổ cứng ngoài
- Instructions for upgrading BIOS
Was this article helpful?
Your feedback helps us improve.
Related Articles
 Instructions for entering BIOS on different computers5 minutes read
 Display BIOS information on Windows 10 using Command Prompt2 minutes read
 5 tips for using the BIOS to help you master your computer7 minutes read
 Differences between UEFI and BIOS4 minutes read
 How to enter Bios for all motherboard and laptop lines5 minutes read
 What is BIOS in a computer? What is the simplest way to access BIOS?10 minutes read
Reader Comments 0
Sign in with email or Google to join the discussion.