Table of Contents
Instructions on How to Ghost Windows 7 Using USB is easier to understand when the core ideas are paired with practical examples. The sections below explain the topic clearly, highlight useful steps, and point out details that can prevent common errors.
Creating USB ghost Win 7 can help you ghost many Win 7 computers without creating many Windows ghosts. See how Ghost Win 7 from USB is quite simple below!
In addition to reinstalling the Windows operating system, users can choose how to get the Ghost Win. The process and the time for ghost win to be faster than the installation of Windows operating system. Similar to installing Windows from a DVD, USB or HDD, the Ghost Win can also be performed on the above devices. This guide, we will show you how the Windows 7 ghost from a USB device.
How ghost Windows 7 from USB
First of all, to make Windows 7 ghost, you need to prepare:
- Use USB from 1 GB or more.
- Tool to format, format USB for FAT 32. Download USBFormat tool.
- Tool to create the ability to boot USB download grub4dos.zip tool.
- Tool to boot and edit computers download Hiren's BootCD tool. Only in the old Hiren's BootCD version will include Norton Ghost.
- .GHO format Windows 7 file to run ghost.
Step 1:
Then we will proceed to create USB Boot with Hiren's BootCD. You read reference how to perform details in Hiren's USB flash tutorial .

Step 2:
Next, users will take steps to conduct a ghost Win 7 using USB. First of all, we will access the BIOS interface according to different shortcuts in the computer lines. To know the BIOS access key on the device you are using, refer to the Guide to BIOS entry on different computers.

After that, users will set boot mode from USB instead of DVD or hard drive. Click on the Boot tab and use the arrows to navigate and select the Removable Devices boot method, using a USB or external hard drive to boot.
How to set up the BIOS How to set up BIOS to boot from USB / CD / DVD, external hard drive.
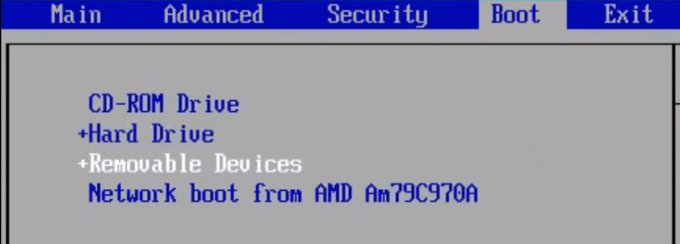
Finally, press F10 and select Yes to save.

Step 3:
After choosing to boot from USB, the user clicks on the Dos Program .

Next to the user press 2 to select Backup Tools. If using another version, it will be Custom Menu. okay.
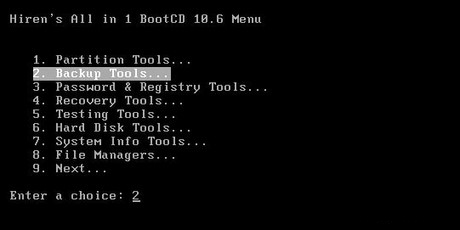
Step 4:
In the list of Norton Ghost appear, you press number 6 to access.

Finally, press 8 to select Ghost (Normal) to perform ghost Win 7.

Step 5:
Next to the user to process then run automatically. When the screen appears the ghost / ghost creation software interface as shown below, click OK to continue.

Then select Local> Partition> From Image .

Step 6:
In the folder interface on the computer, we use the up and down arrow keys to navigate to the folder containing the Win 7. GHO file .

Then click Open to open this.GHO file.

Step 7:
Switch to the new interface for users to select the drive to install. typically there will be 2 HDD and USB drives when we run Windows 7 ghost with USB. USB drives are typically smaller than HDD drives. After selecting click OK to continue.

Step 8:
Next, we will select the partition to install the Windows 7 operating system. Users should install the system partition that installed the previous operating system to Norton Ghost to overwrite. If you select the partition containing the data, all the data will be erased.
Click OK to go to the next step.
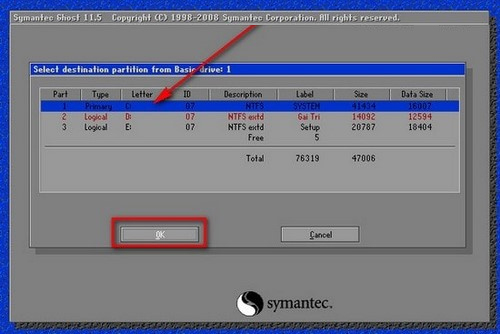
Step 9:
A message dialog box will appear, click Yes to confirm.
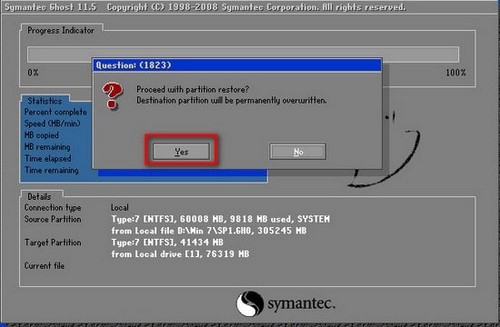
Soon, Norton Ghost will proceed with Windows 7 ghost process automatically.

Above is the guide how to ghost 7 Win with USB. The ghost Win process of backing up and restoring data in this way is faster than when we install a new operating system. However, you should not abuse the ghost ghost too much on your computer because it will affect the hard drive.
I wish you all success!
FAQ
How ghost Windows 7 from USB?
First of all, to make Windows 7 ghost, you need to prepare:
What is Instructions on How to Ghost Windows 7 Using USB?
Creating USB ghost Win 7 can help you ghost many Win 7 computers without creating many Windows ghosts.
Why is Instructions on How to Ghost Windows 7 Using USB important?
A clear understanding of Instructions on How to Ghost Windows 7 Using USB helps you make informed decisions, avoid common mistakes, and use the relevant tools or techniques more effectively.
Related Articles
 How Ghost Windows 7/8, Windows 10 with Onekey Ghost5 minutes read
 Download Ghost Win Xp, Win 7, 8, 10 32 and 64bit Link Google Drive3 minutes read
 How to Ghost Windows 7, Ghost Windows 7 32bit 64bit Using7 minutes read
 How to Ghost Windows from Hard Drive, Applies Win 11, 10, 89 minutes read
 How to Ghost Windows Directly on Windows 11 and Ghost Windows Using UBS Boot13 minutes read
 Ghost Windows 10 Pro 1909 64 / 32bit Full Soft 20206 minutes read
Reader Comments 0
Sign in with email or Google to join the discussion.