Enable or disable Secure Boot via the ASUS UEFI BIOS utility
By default, Secure Boot is enabled on ASUS motherboards using UEFI BIOS. However, if you want to install dual-boot, you will have to disable Secure Boot. In the following article, Network Administrator will guide you through steps to disable Secure Boot on UEFI BIOS on Asus X99-Deluxe motherboard.

In addition, readers can refer to the steps to disable Secure Boot on the BIOS here. Or if you want to have Secure Boot check enabled on your computer, can you read here?
1. Prerequisites for Windows UEFI Mode: GPT partition
Installing Windows on UEFI - the system platform requires the hard drive partition type to support UEFI Mode or at least Legacy BIOS mode - compatible mode.
And if the following error message is displayed on the screen, it means your computer is started in UEFI mode but the hard drive does not support UEFI mode:
' Windows không thể được cài đặt để đĩa này. Máy ảnh đã chọn không phải là kiểu kiểu GPT

GPT partitions on hard drives are required for UEFI Mode. Also the advantage of GPT partition is that users can set up drives larger than 4 GB and have more partitions.
The easiest way to apply GPT partitions on your hard drive is through Command Prompt using the installation drive or tool on Widows.
2. Use Command Prompt to convert hard drive into GPT partition
- Insert the Windows setup drive or USB drive and boot up your computer in UEFI mode.
- After booting from Windows setup, press Shift + F10 to open the Command Prompt window.
- Next open the disk partition tool with diskpart .
- List and confirm the format drive (format) with list disk .
- Select the drive to format and convert to GPT:
select disk
clean
convert gpt
exit
- Close the Command Prompt window and continue.

3. Use Windows Partition Manager Tool to convert hard drive into GPT partition
You can also convert to GPT without having to use Command Prompt using the Windows partition manager tool from EaseUS.
EaseUS partition master can help you convert hard drive to GPT. Also you can create, merge, delete partition or wipe partion. In addition the tool also assists you in recovering data in case if the data is deleted or the partition is lost.
4. Steps to backup Existing Keys and disable Secure Boot
- Insert the USB drive into your computer.
- Restart the computer and access BIOS mode by pressing the DEL key (or use the other key, paying attention on the first instruction window). This to open the UEFI BIOS interface.
- Access Advanced Mode (press the F7 key or another specified key).

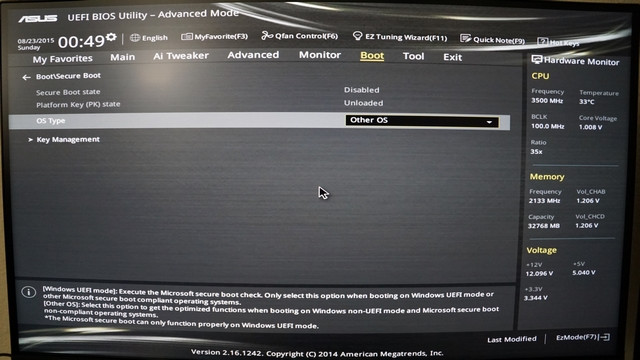
- Go to the Secure Boot option under Boot.

- Make sure that the correct OS Type is selected, then access Key Management.

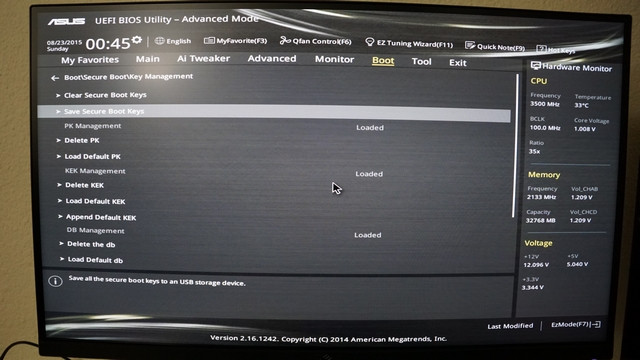
- Select Save Secure Boot Keys and press Enter.

- Select the USB drive when asked to Select a File System.

- 4 keys named PK, KEK, DB and DBX will be saved to the USB drive.

- Delete the Platform Key (PK) to disable Secure Boot (note not to delete other keys).

- Save and restart to apply settings (usually using F10 key).

5. Restore the key and activate Secure Boot
- Follow steps 1 to 5 above. Use a USB drive containing backup of keys.
- Access Load Default PK and press Enter. And you will have 2 options to set up a new key.

- Select Yes to load the default key. Once completed, save the configuration and reboot to activate Secure Boot.
- Select No to load the backup keys:

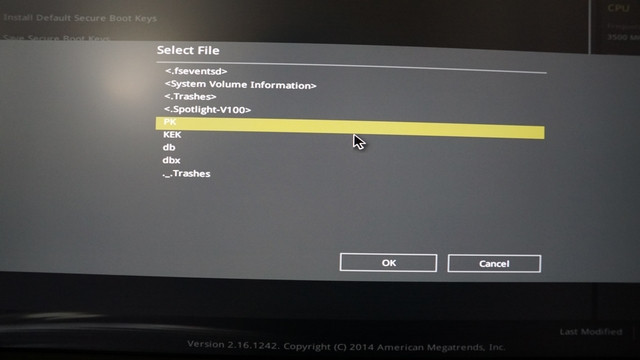
- Select the USB drive containing the backup files.

- Select file to restore (in this case PK).

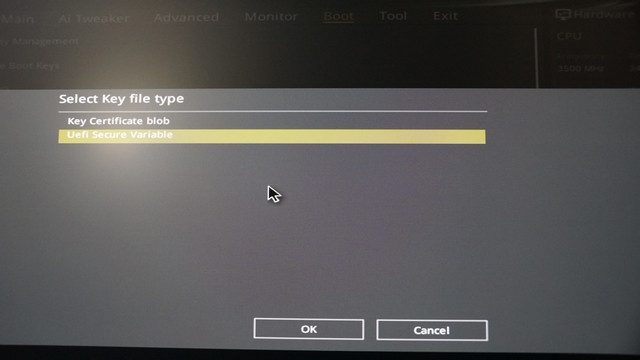
- Validation is UEFI Secure Variable.

- Confirm that you want to update (update) the PK file.

- Save changes and restart. Secure Boot will be activated.
Refer to some of the following articles:
- How to check Secure Boot has been enabled on your computer or not?
- How to turn off Secure Boot mode and open Boot Legacy mode
- How to fix the screen error of Windows 7/8 / 8.1 / 10 is black
Good luck!
You should read it
- ★ How to check Secure Boot has been enabled on your computer or not?
- ★ How to turn off Secure Boot mode and open Boot Legacy mode
- ★ How to enable / disable Fast Boot in UEFI firmware settings on Windows
- ★ How to create USB BOOT standard UEFI - GPT standard
- ★ Windows 8 security feature prevents dual booting with Linux