How to Resize an Image in Microsoft Paint
This wikiHow teaches you how to enlarge, shrink, or crop an image in Microsoft Paint. The first two maintain the native aspect ratio while the latter removes the outer area from the image. Make a copy of the image you want to resize. Go to...
Table of Contents
Method 1 of 2:
Enlarging or Shrinking an Image
-
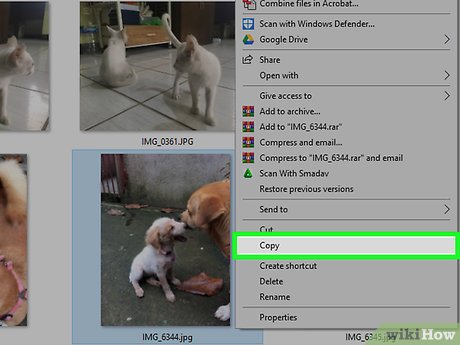
 Make a copy of the image you want to resize. Go to the image you want to resize, right-click it, and click Copy in the drop-down menu, then right-click an empty space in the folder or on the desktop and click Paste.
- Failing to make a copy of the image will result in the original image being modified.
-
 Right-click the image's copy. Doing so will prompt a drop-down menu.
 -
 Select Open with. This option is toward the middle of the drop-down menu. A pop-out menu will appear.
 -
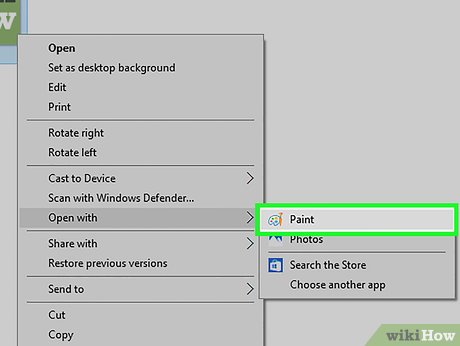 Click Paint. It's in the pop-out menu. Doing so will open your selected image in the Paint program.
 -
 Click Resize. This option is on the middle-right side of the "Image" section at the top of the Paint window.
 -
 Make sure "Percentage" has a black dot next to it. If not, click the circle next to "Percentage" to ensure that your image's changes will be measured in percents.
- Your image will start at 100 for both the vertical and horizontal values, so changing these to "75" will reduce your image to three-quarters of its original size.
- If you know the exact horizontal or vertical pixel count you want, you can click the circle next to "Pixels" instead.
-
 Check the "Maintain aspect ratio" box. If there is no checkmark in the box next to "Maintain aspect ratio", click the box; otherwise, any changes you make to one aspect of your image (e.g., vertical size) won't scale with the other aspects.
- If this box is already checked, proceed to the next step.
-
 Resize your image. Type a number between 1 and 500 into the "Horizontal" text box. Any number below 100 will cause your image to shrink while maintaining its dimensions, and any number over 100 will enlarge the image while maintaining the dimensions.
- If you're resizing using pixels, type the number of vertical pixels you want to use into the "Vertical" text box. You can also uncheck the "Maintain aspect ratio" box and enter a different number than was initially used in the "Horizontal" text box if necessary.
-
 Click OK. Doing so will apply your changes to the image.
 -
 Save your image. Press Ctrl+S to do so. This will save your changes to the image.
Method 2 of 2:
Cropping an Image
-
 Understand what cropping accomplishes. Cropping an image can only result in a smaller section of the image, but the cropped section will retain its quality. This is ideal if you're trying to remove excess parts of your photo while maintaining its resolution.
- Cropping an image will also make the image's file size smaller.
-
 Make a copy of the image you want to resize. Go to the image you want to resize, right-click it, and click Copy in the drop-down menu, then right-click an empty space in the folder or on the desktop and click Paste.
- Failing to make a copy of the image will result in the original image being modified.
-
 Right-click the image's copy. Doing so will prompt a drop-down menu.
 -
 Select Open with. This option is toward the middle of the drop-down menu. A pop-out menu will appear.
 -
 Click Paint. It's in the pop-out menu. Doing so will open your selected image in the Paint program.
 -
 Click ▼ beneath Select. Select is in the "Image" section of the Home tab at the top of the "Paint" window. A drop-down menu will appear.
 -
 Click Rectangular selection. It's the first option in the drop-down menu here.
- If you want to be able to draw your own selection, click Free-form selection instead.
-
 Click and drag over the image. Doing so will drag a rectangular dotted line over the image; anything inside of the dotted line will remain when you crop the image.
- If you're trying to remove a border from a photo, the best way to do so is to click in the top-left corner and drag diagonally into the bottom-right corner (or similar).
- To remove the dotted line and start over, click anywhere outside of the area surrounded by dotted lines.
-
 Click Crop. It's at the top of the "Image" section of options and to the right of Select. Clicking this button will remove everything outside of the dotted lines, leaving only the part of the image that's inside.
 -
 Save your image. Press Ctrl+S to do so. This will save your copied image as a cropped file rather than as the original image.
Was this article helpful?
Your feedback helps us improve.
Related Articles
 How to blur photos on Paint 3D2 minutes read
 How to resize images in Paint 3D application on Windows 104 minutes read
 Microsoft Paint - Download the latest Microsoft Paint here5 minutes read
 The fastest way to batch resize photos with Microsoft's Power Toy software3 minutes read
 Microsoft Copilot has a Copilot button and here's how to use it3 minutes read
 How to create a 3x4 photo in Paint3 minutes read
Reader Comments 0
Sign in with email or Google to join the discussion.