How to remove the Magisk module using TWRP Recovery
A quick guide to uninstalling the Magisk module without using Magisk Manager is also known as uninstalling the Magisk module using TWRP Recovery or offline.
Table of Contents
A quick guide to uninstalling the Magisk module without using Magisk Manager is also known as uninstalling the Magisk module using TWRP Recovery or offline. One of the most awaited methods for users of Magic Mask to remove the Magisk module is through offline. This will be the best method when the module is causing the boot loop. In that case, your phone will not respond, right? So what do you need to do in that case? One is removing the module causing the problem, and the other two is completely removing Magisk Su.
Removing the module causing that boot loop is very useful. One of the senior members of the Xda forum called veez21, has developed Magisk Module Uninstaller to meet this need. This can help you bring your phone back to its normal operating state by deleting the Magic Mask module.
Method 1 - Magisk Module Uninstaller - Uninstall the Magisk module via TWRP
Step 1 : Download compressed file Magisk Module Uninstaller Flashable to PC.
Step 2 : Transfer the zip file to your phone's SD card or internal memory with MTP (Most TWRP Recovery will support this method).
Step 3 : Now, click the Install button and select the Magisk Module Uninstaller Zip file.

Step 4 : After completing the installation. Go back to the Home page of TWRP.
Step 5 : Select Advanced Option from the Home page of TWRP. Now, select Terminal Option.

Step 6 : Type uninmod in the terminal window and press the Enter button . It will take nearly 3 minutes to mount /data/adb/magisk.img to / dev / tmp / magisk_img.
Step 7 : Again need to wait (about 3 minutes) to download the module currently installed on your device.

Step 8 : Now, you can see the list of modules and you must enter the number you want to uninstall (see screenshot below).
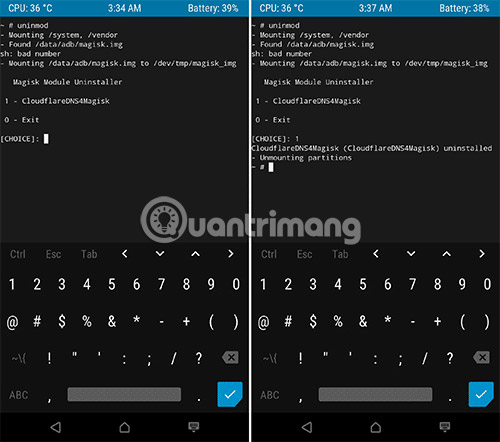
Step 9 : Finally, Magic Mask Module will be completely removed. But you have to wait again for 4 minutes to unmount the partitions.
Note : Magisk Module Uninstaller Zip needs to be flashed whenever the above Procedure follows.
Method 2 - Uninstall the Magisk module with Magisk Manager in Recovery Mode
VR25 developed Magisk Manager in Recovery Mode. This is one of many modules being developed by VR25 regarding Magic Mask. This module has better options than the above mentioned method. You will get a flexible and interactive experience when using this module, as well as no need to install, whenever you want to remove the magisk module via TWRP.
Step 1 : Download the Magisk Manager zip file in Recovery Mode to PC and transfer it to your Android device via MTP.
Step 2 : Click the Install button on the Home page of TWRP and select Module.
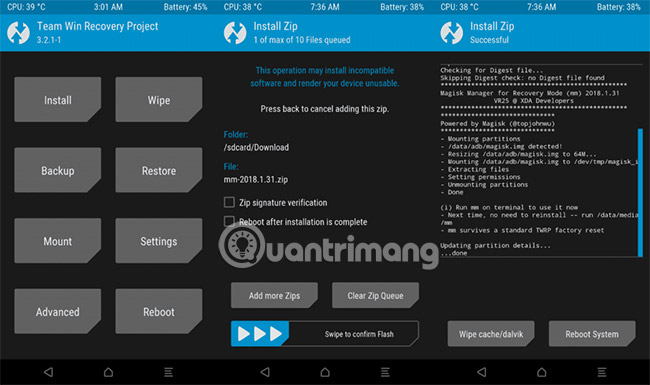
Step 3 : Swipe to install the module.
Step 4 : Select Advanced Option from the TWRP Home page and click Terminal Option to access Magisk Manager Modules.
Step 5 : Type the command below, you will get a list of options: mm (for the first time) or / data / media / mm (from the second time onwards).
- e - Turn on / off the module
- l - List of installed modules
- m - Reset magisk.img srvive f.
- r - Resize magisk.img
- s - Change Magisk settings (using text editor)
- t - Convert auto_mount
- u - Uninstall the module
- x - Exit
Step 6 : In this list, you can choose any setting according to your needs. For example, if you select " e ", you can turn the modules on or off.

Step 7 : If you want to remove the magisk module, you need to select the command ' u '. It will display the list of modules that you have installed on your device.

Step 8 : Now, type the name of the module and press the Enter button (twice). This step will completely remove the module.
Now, the program will ask if you want to perform any other actions, if so, type Y , otherwise type N.
See more:
- Instructions for rooting Android phones with Magisk
- How to remove Magisk and unroot Android phones
- 10 Magisk Module "must have" for your Android device
Was this article helpful?
Your feedback helps us improve.
Related Articles
 10 Magisk Module 'must have' for your Android device9 minutes read
 How to remove Magisk and unroot Android phones6 minutes read
 Steps to install TWRP Recovery for Xiaomi phones5 minutes read
 How to install TWRP Recovery on Android (no root required)6 minutes read
 Instructions to Root Android using TWRP Recovery4 minutes read
 Magisk - Download the latest Magisk here3 minutes read
Reader Comments 0
Sign in with email or Google to join the discussion.