How to install TWRP Recovery on Android (no root required)
TWRP allows users to save, install, backup and restore firmware on the device without having to worry about affecting the device's status when root, flash or installing new firmware on an Android device.
Table of Contents
TWRP stands for Team Win Recovery Project and it is an open source recovery software for Android devices. TWRP allows users to save, install, backup and restore firmware on the device without having to worry about affecting the device's status when root, flash or installing new firmware on an Android device.
This tutorial illustrates how to safely install TWRP for your Android device without root.
Note: Users do not need to root Android to install TWRP, but will need to unlock the bootloader, and it will delete all content on your device. Also the method to unlock bootloader will also be different for each device.
1. Download the SDK Platform file
First, download the Android SDK Platform Tools. There will be three links in the download section. Please select the version that corresponds to the operating system you are using on your desktop or laptop computer. Downloaded file will be compressed.
2. Download TWRP IMG
To download TWRP, visit TeamWin website. In the upper right corner, click the 'Devices' button .
Next, find the correct TWRP file for your device. Do this using the search bar or sort the OEM list. When the device is found correctly, there will be a section called 'Download Links' with two categories to choose from: Americas and Europe. After clicking the correct link, a file list will appear, select the latest 'TWRP.img' file and download it.
3. Unzip the SDK Platform Tools
Go to the directory containing the SDK Platform Tools and extract the file. Copy the TWRP.img file to the SDK Platform Tools folder.
4. Unlock Developer Options

To activate developer mode on Android, go to Settings and click 'About phone'.

Dragging to the bottom of the page will have a 'Build number' button . Click 'Build number' 7 times to unlock Developer Options.
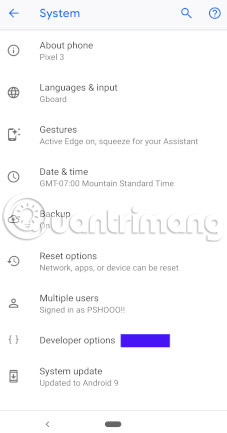
When Developer Options are unlocked, click the Back button and click on Developer Options.
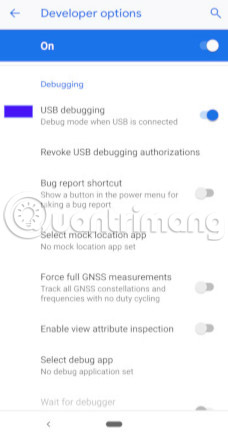
Once in Developer Options, locate the 'USB debugging' installation location and turn it on.
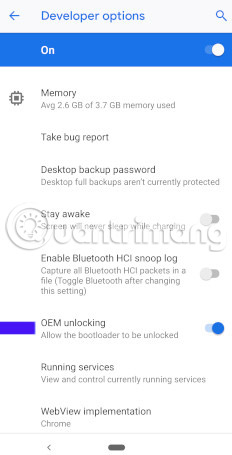
In the Developer Options menu, find the 'OEM unlocking' button and click to turn on. The device will require entering the security code and indicating that unlocking the bootloader will disable device protection. This allows unlocking the bootloader when starting the device. Opening the bootloader will delete the data from the device, so be sure to back up all files, images, data and settings you want to save.
5. Connect the device to the computer
Connect the device to the computer via USB-C or micro USB. When connecting the device to a computer, a message asking to allow USB debugging will appear. Click ' Always allow from this computer ' and the OK button .
6. Open a command window
Before continuing this step in the manual, make sure the device is charging at least 70% of the battery. Go to the SDK Platform Tools folder on the computer. In the space, hold down the Shift key and right-click, a menu will appear and click the ' Open command window here '. The command window will open.
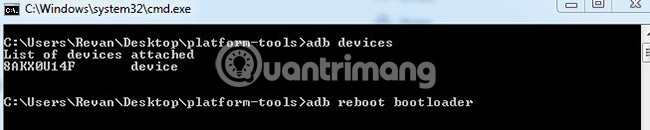
In the command window, enter:
adb devices
Then press Enter. Equipment will be listed. Enter the following command and press Enter:
adb reboot bootloader
The device will enter bootloader mode. Enter the command window:
fastboot flash recovery twrp.img
If the file twrp.img has a different name, change the entry 'twrp.img' to the TWRP file name for the corresponding device. For an example device in this tutorial, the following command is entered:
fastboot flash recovery twrp-3.2.3-0-blueline.img
Finally, type in the command window:
fastboot boot twrp.img
In the example case is:
fastboot boot twrp-3.2.3-0-blueline.img
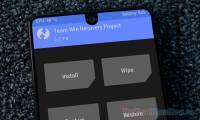
The device will start booting, then the TeamWin logo will appear and start the installation. It will take 2 to 5 minutes to install, depending on the device. Now, users can backup, delete, install, root and restore anything they want for their Android device.
Good luck!
See more:
- How to remove the Magisk module using TWRP Recovery
- How to remove Magisk and unroot Android phones
- Instructions for rooting Android phones with Magisk
Was this article helpful?
Your feedback helps us improve.
Related Articles
 Instructions to Root Android using TWRP Recovery4 minutes read
 Steps to install TWRP Recovery for Xiaomi phones5 minutes read
 How to remove the Magisk module using TWRP Recovery5 minutes read
 Is root Android phone still a must-do?6 minutes read
 Instructions to root Android easily and quickly10 minutes read
 Root way of Android phones 7.0 / 7.1 Nougat with KingoRoot4 minutes read
Reader Comments 0
Sign in with email or Google to join the discussion.