How to Reinstall Windows XP
Sometimes system files can get corrupted, and you're left trying to work with a barely functioning copy of Windows XP. Maybe all your programs are starting to run slow, and you wish there was a way to get Windows moving as fast as it used...
Table of Contents
Method 1 of 3:
Repair Install
-
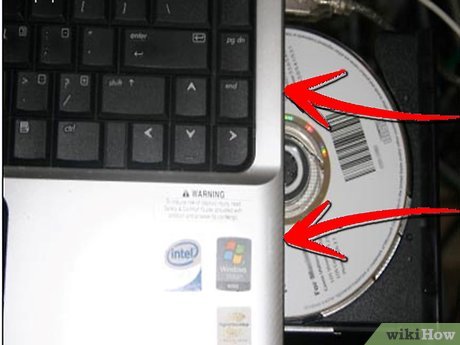 Insert the Windows XP CD into your computer. If you no longer have a copy of the CD, contact your computer manufacturer for a replacement, or download an .iso from the internet that you can burn to a blank CD. Be aware of viruses, and know that you will still need to enter a valid Product Key to install.
 - Make a note of your Product Key. It is useful to have this handy before you start the install process. This key is a 25-character code that you have to enter in order to install Windows. It can usually be found in one of a couple different places:
- Attached to the case your Windows XP CD came in, usually on the back.

- Attached to your computer. If it is a desktop then it is usually located on the back of the tower. For a laptop, it is on the bottom.
- Attached to the case your Windows XP CD came in, usually on the back.
-
 Reboot your computer. Make sure that the Windows XP CD is inserted. Your computer needs to be set to boot from the CD drive first. In order to do this, you will have to enter the BIOS setup.
- To access the BIOS, hit the Setup button as soon as your computer's manufacturer's logo appears. The key is different from different manufacturers, but is generally either F2, F10, F12, or Del. The correct key will be displayed on the same screen as the logo.

- Once you are in the BIOS, navigate to the Boot menu. Set the 1st Boot Device as the CD drive. Depending on your BIOS and setup, this could also be called the DVD drive, the Optical drive, or CD/DVD drive.

- Save your changes and exit the BIOS. This will cause the computer to reboot.

- To access the BIOS, hit the Setup button as soon as your computer's manufacturer's logo appears. The key is different from different manufacturers, but is generally either F2, F10, F12, or Del. The correct key will be displayed on the same screen as the logo.
-
 Start the installation. Once the manufacturer's screen has disappeared, a message will appear that says 'Press any key to boot from CD…' Press any key on the keyboard to start the install process. If you do not press a key, then the computer will boot from the hard drive as usual.
 -
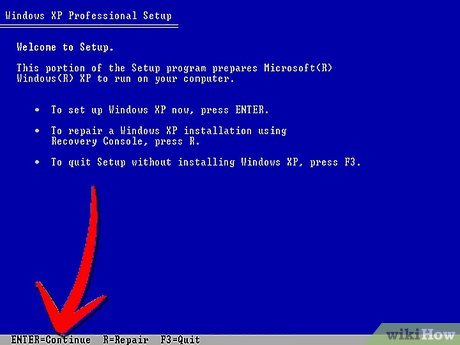 Setup will load. Windows has to load drivers to start the setup process. This could take a few moments. Once it is complete, you will be greeted with the Welcome screen. Press Enter to begin a repair install. Do not enter the Recovery Console.
 -
 Read the agreement. After you have gone over the license agreement, hit F8 to agree and continue. Setup will load a list of your Windows XP installs. Most users will only see one thing listed here.
 -
 Select your previous installation. If you only have one install, it will be automatically highlighted. Press R to begin the repair process. Windows will begin copying files, and then reboot the computer automatically. It will then begin the repair install.
- You will be asked to confirm the date and time as well as a few other basic questions. Most of the time, the default option is acceptable.

- You will be asked to confirm the date and time as well as a few other basic questions. Most of the time, the default option is acceptable.
-
 Enter the Product Key. Towards the end of the installation, you will be asked to enter the product key. Windows will check to make sure it is a valid key before proceeding.
- After installation, you will have to authorize your copy of Windows online or over the phone. The Product Activation wizard will appear when you log into your newly repaired copy. If you have an internet connection, then you should be able to authenticate your copy by clicking a button.

- After installation, you will have to authorize your copy of Windows online or over the phone. The Product Activation wizard will appear when you log into your newly repaired copy. If you have an internet connection, then you should be able to authenticate your copy by clicking a button.
- Check your programs. Once the installation is complete, you will be taken to your repaired install of Windows. Because certain system files were replaced, some of your installed programs may not function, and may need to be reinstalled.
- Some of your devices may need to have their drivers reinstalled. To see which devices are not installed properly, open the Start Menu and right-click My Computer. Select the Hardware Tab, and then click Device Manager. If there are devices with a yellow exclamation point, then they may need their drivers reinstalled.

- Your personal data and documents should be untouched with a repair install. Verify that everything is where it should be.

- Some of your devices may need to have their drivers reinstalled. To see which devices are not installed properly, open the Start Menu and right-click My Computer. Select the Hardware Tab, and then click Device Manager. If there are devices with a yellow exclamation point, then they may need their drivers reinstalled.
Method 2 of 3:
Format and Install
-
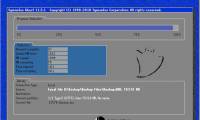
 Backup your data. Formatting and reinstalling Windows will wipe your hard drive clean. Be absolutely sure that you have backups of all your important files before starting. Pictures, movies, documents, and music will all be erased.
 -
 Insert your Windows CD. Make note of your Windows Product Key, you will need it during the installation. Boot from the Windows CD to start the setup program
- Details for this step can be found in steps 1-4 in the first section of this guide.
-
 Setup will load. Windows will load the drivers for the setup program. Once this is complete, press Enter at the Welcome screen to start the setup. Do not enter the recovery console.
 -
 Read the agreement. Hit F8 once you are done reading the agreement to continue the setup process. Setup will load a list of your Windows XP installs. Press Esc to continue with a fresh install.
 - Delete the partition. You should see a list of your hard drive partitions. These are your C: and D: drives (The lettering is dependent on the way the system was set up).
- This is your last chance to restart and back up any files you forgot. Once the partition is deleted, your data is gone.

- Highlight the partition that contains Windows. This is commonly the C: partition. Press D to delete the partition. Confirm that you wish to delete that partition by hitting Enter.

- You will get one more chance to back out. To really confirm that you want to delete the partition, press L.

- This is your last chance to restart and back up any files you forgot. Once the partition is deleted, your data is gone.
-
 Create a new partition. Select the unpartitioned space. Press C to create a new partition. Enter the maximum size possible and press Enter.
- You can create smaller a smaller partition if you want to create other partitions in your hard drive later through Windows. There are multiple reasons why someone might do this, but for most users simply creating the largest partition possible should be fine.

- You can create smaller a smaller partition if you want to create other partitions in your hard drive later through Windows. There are multiple reasons why someone might do this, but for most users simply creating the largest partition possible should be fine.
- Begin Windows setup. Once the partition is created, highlight it and press Enter to begin the Windows installation. You will be asked to format the partition. Select 'Format the partition using the NTFS file system.' Choose NTFS over FAT, as NTFS is much more stable for Windows.
- Formatting will begin. This could take up to several hours depending on the size and speed of your hard drive, but for most users it will take a few minutes.

- After formatting, Windows will copy over the files it needs for the Setup process. This will take a few minutes and requires no user interaction.

- Formatting will begin. This could take up to several hours depending on the size and speed of your hard drive, but for most users it will take a few minutes.
-
 Windows will begin installing. This is a mostly automated process that requires the user to enter some data at a few points. The first option that pops up is changing the default language and region. Click Customize… if the settings are incorrect for your region. Once the settings are correct, click Next to move on.
- When prompted, type your name and organization. These will be used when labeling documents, and can be changed in Windows settings later.

- When prompted, type your name and organization. These will be used when labeling documents, and can be changed in Windows settings later.
-
 Enter your Product Key. You will be prompted to enter your 25-digit product key at this time. Your Product Key should be found at the lower part of you Certificate of Authenticity.If you are installing from a Windows XP SP 3 disc, then you will not be asked for it yet.
 -
 Enter your computer name. This is the name that will appear on the network to describe your computer. Windows auto-generates a name for you, though you are free to change it to whatever you'd like.
- For XP Professional, you will be asked to enter an Administrator password that will be used to access the Administrator account.

- For XP Professional, you will be asked to enter an Administrator password that will be used to access the Administrator account.
-
 Set the correct date and time. You will now see a calendar and clock that can be adjusted to your specific time. You can also select the correct timezone for your location.
 -
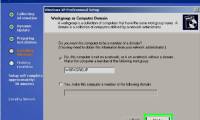
 Setup network basics. You will be asked if you want to install Typical or Custom network settings. For nearly all users, Typical is the correct choice. If you are installing in a corporate setting, check with your system administrator first.
- When asked to enter a workgroup, most users will want to select the first option, and leave the workgroup label as default. If you are in a corporate setting, you may need to specify a domain. Again, check with your administrator.

- When asked to enter a workgroup, most users will want to select the first option, and leave the workgroup label as default. If you are in a corporate setting, you may need to specify a domain. Again, check with your administrator.
-
 Windows will finalize the setup. This will take several minutes and requires no input from the user. Once it is complete, your PC will automatically restart and load Windows XP.
- If you had to change your BIOS to boot from CD, you will probably see the option to 'Press any key to Boot from CD…' again. Don't hit any key and wait for the screen to pass. Your computer will continue to boot from the hard drive and finish the Windows install.

- If you had to change your BIOS to boot from CD, you will probably see the option to 'Press any key to Boot from CD…' again. Don't hit any key and wait for the screen to pass. Your computer will continue to boot from the hard drive and finish the Windows install.
-
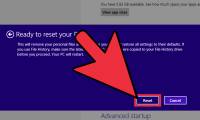
 Select OK to adjust screen resolution. Windows will attempt to automatically change the screen size to make reading easier. Once the screen resets, you will be asked if you can read the new text box. If you can, click OK to continue. If you cannot, then hit Cancel or simply wait 20 seconds for the screen to revert to its original settings.
 - Select Next to proceed with the installation. The Welcome to Microsoft Windows screen will appear once the screen changes are made. This process will just take a couple minutes.
- Windows will attempt to check your network connectivity. If you are planning on setting this up later, you can skip this screen.

- Next Windows will ask you if you are connecting to the internet through a local area or home network, or if you are connected directly to the internet. If you are using a router for your network, then select the first option. If the modem is plugged directly into your computer, then select the second option.

- You are given the option to register your product with Microsoft. Whether or not you do this is up to you, it is not required to use Windows.

- Windows will attempt to check your network connectivity. If you are planning on setting this up later, you can skip this screen.
-
 Enter the names of your users. In this step, you can create separate logins for each of the users of your computer. You must enter at least one name. You can enter up to five users on this screen, but more can be entered through the Control Panel after installing.
- After entering the names, click Finish to finalize the installation. Windows will work for a few moments and then you will be greeted with your new desktop.

- After entering the names, click Finish to finalize the installation. Windows will work for a few moments and then you will be greeted with your new desktop.
-
 Run Windows Update. Your installation is complete, but you'll want to run Windows Update as soon as possible. This will download the latest system updates from Microsoft. These are very important, as the patch system vulnerabilities and stability issues.
 -
 Install your drivers. Chances are you will need to install your drivers again now that the computer has been formatted. Depending on the devices you have attached to your computer, this could include your video card, your modem or network card, your sound, and more.
- These drivers can be found on the discs that came with your computer, and can also be downloaded from their respective manufacturer's websites.
Method 3 of 3:
Installing Without a CD
- Install from the recovery partition. Many computer manufacturers ship their computers with a partition on the hard drive that contains the Windows installation files. In order to access it, you will need to boot into the recovery partition.
- The most common key to enter the partition is F11. This will appear underneath the manufacturer log right after starting the computer.

- Recovery partition boot sequences vary by manufacturer. Follow the steps on screen to enter the Windows setup program. Once setup has started, follow the steps in the above section starting at Step 3.

- The most common key to enter the partition is F11. This will appear underneath the manufacturer log right after starting the computer.
-
 Install from within Windows. You will need to use a file called winnt32.exe. This file is a Windows installer that can be run from inside Windows XP. To find it, open the Start menu and click Search. Select "all Files and Folders" from the left frame. Enter "winnt32.exe" in the search box.
- Running winnt32.exe will reboot your computer into Windows setup. From this point, follow Step 3 in the above section. You will still need to enter a valid product key. Your data will be deleted as it would through a regular install.

- Running winnt32.exe will reboot your computer into Windows setup. From this point, follow Step 3 in the above section. You will still need to enter a valid product key. Your data will be deleted as it would through a regular install.
Was this article helpful?
Your feedback helps us improve.
Related Articles
 Download Ghost win xp, win 7, 8, 10 32 and 64bit Link Google Drive2 minutes read
 Instructions for reinstalling Windows 8.1 on the Surface Pro tablet4 minutes read
 How to Reinstall Windows 7 without using a disc9 minutes read
 Should you use Cloud Download or Local Reinstall when resetting Windows?4 minutes read
 How to Reinstall Windows 8 Without a CD2 minutes read
 How to Reinstall Windows XP Without the CD6 minutes read
Reader Comments 0
Sign in with email or Google to join the discussion.