How to Reinstall Windows XP Without the CD
This wikiHow teaches you how to reinstall Windows XP if you don't have the installation CD. To do so, you will need your Windows XP product key. Back up your files. Since you'll be reinstalling the operating system, there's a good chance...
Table of Contents
Part 1 of 3:
Preparing to Reinstall
-
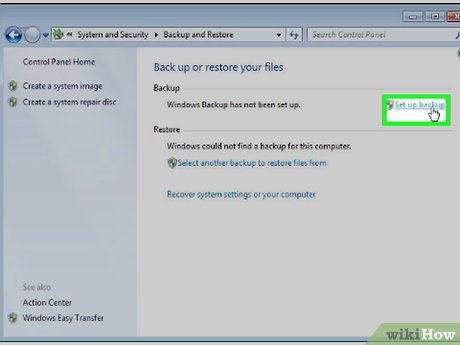 Back up your files. Since you'll be reinstalling the operating system, there's a good chance that you'll lose your saved files in the process. Creating a backup file will ensure that you can restore the files at any time.
- After backing up your files, you'll need to move the backup file to an external location (e.g., a disc or a flash drive).
-
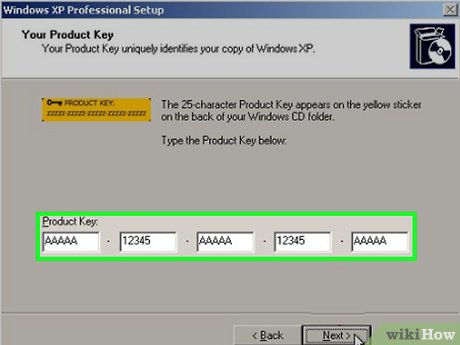 Find your product key. The product key is a 25-character code. It's usually located on a sticker that's on the bottom of the computer (laptops), the back of the CPU tower (desktops), or inside of the Windows XP box.
- If you can't find your product key sticker, you can try using ProduKey to retrieve your computer's product key.
-
 Click Start. It's a green button in the bottom-left corner of the screen.
 -
 Click My Computer. This monitor-shaped option is in the upper-right side of the Start window. Doing so will open the My Computer folder.
 -
 Enable viewing for hidden files and folders. To do so:[1]
- Click the Tools tab in the top-left side of the window.
- Click Folder Options... in the drop-down menu.
- Click the View tab.
- Check the "Show hidden files and folders" circle.
- Click Apply, then click OK
-
 Double-click Local Disk. It's below the "Hard Disk Drives" heading in the middle of the My Computer folder.
- If there are multiple Local Disk options, make sure that you double-click the (C:) drive.
-
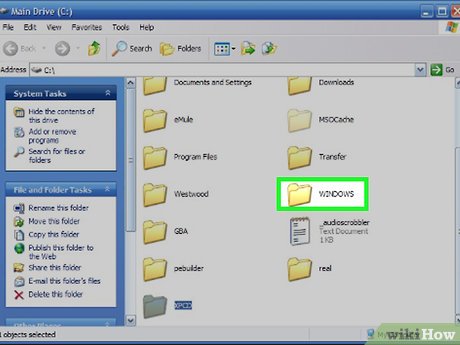 Double-click the Windows folder. This will open the Windows folder.
 -
 Double-click the i386 folder. You may have to scroll down to find this option.
 -
 Find the "winnt32.exe" file and double-click it. Doing so will launch the Windows XP setup process.
 -
 Wait for the setup window to appear. Depending on how fast your computer is and which programs were open when you double-clicked winnt32.exe, this may take several minutes. Once the setup window appears, you may proceed with reinstalling Windows XP.
Part 2 of 3:
Formatting Your Computer
-
 Press ↵ Enter on the blue screen. This will initiate the setup.[2]
 -
 Press the "I agree" key. At the bottom of the screen, you'll see a key (e.g., F8) to the left of the phrase "I agree"; press this key to agree to Microsoft's terms of use and continue the reinstallation.
 -
 Press the "Don't Repair" key. You'll see this listed at the bottom of the screen. The "Don't Repair" key is usually Esc.
 -
 Delete your current XP installation. Select the NTFS hard drive option using the arrow keys, then press the "Delete" key (usually D) that's listed at the bottom of the screen.
 -
 Press ↵ Enter when prompted. This will indicate to Windows that you want to delete the selected installation.
 -
 Press L when prompted. Doing so erases the hard drive and returns you to the installation menu.
 -
 Select Unpartitioned space and press ↵ Enter. This will select your computer's hard drive as the installation point.
 -
 Format your computer's hard drive. Select Format the partition using the NTFS file system and press ↵ Enter. Doing so will set up the hard drive for a Windows installation. This process will take several minutes to an hour depending on your hard drive's size.
- You can select the Quick option here as well, though your hard drive might be improperly formatted if you do so.
-
 Wait for your computer to restart. After the computer finishes formatting, it will restart into the user options setup window. Make sure that you don't press any keys until you arrive at the user options setup window.
Part 3 of 3:
Setting up Windows XP
-
 Click Next. It's in the bottom-right corner of the window.
- You can also click Customize... to the right of the Regional and Language Options section to select a different region and/or language.
-
 Enter your name, then click Next. Your name goes in the "Name" text field.
- You can also add a business name in the "Organization" section.
-
 Enter your product key, then click Next. Type the 25-character key that you retrieved earlier into the "Product Key" boxes.
 -
 Add a password, then click Next. Type your preferred password into the "Administrator password" and "Confirm password" text fields at the bottom of the window.
- You can also change your computer's name in the text field at the top of the window.
-
 Set a date and time zone, then click Next. Click the "Date" drop-down box, select the current date, and then repeat with the "Time" and "Time Zone" boxes.
 -
 Check the "Typical Settings" box, then click Next. This will cause Windows XP to install using default settings.
 -
 Check the "No" box. It's at the top of the window. If your computer is part of a workgroup, you'll instead check the "Yes" box and enter your workgroup's address in the text box.
 -
 Click Next. This will complete the installation setup process, at which point Windows XP will resume installing. You may have to wait for 30 minutes or so before the installation finishes.
Was this article helpful?
Your feedback helps us improve.
Related Articles
 Download Ghost win xp, win 7, 8, 10 32 and 64bit Link Google Drive2 minutes read
 Instructions for reinstalling Windows 8.1 on the Surface Pro tablet4 minutes read
 How to Reinstall Windows 7 without using a disc9 minutes read
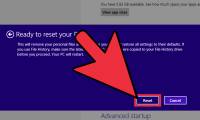
 Should you use Cloud Download or Local Reinstall when resetting Windows?4 minutes read
 How to Reinstall Windows 8 Without a CD2 minutes read
 4 reasons why you want to reinstall macOS8 minutes read
Reader Comments 0
Sign in with email or Google to join the discussion.