How to Make a Jeopardy Game on PowerPoint
This wikiHow teaches you how to create a working Jeopardy-style game using Microsoft PowerPoint. You can do this on both Windows and Mac versions of PowerPoint. Open PowerPoint. Its app icon resembles a white 'P' on an orange background.
Table of Contents
Part 1 of 3:
Creating the Categories Slide
-
 Open PowerPoint. Its app icon resembles a white "P" on an orange background.
 -
 Click Blank Presentation. It's in the upper-left side of the PowerPoint window. Doing so opens a new, blank presentation.
 -
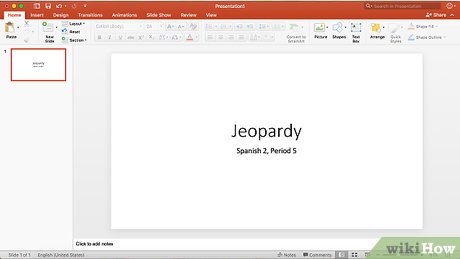 Enter your jeopardy game's name. In the "Click to add title" box, type in the name of the game (e.g., "Jeopardy"). You can also enter information about the game in the text box below the title box if you like.
- For example, if you're creating this game for a class, you might enter the class' designation and period (e.g., "Spanish 2, Period 5").
-
 Create a new slide. Click the Insert tab at the top of the PowerPoint window, then click the white New Slide square that's on the far-left side of the Insert toolbar. Doing so will create a new slide and open it for you.
- On a Mac, you can also click Insert at the top of the screen and then click New Slide in the resulting drop-down menu.
-
 Click the Insert tab. It's near the top of the PowerPoint window.
- Make sure that you don't click the grey Insert menu item at the top of the Mac's screen.
-
 Click Table. You'll find this option in the far-left side of the Insert toolbar. A drop-down menu will appear.
 -
 Create a six-by-six table. In the drop-down menu, position your mouse on a square that is six blocks over and six blocks down, then click the square.
 -
 Resize your table. Click and drag the grey sphere at the top of the table up to the top of the slide, then drag the grey sphere that's at the bottom of the table down to the bottom of the slide. The table should now take up the whole slide.
 -
 Enter the categories. For each cell in the top row of the table, type in a category's name.
- For example, you might type "Types of Dog" into the top-left cell, "Types of Vegetable" into the next cell over, and so on.
- Press the Tab ↹ key after entering in a category name to skip into the next cell over.
-
 Enter the points. For each category's column, you'll type in the following point values:
- First question - 200
- Second question - 400
- Third question - 600
- Fourth question - 800
- Fifth question - 1000
-
 Center the table's contents. Click the table, press Ctrl+A (Windows) or ⌘ Command+A (Mac) to highlight the entire table, and press Ctrl+E (Windows) or ⌘ Command+E (Mac) to center everything in your table. Now that you have your "categories" slide set up, you can proceed to creating the clues for each question.
Part 2 of 3:
Creating the Clues
-
 Create 30 new slides. Simply click the New Slide button 30 times to do this.
- Alternatively, you can press Ctrl+M (Windows) or ⌘ Command+M (Mac).
-
 Enter each question's clue. Select a slide in the left-hand column of slides, then click the text field in the middle of the slide and type in the clue for the question.
- You can center the clue by selecting it and then pressing Ctrl+E (Windows) or ⌘ Command+E (Mac).
- It's best to do this in order (e.g., in the first blank slide after the "categories" slide, enter the clue for the first category's first question) so that you don't get confused later.
-
 Select the "categories" slide. It's in the column of slide previews on the far-left side of the PowerPoint window, though you'll likely have to scroll up to find it. Doing so will re-open the "categories" slide.
 -
 Highlight the first category's first question's points. Click and drag your mouse across the "200" text in the table's far-left column to do so.
 -
 Click Insert. This option is near the top of the PowerPoint window.
- If you're on a Mac, make sure that you click Insert near the top of the PowerPoint window, not Insert in the menu bar.
-
 Click Link. It's in the Insert toolbar. A pop-up window will appear.
- On a Mac, you'll click Hyperlink instead.
-
 Click Place in This Document. It's a tab on the left side of the pop-up window.
- On a Mac, click This Document at the top of the pop-up window.
-
 Select the question's clue slide. Click the text for the clue that belongs to the first question in the first category.
 -
 Click OK. It's in the bottom-right corner of the pop-up window. Doing so will create a link from the "200" text to the clue; when you click the "200" text, you'll be taken to the clue's slide.
 -
 Go to the clue slide. Hold down Ctrl (or ⌘ Command on a Mac) while clicking 200 to do so.
- Alternatively, you can find the correct clue slide in the left-hand sidebar and click it.
-
 Create a link from the clue slide back to the "categories" slide. To do this, select the clue slide's text, then click Link or Hyperlink in the toolbar and select the "categories" slide.
 -
 Create links for the other clues. Once you've linked every clue back to the "categories" slide, you have a functional Jeopardy game! If you'd like the full Jeopardy experience, however, you can can proceed with making the final two rounds of slides.
- If you want to create a double-jeopardy slide, you can make a new slide, label it as "DOUBLE JEOPARDY", link it to one of the point values on the "categories" slide, and then place a link from the "DOUBLE JEOPARDY" slide to the pertinent question.
Part 3 of 3:
Creating Additional Rounds
-
 Create a new six-by-seven "categories" slide. The seventh row in the table will be for the "FINAL JEOPARDY" button.
- When making this slide's point values, remember to double the points (e.g., start with 400 points instead of 200, end on 2000 points instead of 1000, etc.).
-
 Select the bottom row of the table. Click and drag your mouse across the bottom row to do so.
 -
 Click the Layout tab. It's near the top of the PowerPoint window. This will open the Layout toolbar.
 -
 Click Merge Cells. This is an option in the Layout toolbar. Doing so will create one large row at the bottom of the table.
 -
 Create the "FINAL JEOPARDY" button. Type FINAL JEOPARDY into the bottom row.
 -
 Center everything in the table. Press either Ctrl+A (Windows) or ⌘ Command+A (Mac), then press Ctrl+E or ⌘ Command+E.
 -
 Create and link 30 more clue slides. You'll do this using the method from the previous section.
- Remember, the clues should be significantly harder for this round than they were in the last round.
-
 Create and link the "Final Jeopardy" slide. Create one last new slide, then enter the final jeopardy question and link it back to the "FINAL JEOPARDY" text at the bottom of the second "categories" slide.
 -
 Save your project. To do so:
- Windows - Click File, click Save As, double-click This PC, click a save location on the left side of the window, type the document's name (e.g., "Jeopardy Game") into the "File name" text box, and click Save.
- Mac - Click File, click Save As..., enter the document's name (e.g., "Jeopardy Game") in the "Save As" field, select a save location by clicking the "Where" box and clicking a folder, and click Save.
Was this article helpful?
Your feedback helps us improve.
Related Articles
 How to Create a Jeopardy Game in Google Slides9 minutes read
 How to make an apple picking game on PowerPoint6 minutes read
 How to create a guessing game on PowerPoint8 minutes read
 PowerPoint 2019 (Part 11): Presenting Slideshows7 minutes read
 10 awesome PowerPoint templates make the presentation 'shine'8 minutes read
 PowerPoint 2019 (Part 16): Shapes5 minutes read
Reader Comments 0
Sign in with email or Google to join the discussion.