How to make a countdown timer in PowerPoint
You are looking for a way to make a countdown timer in Powerpoint to apply to your teaching presentation more vividly. So please follow the article below to learn how to make a countdown timer in Powerpoint.
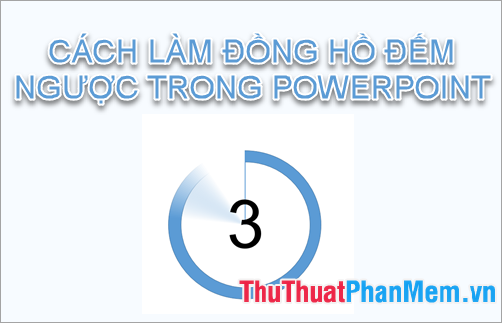
Here TipsMake.vn will show you how to make a countdown timer in PowerPoint, please refer.
Step 1 : Create the Start button .
Choose Insert -> Shapes, select the image you want to add as a Start button .

Next draw shapes on the slide then add and edit the word Start .

Step 2: Create two circles for rotation
Select Insert -> Shapes -> select the oval.

Hold Shift to draw a circle, as small as you like.

Next copy the circle by holding down Ctrl and holding down the left mouse button and dragging the mouse cursor, so you will get 2 equal circles.
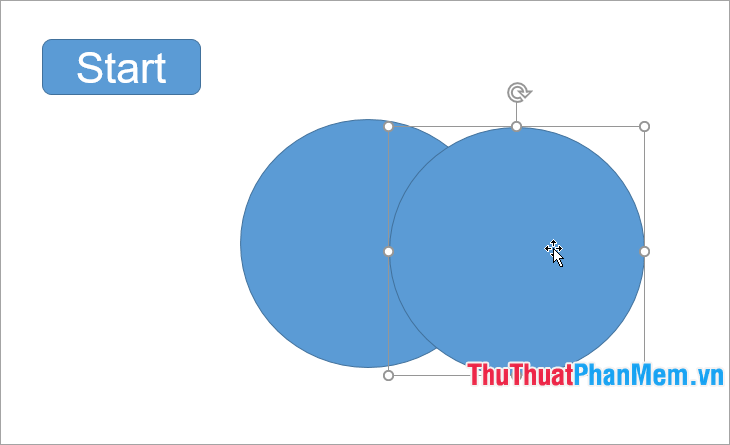
Minimize the second circle and drag inside the first circle, then choose Format and change the color for the second circle in Shape Fill.

Step 3 : Create a rotating effect for 2 circles.
Select two circles (hold down the Shift key to select multiple shapes), then select the Animations tab -> select the Wheel effect in the Entrance .

In the Animations tab, select Animation Pane to display Animation Pane on the right side of PowerPoint interface.

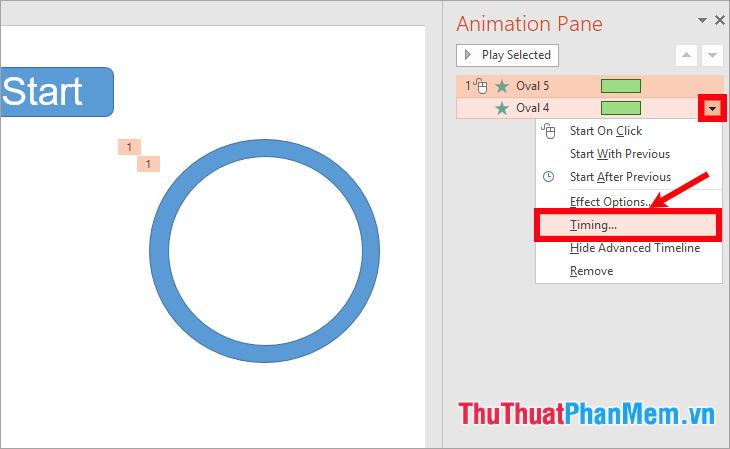
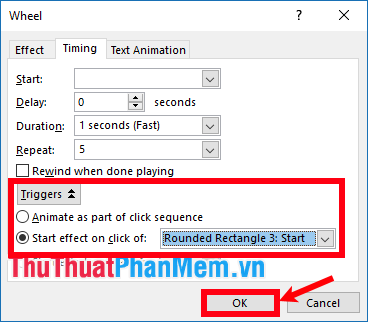
Since the countdown from 5 and the rotation is 1 second, you need to set the rotation to 5 times and the time is 1 second by selecting the two effects names in the Animation Pane section and selecting the black triangle icon and selecting Timing .
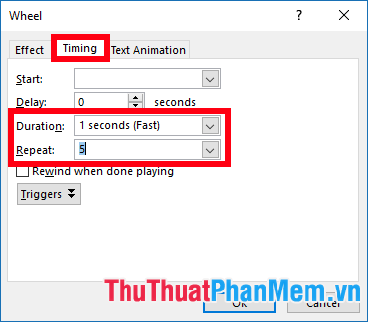
The effect name window appears, in the Timing tab you choose Duration is 1 seconds (Fast), Repeat is 5.
In addition, when you press the Start button , it will start to rotate so you need to set the Triggers by selecting Triggers and selecting the Start effect on click of is [ Start button name ]. After setup is complete you click OK .
Step 4: Insert the textbox
1. Add textbox number 5
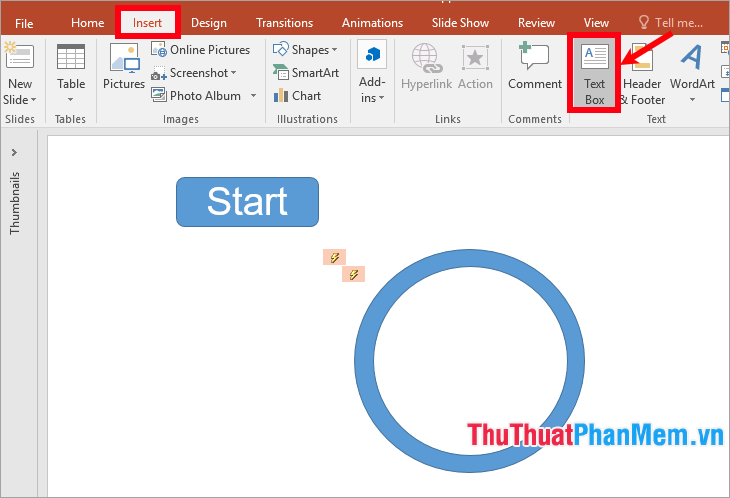
Select Insert -> Textbox.
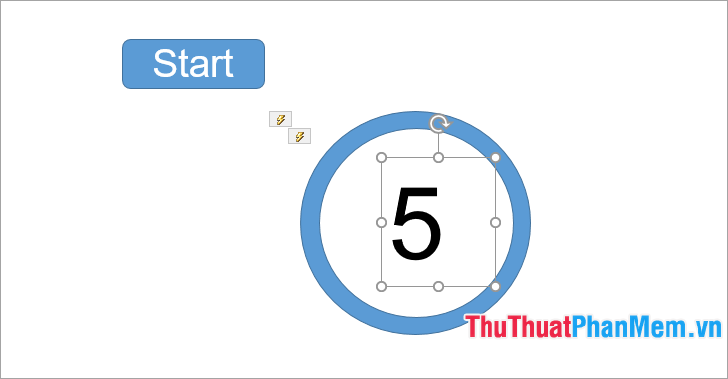
Then you insert the textbox enter the number 5 and edit the font size, text color arbitrary.
Display effect:
Choose No. 5, select Animations tab and select display effect number 5 in the Entrance section, for example choose Appear effect .

Thus, the display effect number 5 will appear on the right in the Animation Pane , you can set this effect by selecting the effect name in the Animation Pane section and editing in the Animations tab with Start: With Previous.
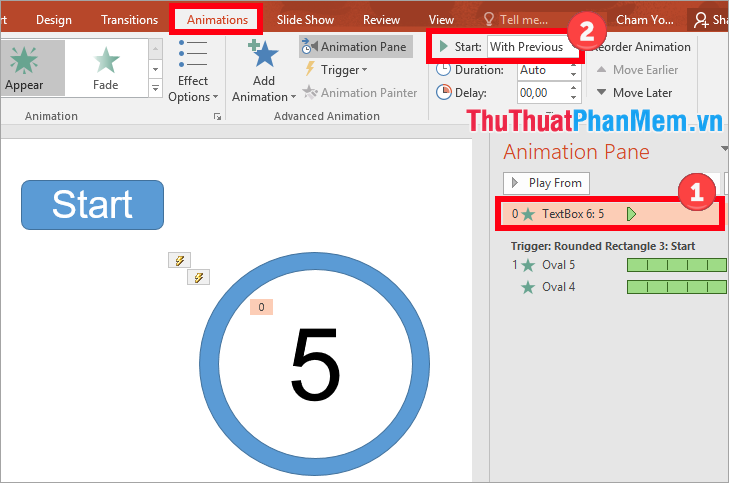
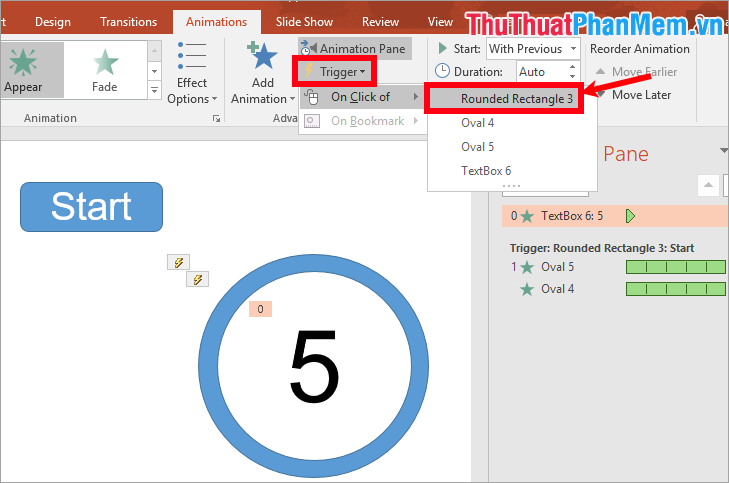
Next, assign Triggers by selecting Animations -> Trigger -> On click of -> Start button name.
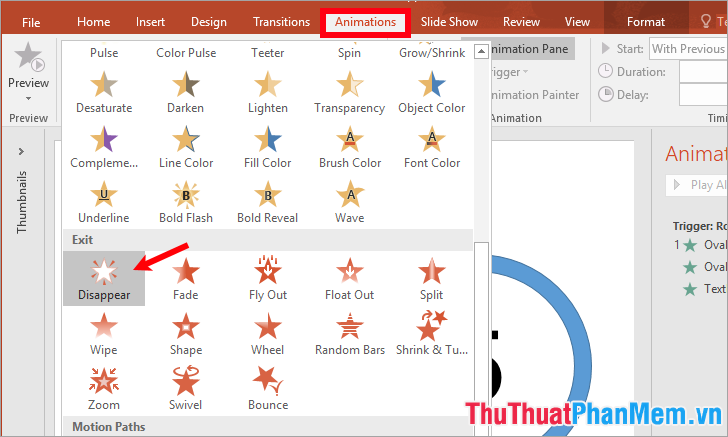
After clicking Start , the wheel displays the number 5 and so you will set the disappearance effect for the Start button by selecting the Start button -> Animations -> selecting the effect in Exit.
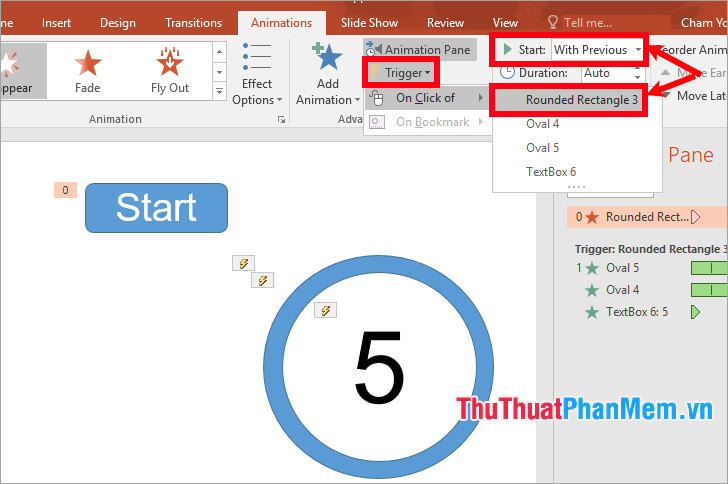
Select the effect name in the Animation Pane section , set it in the Animations Start With Previous tab , and assign the trigger by selecting Trigger -> On Click of -> the Start button name.
Next you create the disappearance effect of number 5 by selecting textbox number 5 and selecting Animations -> Add Animation -> select the Disappear effect in the Exit section .
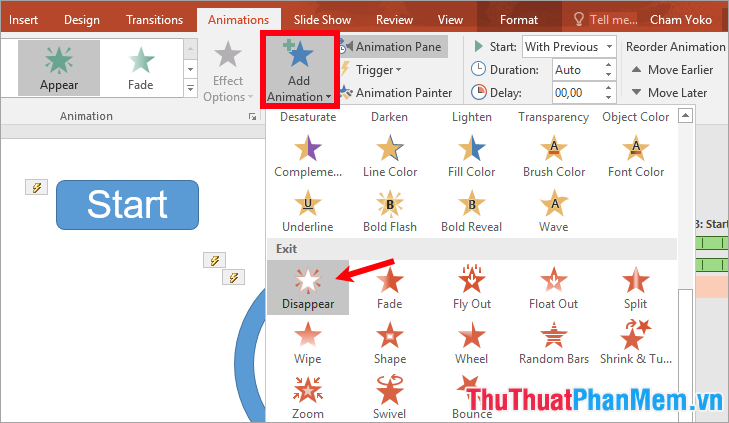
Select the name just added effects and set in the card animations , select Start is with Previous , because the number 5 appears after 1 second will disappear should you set Delay is 1 seconds.

Next, assign the trigger by selecting Trigger -> On click of -> Start button name.
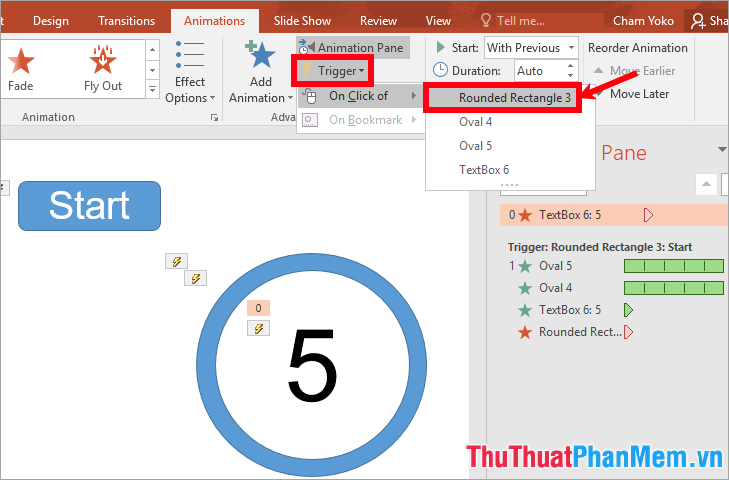
So when clicking Start , the rotation and the number 5 are displayed, when at the end of a second, the number 5 will disappear.
2. Add textbox number 4
Add the number 4 textbox similar to the textbox number 5, and you also set the effect for the textbox number 4 with Start with previous , assign Trigger as the Start button name , delay of the existing effect. With the disappearance effect of textbox 4 you also choose Start with previous , assign Trigger as the Start button name and delay of the disappear effect. But you can do it quickly by copying the textbox number 5 as follows:
Select number 5, press and hold Ctrl and left click and drag to copy.
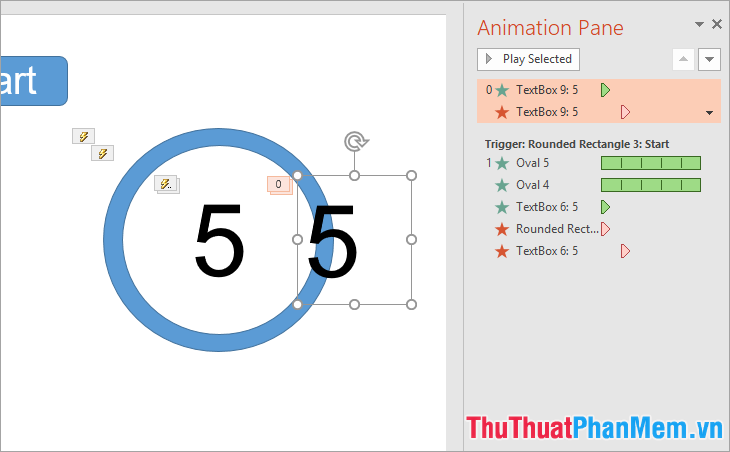
When copying, the effect appears and disappears will be copied, you edit the name to No. 4 then set the delay for the current effect and the disappearing effect. Because immediately after the number 5 disappears, the number 4 will appear, so the delay of the effect of number 4 is 1 second, you select the effect name of the textbox number 4 and enter the number 1 in the delay of the Animations card .

The number 4 appears after 1 second of the number 5 and appears 1 second will disappear, so the number 4 after 2 seconds from the start press will disappear. You select the disappearance effect name of the number 4 and select the Animations tab , enter the delay is 2.
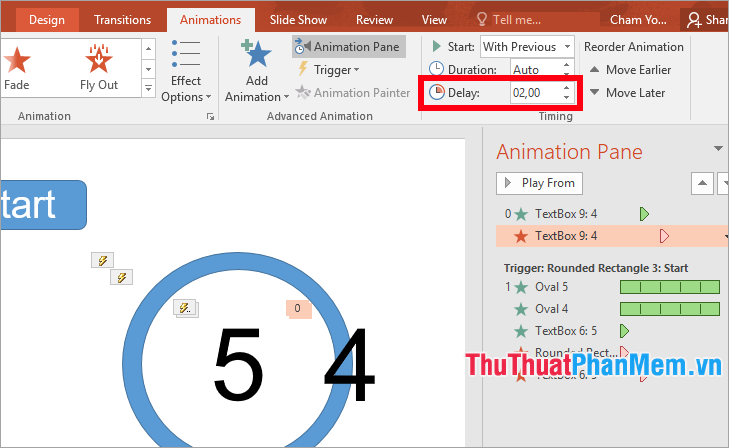
Select the names of the two effects of textbox number 4 and select Animations -> Trigger -> On click of -> the Start button name to assign triggers to the two effects of textbox number 4.

3. Add textbox 3, 2, 1
You do the same as adding textbox number 4, and set the effect for the textbox with Start with previous , assign Trigger as the Start button name , delay of the current effect of the textbox number 3, 2, 1 is 2 seconds, 3 seconds, 4 seconds.
With the disappearing effect, you also choose Start with previous and delay of the disappearing effect for textboxes 3, 2, 1 respectively 3 seconds, 4 seconds, 5 seconds. If you copy from another textbox, then you just need to fix the delay and assign the trigger to the name of the Start button of the two effects of that textbox.
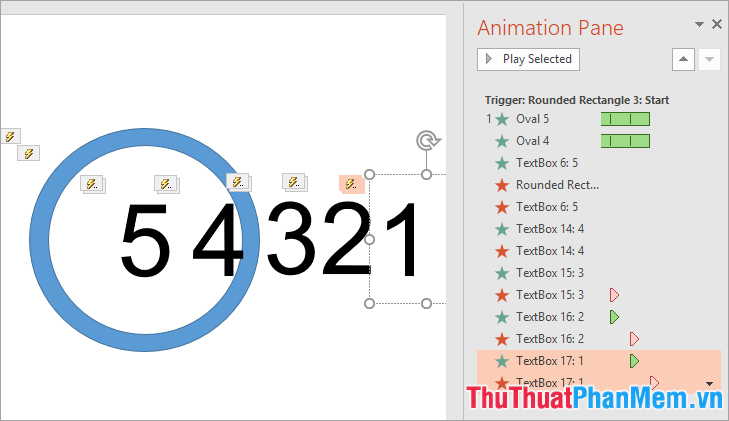
You can copy and add the number 0, select the black triangle icon next to the effect name disappears -> Remove to remove the effect.
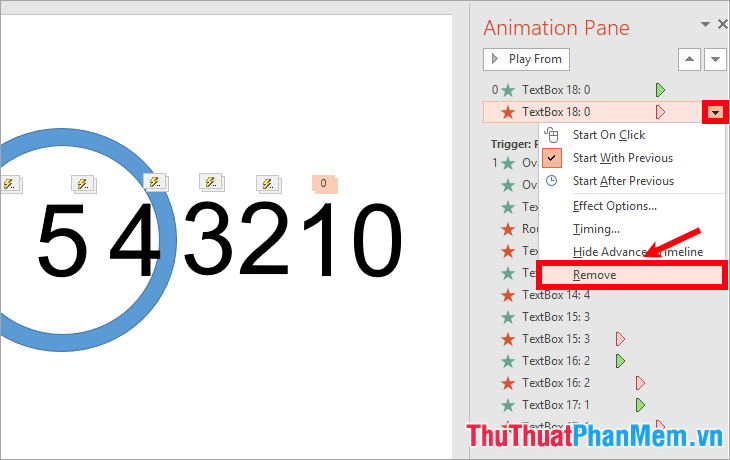
Next you set the effect for the number 0 with Start is With Previous , delay is 5 seconds and assign triggers -> On click of -> Start button name.

Step 5: Edit the position of components on the slide
After creating, select all the textboxes, then select Format -> Align -> Align Center.
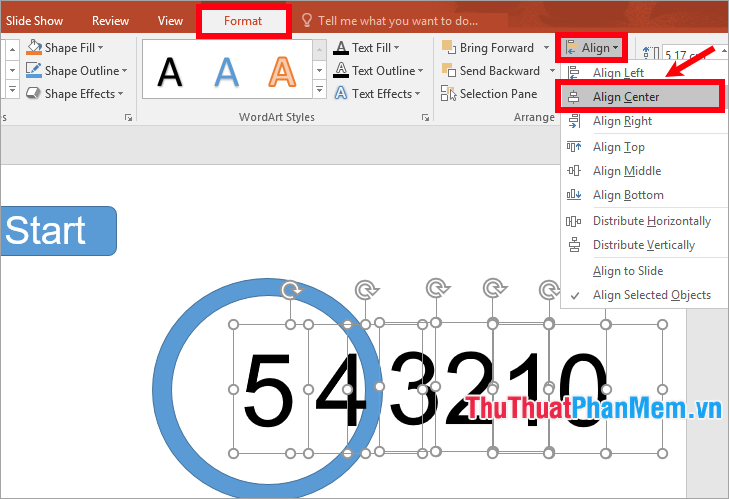
Then drag to the center of the circle, and drag the Start button to the middle of the circle.

So you've created the countdown timer, press F5 and see the results. You can download the countdown sample file here:
file-mau-how-to-do-ho-dem-power-in-powerpoint-TipsMake.vn.pptx
Above the article has guided you how to make a countdown timer in Powerpoint. Hope you will learn thoroughly and can create yourself a countdown timer in Powerpoint slide. Good luck!