Table of Contents
This updated guide explains how to Insert Images Into Word Documents through clear steps, practical examples, and important checks that help prevent common errors.
INSERT IMAGES AVAILABLE IN COMPUTERS
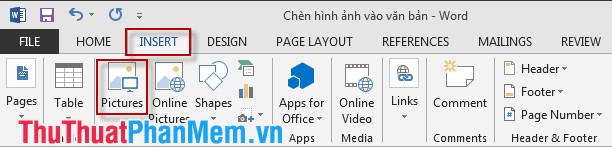
Step 1: Click Insert -> Picture .
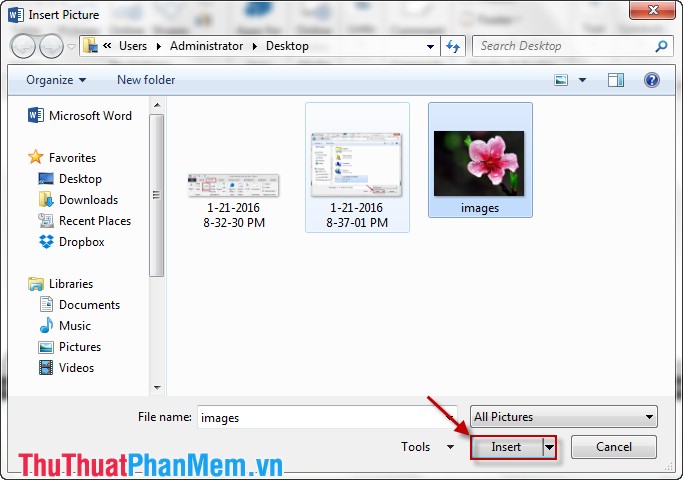
Step 2: The Insert Picture dialog box appears -> select the path to the image file to be inserted and then click Insert .
INSERT IMAGE ONLINE
Step 1: Select the Insert tab -> Online Pictures .

Step 2: The Insert Picture dialog box appears, enter the name of the image you may need to search and press Enter . After you've selected the image you click Insert .

EDIT THE PHOTO AFTER AVAILABLE
The operation is very simple is not it. However, after inserting, there are many images of size, position. that do not fit the requirements you can edit photos after inserting in the following ways:
1. Resize the Image File
- The image file size is too small or too large. You move to the edges or 4 corners of the image. When the mouse pointer changes to a 2-way arrow, drag in the direction you may need to change. Note that when the image is too small you may need to zoom in, so you zoom in both directions so the image is not distorted, hold down the Shift key and drag at a certain corner of the image.

- If you want the image to be the correct height and width by selecting the Format tab to resize:

2. Create Effects for Photos
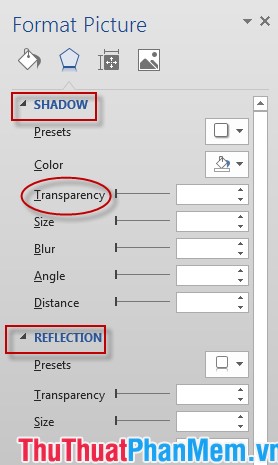
- If you know how to use a combination of effects for your photos, it's great. Right-click the image and select Format Picture. There are many effects for you to choose: Shadow, 3- D Format. I for example effects in SHADOW . You can change the brightness of your photos using Transpancy. Application 3-D FORMAT useful for you to advertise on furniture.
3. How to Display Photos
- There are many ways you can promote your product. You can take that image as a background or combine with the text to win customer trust. You can use your product image as a background for the text that you may need to present.
+ Right click the image and select Wrap Text -> Behind Text .
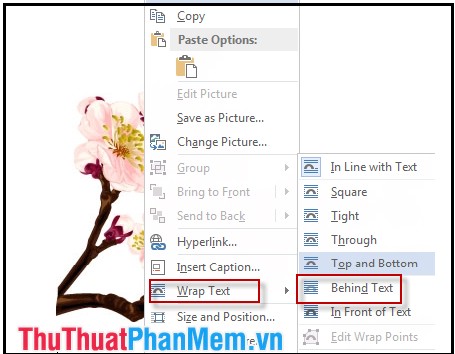
+ Results after choosing Behind Text :
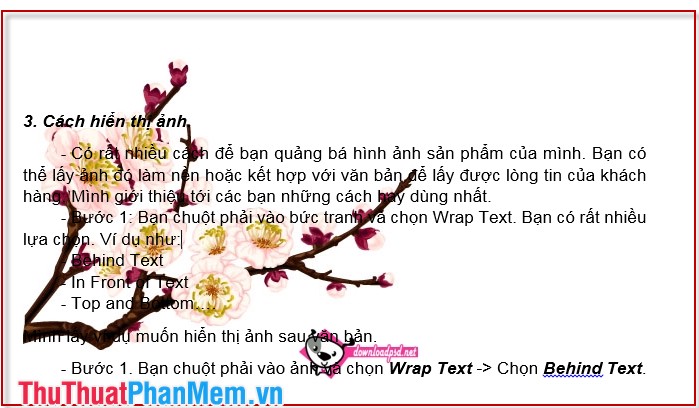
- There are also many ways to coordinate such as In Front Of Text , In Line With Text .
FAQ
What is the easiest way to Insert Images Into Word Documents?
Start with the requirements in this guide, then follow each step in order. Check the result after every major change so problems are easier to identify.
Can beginners follow these instructions?
Yes. The process is organized into practical steps, and you can repeat any step before moving forward.
What should I check if the method does not work?
Confirm your software or device version, permissions, settings, file format, and internet connection when the task depends on online services.
Related Articles
 How to Insert Pictures into Word, Edit Size and Format9 minutes read
 How to Rotate Images in Word3 minutes read
 Insert Images into Text Content: Add Photos to Word10 minutes read
 How to Save Images on the Web Into Word Documents3 minutes read
 Insert Images into Word 2016 and Align Images in Word 20166 minutes read
 How to Fix the Error Does Not Print Images in Word4 minutes read
Reader Comments 0
Sign in with email or Google to join the discussion.