Insert images into text content
TipsMake.com guides you to insert images into text content on Word 2000, 2003. The newer versions are not much different, you can apply the same operation to add images to Word.
TipsMake.com guides you to insert images into text content on Word 2000, 2003. The newer versions are not much different, you can apply the same operation to add images to Word.
-
Insert images into text content (Office 2003)
-
Download photos from the Office suite on Microsoft website to your computer.
-
Photo by shooting a computer screen
-
Insert images from an existing image file on your computer
-
Insert pictures into text content (Office 2000)
-
Align photos in Word
Insert images into text content (Office 2003)
1. Go to Insert Picture Clip Art .
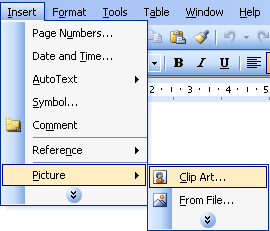
2. On the screen the Clip Art panel appears on the right, you can search for images using the Search boxes. Or find photos at:
- Organize clips .: Open Favorites window - Microsoft Clip Organize: Use the existing image structure in Office and in the computer. (Please select this section)
- Clip art on Office Online: Open the photo section of the Office suite on Microsoft website with the condition that the computer is connected to the Internet, at http://r.office.microsoft.com/r/hlidClipArtFromClient/EC790014051033/6 . This section to Download photos from the Office suite on Microsoft website to the computer.

3. Insert images: Use existing image structures in Office and in computers - Favorites window - Microsoft Clip Organize:
* In the Add clip to Organizer dialog box: Add new to the image structure.
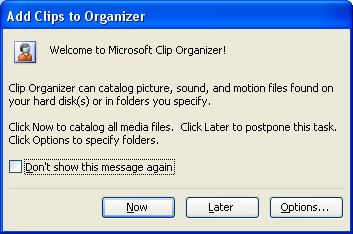
You can add images, audio files, and movies to your hard drive or folder.
- Button Now: Add now
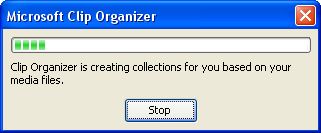
Clip Organizer is aggregating all image data files
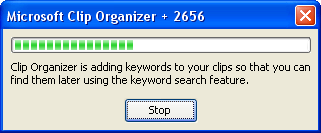
Clip Organizer has added keywords to these so that you can search for them the next time using search keywords.
- Later button: Add later
- Options button . Wait for the disk to scan for a moment
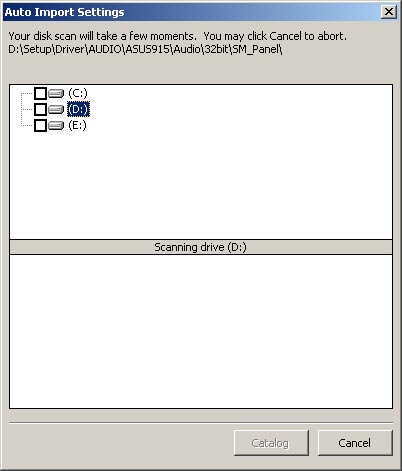
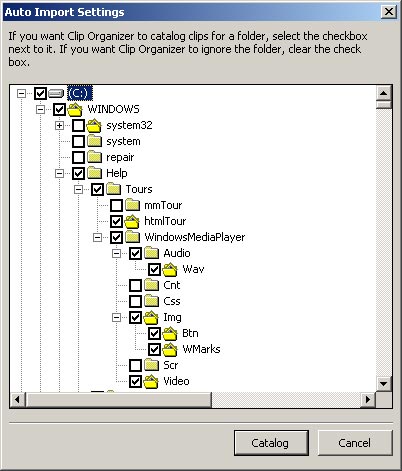
Display the computer photo folders into catalogs
* At Microsoft Clip Organizer window:
After adding on the list My collections in the Collection list area will display the entire folder of images found in your computer:
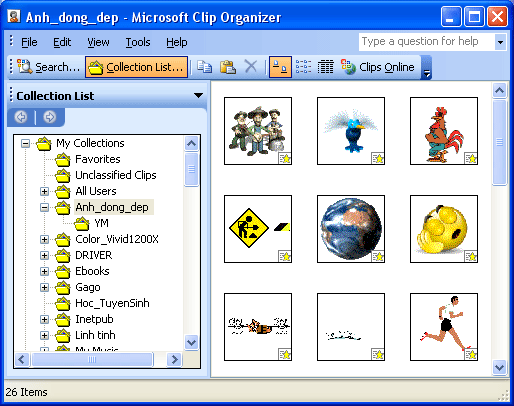
- Find photos you want to insert in Collection List: List the list of folders containing photos of:
- My collections: Summarizes the entire folder of images found in the computer.
- Office collections: The list of images available in the Office suite.
- Web collections: Photo catalogs from websites
When you click on any folder, the entire image in that folder will display the right area. Move the mouse over each image to see the image name, image size and image format.
- Click on the scroll bar on each image or right click on the image to bring up the image processing menu:
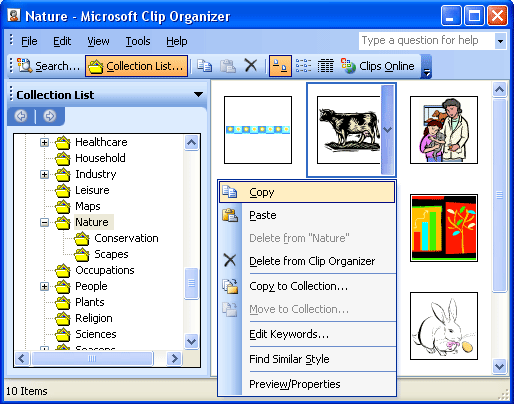
- Copy: Copy photos.Copy the image and go to the MS Word screen. Select Paste to insert the image into the text file content.
- Paste: Paste photos.
- Delete from '': Delete the image folder.
- Delete from Clip Organizer: Delete all photos in the folder.
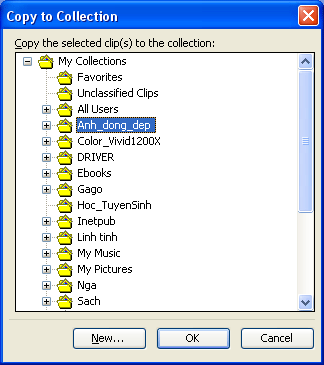
- Copy to Collection .: Copy pictures from photo folders:
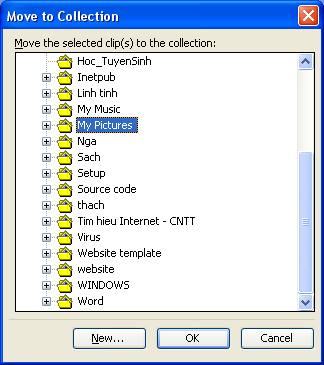
- Move to Collection .: Move images between image folders
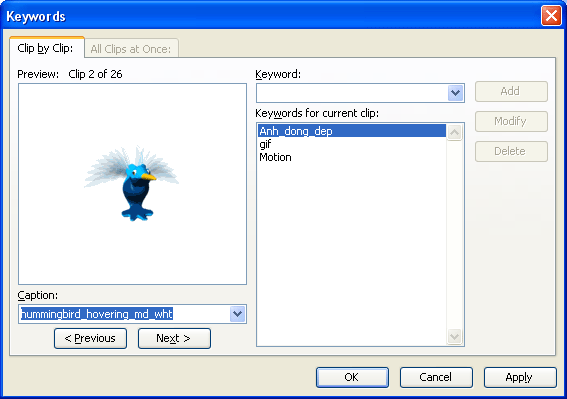
- Edit keywords .: Change, add photos properties.
- Find Similar Style: Search for similar image styles
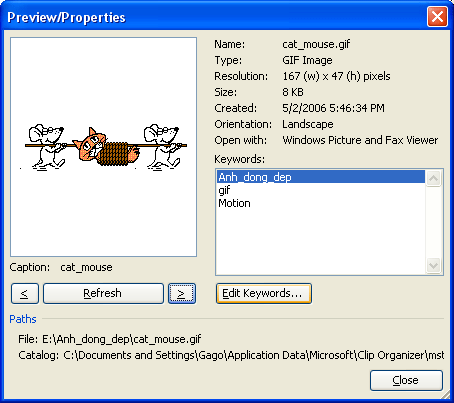
- Preview / Properties: View image properties
Download photos from the Office suite on Microsoft website to your computer:
1 . In the Internet window displays the image structure of the Office online, select the image subject according to the Optional image:
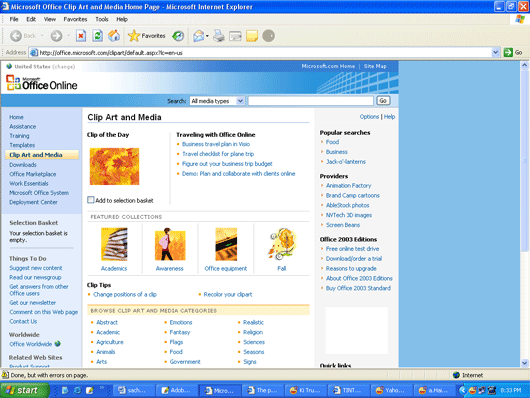
2 . At the window that displays the list of photos by topic:
- Click on the image drop-down menu to display the menu:
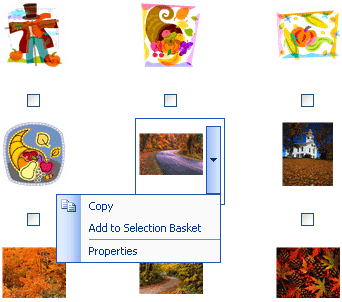
- Copy: Copy photos.
- Add to Selection Basket: Add to photo selection list.
- Properties: View image properties.
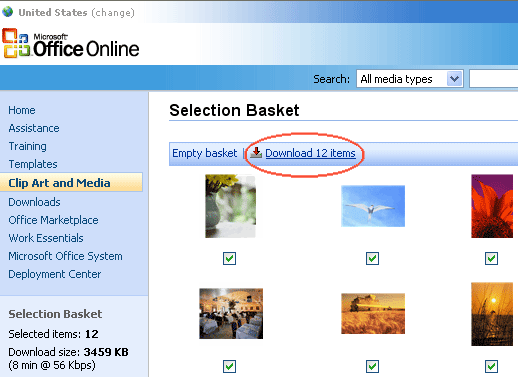
- Click on the image to open the popup showing details of the image attribute:

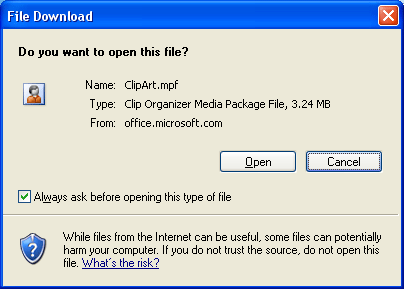
- Click R under each image to select and download it to your computer.
3 . Click on the Download link to start downloading photos:
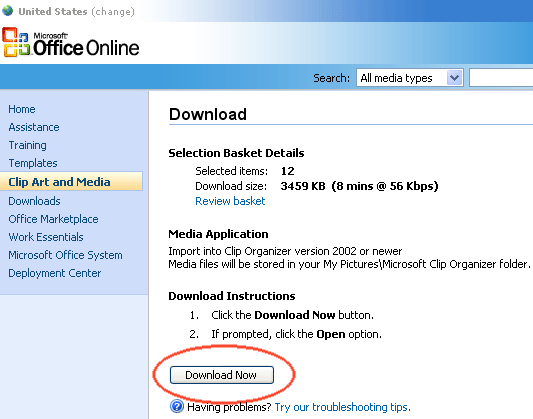
4 . Click the Open button on the File Download dialog box to save the image.
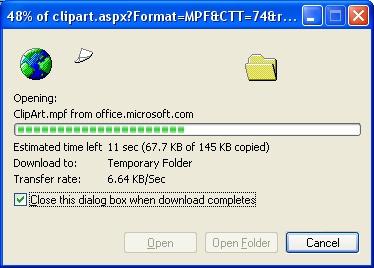
5 . After the download is completed, the Downloaded Clips window will display the downloaded images to the computer and those images will be saved in the Downloaded Clips folder.
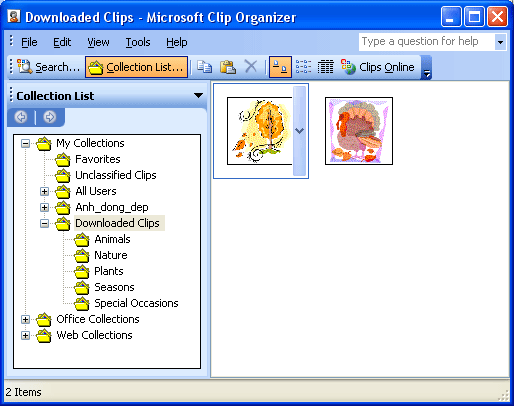
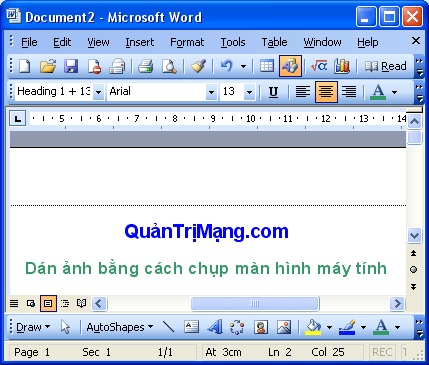
Photo by shooting a computer screen
In case you want to paste computer screen image into word document:
1 . Open the computer screen you want to capture
2 . Press Print Screen key, if you just take a picture of a dialog box, use Alt + Print Screen combination
3 . Paste into Word content: Use Ctrl + V shortcut or use Paste tools to paste.
Insert images from an existing image file on your computer
1 . Go to Insert / Picture / From file .
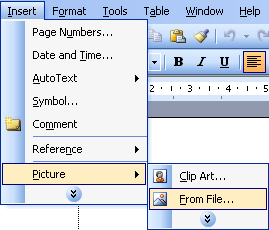
2 . Insert Piture dialog box appears:
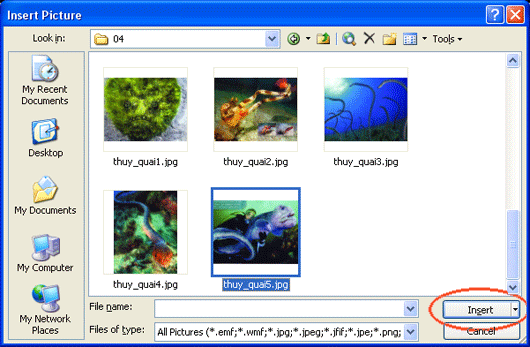
- Select the path containing images and photos.
- Click on the image & select the Insert button (or double click on the image) to insert the image into the word content.
3 . The result on the MS word screen will display the newly inserted image.
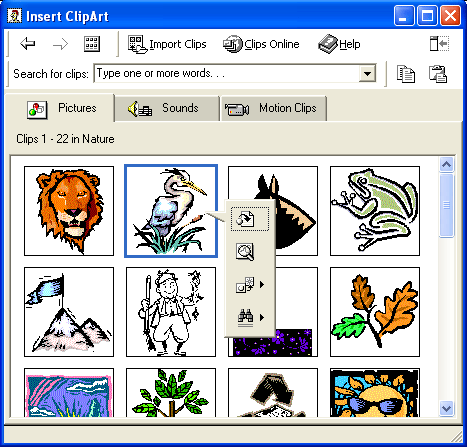
Insert pictures into text content (Office 2000)
1 . Go to Insert / Picture / Clip Art .
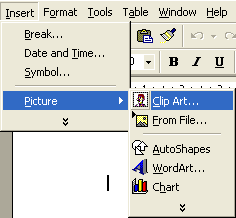
2 . The Insert ClipArt dialog box appears, Click on the image topic and select an image:
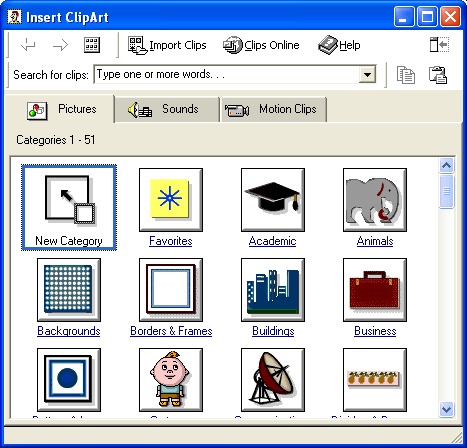
3 . Click on the image or right click to bring up the menu and insert images:
-
 Insert clipArt: Insert image
 -
 Preview clip: Open the popup to view the image
 -
 Add clip to favorites . Add it to another folder containing images
 -
 Find similar clip: Search for similar images.
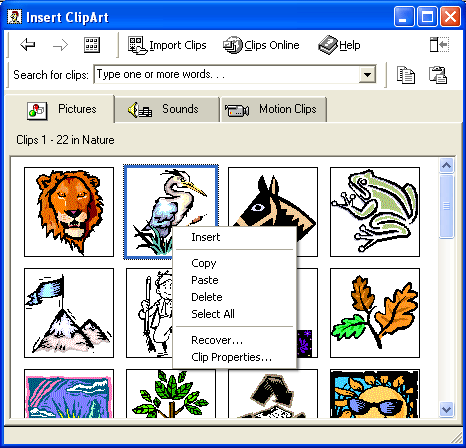
- Insert clipArt: Insert image
- Copy: Copy photos
- Paste: Paste photos
- Delete: Delete the image
- Select All: Select all images
- Recover . Restore photos
- Clip Properties: View image properties
Align photos in Word
After you have inserted the image into the MS Word text content, you still need to align the image to fit the eye (see example below):
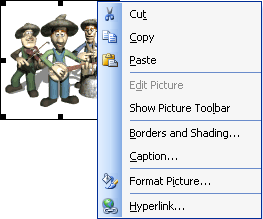
1. Right-click the image to bring up the image processing menu:
- Cut: Cut photos
- Copy: Copy photos
- Paste: Paste photos
- Edit Picture: Photo fix
- Show / Hide Picture Toolbar: Show / hide the image processing toolbar.
- Borders and Shading . Image borders

- Caption . Set the image title (Figure)
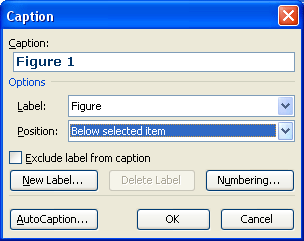
- Caption: Image title name
- Label: Selection of labels (Figure, Equation, Table)
- Position: Position the image evenly (Above or below the image)
- New Label: Create new labels
- Numbering: Set the serial number along with the image title
- AutoCaption .: Create labels automatically
- Format Picture . Some image formats
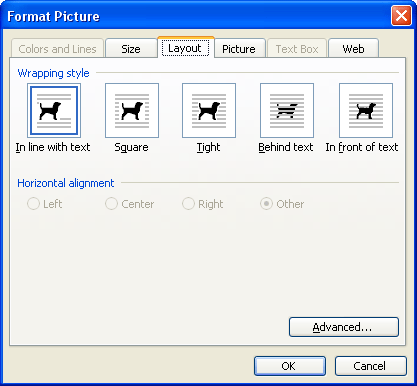
- Clors and Lines: Color and border of the image
- Size: Image size
- Layout: How to place photos. Please note there are some cases when inserting images, photos can move in any position, insert images on words or images are leaped, then use this Layout card to reset images.
- Picture: Some photo features.
- Text Box: This tag will be used when you use the Draw toolbar to draw diagrams in MS Word.
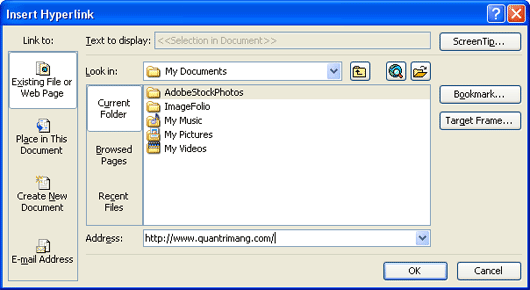
- Hyperlink: Set links for photos
2. Processing photos with the toolbar

-
 Insert another image
 -
 Image color: Automatic (default image color), Grayscalse (gray), Black and White (black and white), Washout (image blur).
 -
 Increase the default color for photos
 -
 Reduce the default color of photos
 -
 Increase brightness
 -
 Reduce brightness
 -
 Trim the border of the image
 -
 Turn photos in the same direction
 -
 Style of image envelope
 -
 Image compression (resolution - quality)
 -
 Set image style: Images can be inserted on text, inserted in addition to text, inserted as a character, .
 -
 Photo editing, photo effect
 -
 Set transparent mode for photos
 -
 Return to the default mode of the image.
If you are using Word 2016, or 2013, refer to the instructions for inserting this photo:
- Tutorial for Word 2016 (Part 16): Insert images and customize the location of photos
- Word 2013 Complete Guide (Part 15): Insert Images and Text Wrapping functions
Hope you are succesful.
Was this article helpful?
Your feedback helps us improve.
Related Articles
 How to insert text into images in PowerPoint3 minutes read
 How to insert images into Word documents3 minutes read
 How to insert images into Word 20074 minutes read
 Software to insert text into images4 minutes read
 How to insert images below the word on PowerPoint3 minutes read
 How to use the Insert key to insert copied text in Word?2 minutes read
Reader Comments 0
Sign in with email or Google to join the discussion.