How to fix the error of not seeing network adapter on Windows 10
It is frustrating when the Internet stopped working. Many people experience this problem because the network adapter (network adapter) disappears from Device Manager or receives a missing network adapter message.
There are many reasons for this problem, such as problems with recently installed software, malware getting into your computer, etc.
This article will guide you how to fix the lost network adapter driver problem on Windows 10.
Instructions for fixing network adapter lost errors
- 1. Restart the computer
- 2. Leave the laptop in sleep mode
- 3. Remove the power cable
- 4. Remove the battery
- 5. Troubleshoot network problems
- 6. Update network driver
- 7. Uninstall or revert to the previous network adapter driver version
- 8. Turn on the driver
- 9. Install the driver
- 10. Display hidden drivers in Device Manager
- 11. Check physical network node
- 12. Disable VPN and antivirus software
- 13. Reset network settings
1. Restart the computer
If there's a miraculous remedy in the tech world, then it's a reboot of the device. Rebooting the computer can fix many common problems. Try restarting your Windows 10 device to check if the adapter is back.
2. Leave the laptop in sleep mode
Some users report that leaving the laptop in sleep mode by closing the lid for a while can also solve the problem of not seeing the network adapter.

3. Remove the power cable
Another workaround is to not use the power source for a while. To do so, turn off the computer and remove the power cable, wait at least 10 seconds, then plug in the power cable and turn on the device.
4. Remove the battery
Removing the battery can force the laptop's motherboard to perform a soft reset of it, thus resolving any issues. If the computer supports a removable battery, turn it off, then remove the battery cover and remove the battery for a few seconds. Put it back on and power on the laptop. Hopefully the network adapter will return.
5. Troubleshoot network problems
Windows 10 provides a troubleshooter that can solve many problems. Follow the steps below to resolve network adapter issues.
- 20 useful troubleshooting tools for Windows 10
Step 1 . Open Settings from the Start menu or press Win + I
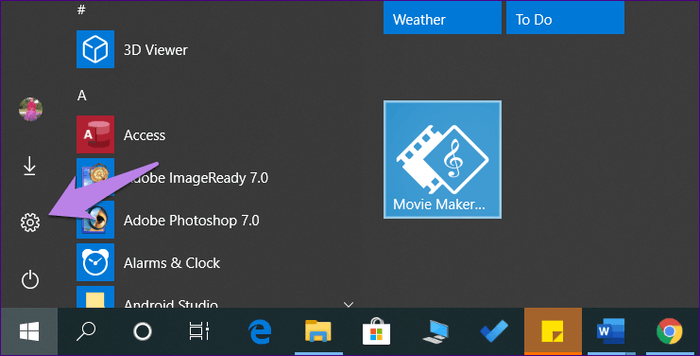
Step 2 . Click on Update & Security .

Step 3 . Select Troubleshoot from the left sidebar. Scroll down and click on Network Adapter> Run the troubleshooter on the right. Follow the onscreen instructions to begin the troubleshooting process.
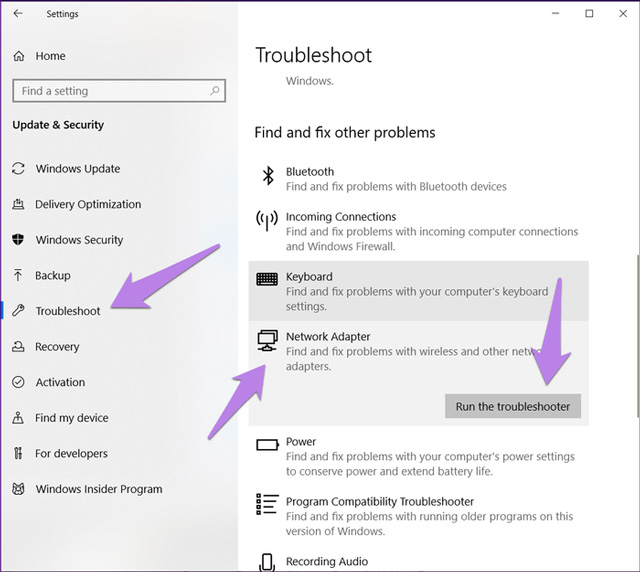
Tip: Type troubleshoot in Windows search to directly open the Troubleshoot screen.
6. Update network driver
If the network adapter is displayed in Device Manager, you can try upgrading it. Sometimes this is a problem with the driver version installed on the system. Therefore, the update may fix the problem of losing network adapters.
To upgrade, follow these steps:
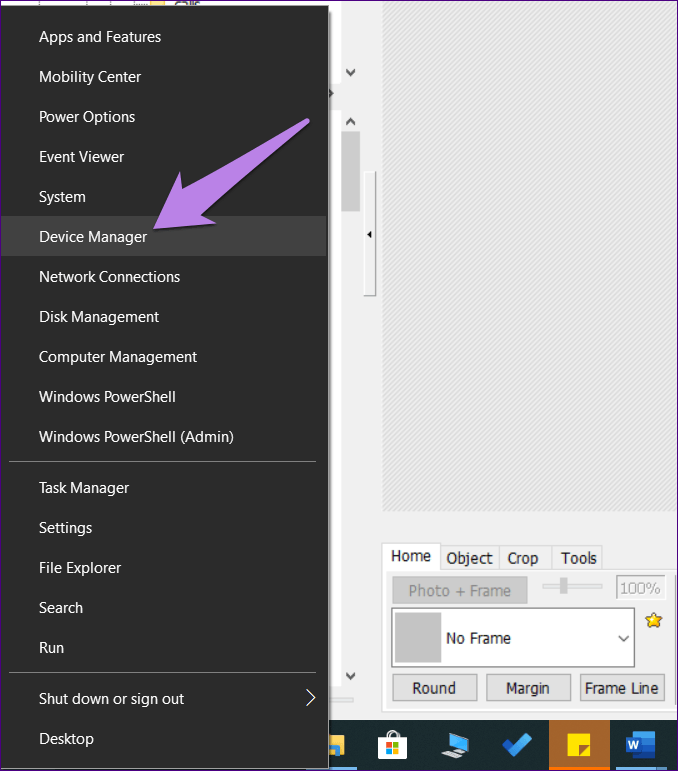
Step 1 . Right-click on the Start menu icon and select Device Manager . Alternatively, you can press Win + R , type devmgmt.msc and press Enter .
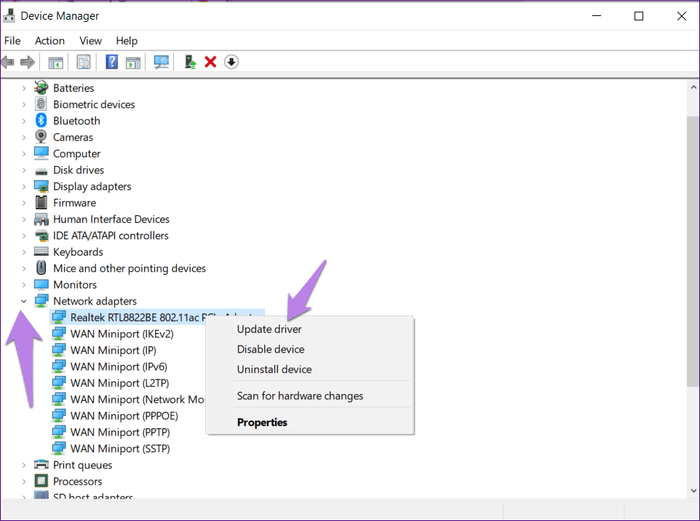
Step 2. Click the small down arrow next to Network adapters . Right-click on your network adapter. It is usually Realtek / Broadcom or from nearby wireless . Select Update driver . Complete the process and restart the computer.
7. Uninstall or revert to the previous network adapter driver version
If updating the driver does not solve the problem, revert to the previous version or uninstall it. If uninstalled, the system will install the driver automatically after reboot.
To uninstall, follow the driver update steps. However, after right-clicking on the driver, select Uninstall device .
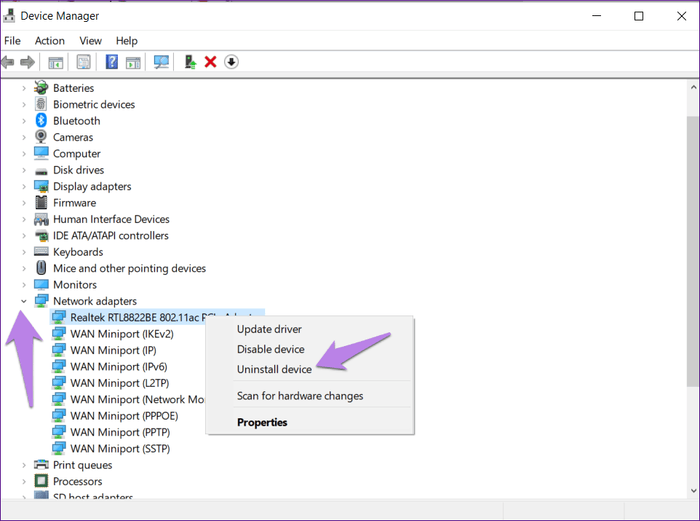
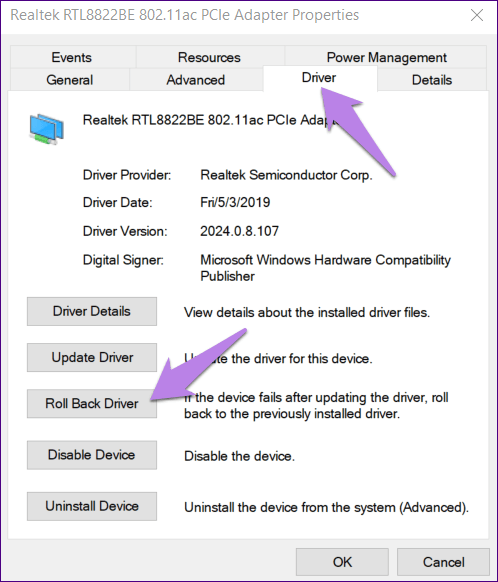
To return to the previous driver version, click Properties after right-clicking the driver. In Properties , access the Driver tab and click on Roll Back Driver , then reboot the system.
8. Turn on the driver
Sometimes drivers are disabled and that is why you cannot connect to the Internet. To fix this problem just turn on the driver.
Open Device Manager , then right-click the network driver under Network adapters and select Enable driver .
9. Install the driver
In case you don't see the driver in Network adapters, you need to find it in Other devices or Unknown devices . It will have a yellow icon next to it. Right-click the driver and select Update driver , then reboot the device.
10. Display hidden drivers in Device Manager
If the network adapter does not appear after trying the above, it may be hidden.
To make it appear, follow the steps below.
Step 1 . Open Device Manager by right-clicking the Start Menu icon.
Step 2 . In Device Manager, click the View option in the toolbar at the top and select Show hidden devices .
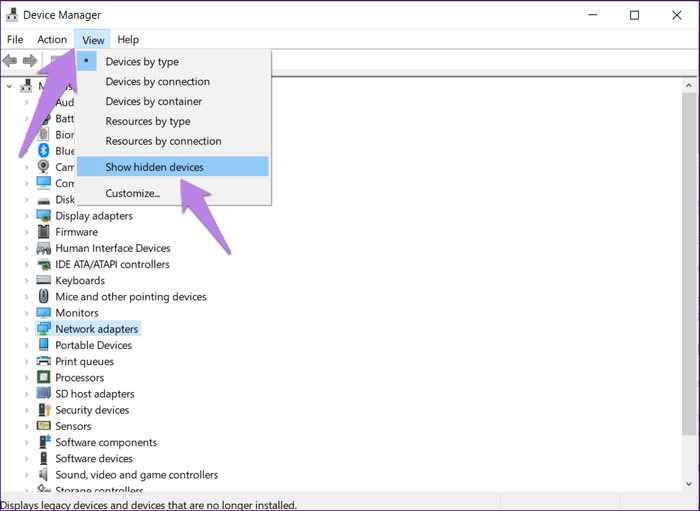
Step 3 . Click on the Action option and select Scan for hardware changes .

Step 4 . If the adapter appears in the list in Unknown devices, update it.
11. Check physical network node
Make sure to turn off airplane mode on the system. In addition, you should also check the physical button for Wifi, which is used to turn on Wifi.
12. Disable VPN and antivirus software
If using a VPN on your computer, try shutting it down or uninstalling it for a period of time, then restart your computer.
Similarly, disable antivirus software or check for updates. Then restart the computer if required.
13. Reset network settings
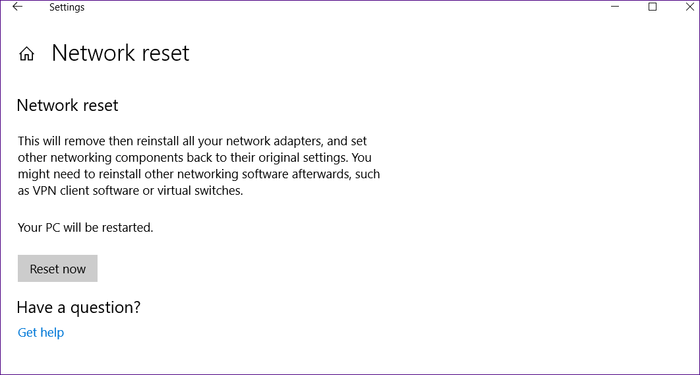
Finally, if none of the above works, reset network settings. This reverts all network settings to the default values.
To reset the network, follow these steps:
Step 1 . Open Settings on the computer.
Tip: Use the shortcut Win + I to open Settings.
Step 2 . Click on Network and Internet .
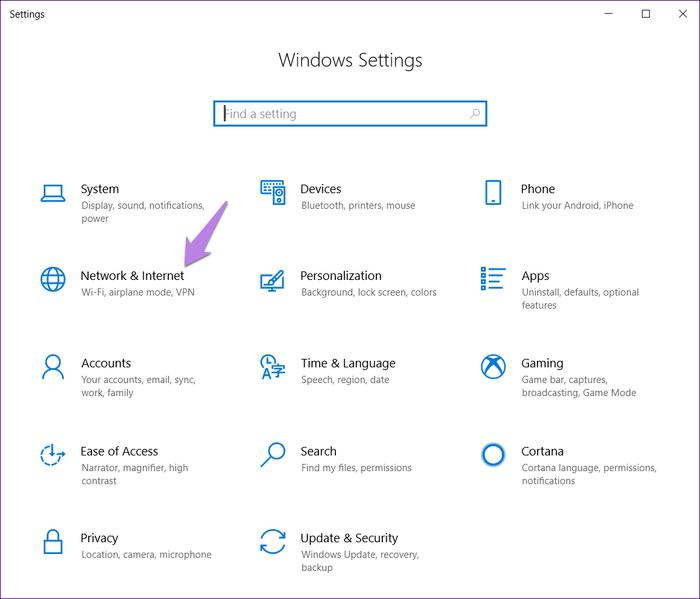
Step 3 . Scroll down on the Status screen and click on Network reset .

Step 4. Reconfirm the decision by clicking on Reset now .
Hopefully the above solutions will bring the network adapter back to your PC. In case you still don't see the network adapter, you should check for Windows updates. Sometimes network adapters are not compatible with the current version of Windows. To check for available updates, go to Settings> Update and Security .
I wish you successful implementation!