How to customize the Command Prompt on Windows
Command Prompt is a powerful tool that many people like to use. However, it looks a bit boring and unfriendly. Fortunately, you can customize the Command Prompt according to your needs and preferences. This article will guide you how to customize this command line tool.
Instructions for customizing Command Prompt
- What is a Command Prompt?
- How to access the properties of the Command Prompt
- Customize the cursor on the Command Prompt
- Customize the size and font style in the Command Prompt
- Customize, layout, size and location of the Command Prompt
- Customize the colors used in the Command Prompt
- Customize the Command Prompt buffer with history records
- Customize the text on the Command Prompt
Note: The screenshots and instructions in this article apply to Windows 10 May 2019 or newer. If you don't know what version of the computer you're running, refer to the article Determining the Windows version on your system for how to do it.
What is a Command Prompt?
Before the graphical user interface and Windows, the most used operating system was DOS (Disk Operating System) - a text-based operating system that allowed to run programs by entering manual commands. The launch of the Windows operating system has simplified the entire computing experience by making it more intuitive. Although DOS has not been in the Windows operating system since Windows ME (2000), there is still a Command Prompt application - a text command line interpreter, similar to the command shell found in old DOS.
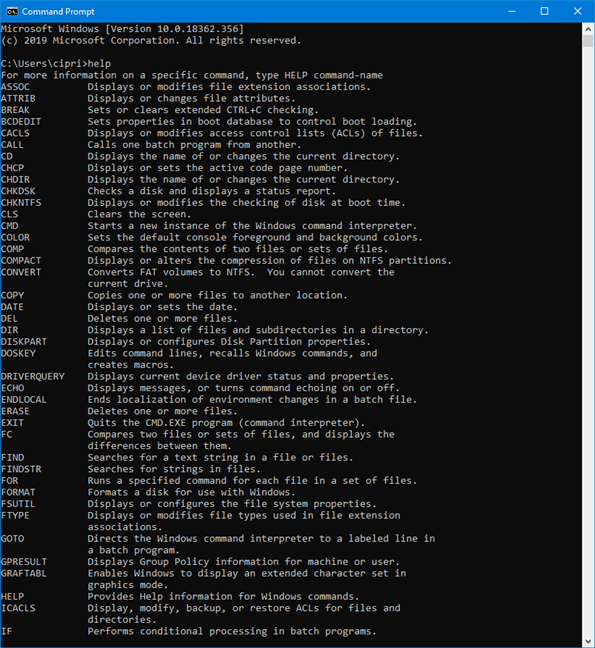
Power users and IT staff often prefer to use the Command Prompt to run all the basic commands to more complex commands like disk and network management commands. The Command Prompt is also useful for viewing system information and managing running processes, fixing problems with booting the computer, or even fixing corrupted or missing Windows files.
How to access the properties of the Command Prompt
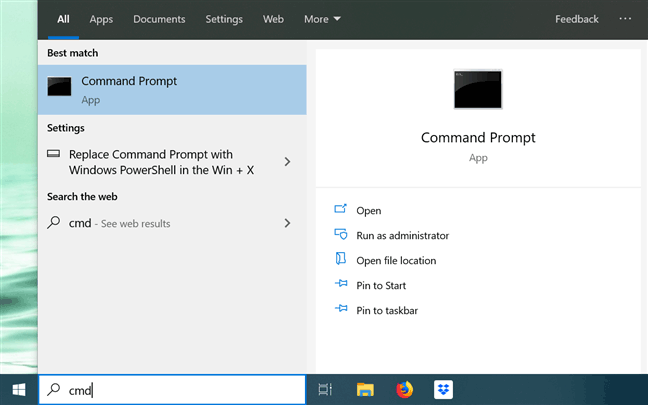
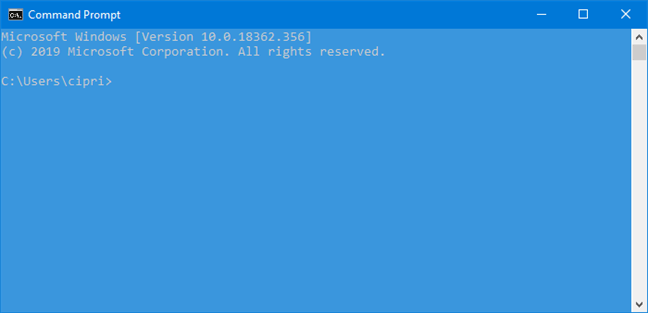
Although there are many ways to open the Command Prompt, you can enter cmd into the Taskbar search field and click on Command Prompt .
When the application launches, you can click on the C: icon in the top left corner or right click on the title bar to open the context menu. Then select Properties to begin customizing the Command Prompt.
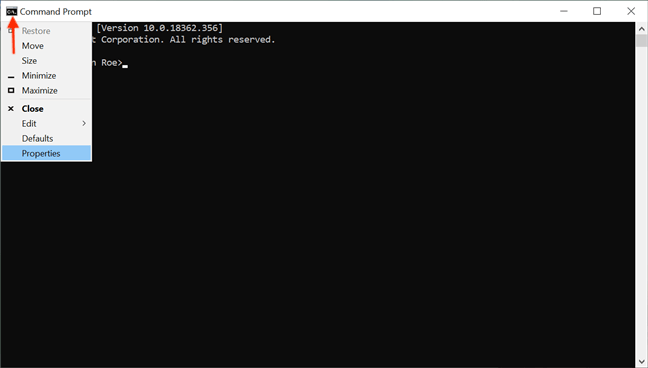
Alternatively, you can use the keyboard shortcut Alt + Space + P to open the Properties window, displaying five tabs to configure Command Prompt: Options, Font, Layout, Colors and Terminal.

Customize the cursor on the Command Prompt
The first part of the Options tab, Cursor Size is used to control the size of the blinking cursor when typing in the Command Prompt window. You can choose between Small (default), Medium or Large .

You can also adjust the cursor from the test settings of the Terminal tab. The Cursor Shape section allows you to select another blinking cursor shape.
The first option in this section is Use Legacy Style , which displays a thick tile with the default Small size and a square box when set to Medium . When in Large size, the Use Legacy Style option is no different from the last option called Solid Box , turning the cursor into a vertical rectangle of all pointer sizes. Other shape options do not show the difference between cursor sizes.
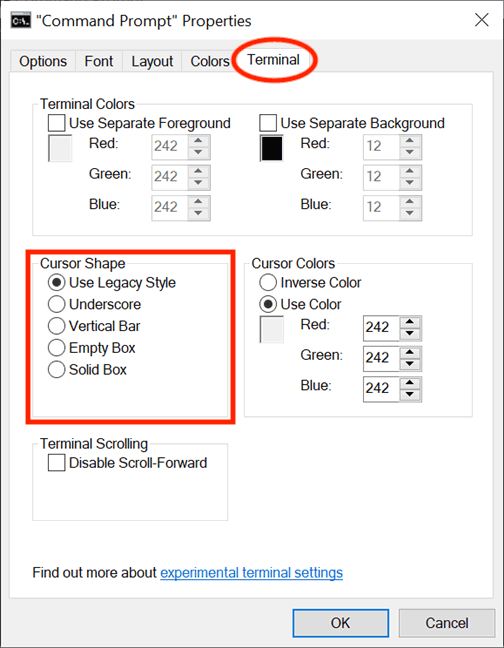
Note: One thing to note is that Cursor Shape is now reset to the default Use Legacy Style every time you access the Properties window. So if making changes in the Command Prompt properties, make sure to select the desired cursor shape before clicking OK .
In the Cursor Colors section of the Terminal tab, select the Use Color test setting to choose a custom color for the cursor by inserting its RGB decimal color code. You can search the Internet to find your favorite color code and the box under the option helps provide a preview of your selection in real time. The Inverse Color option turns the cursor into an additional color for the selected background color. When this option is selected, the cursor automatically changes color when changing the background color.

Customize the size and font style in the Command Prompt
You can easily change the font displayed in the Command Prompt from the Font tab. The first part provides the option to change the text size. Select a value from the list in the Size section or click in the Size box to enter a value between 5 and 72.

In the Font section, you can change the font style used in the Command Prompt. It includes 7 fonts to choose from such as Consolas (default), Courier New, Lucida Console, MS Gothic, NSimSun, Raster Fonts and SimSun-ExtB. Except for Raster Fonts, all six other types of text have a bold effect that can be turned on by checking the box next to Bold fonts .
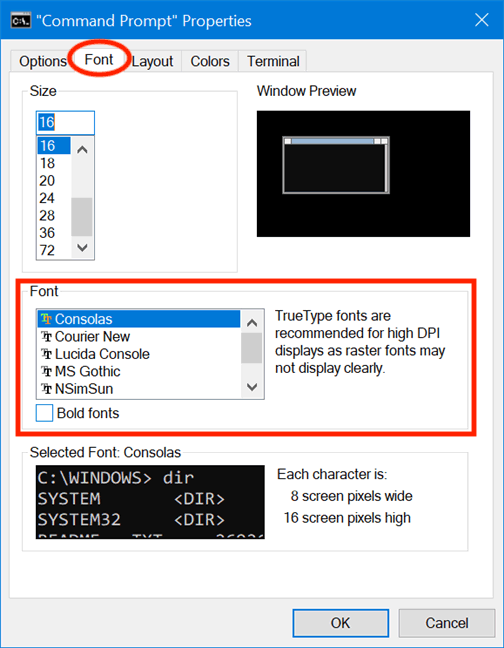
The Selected Font box at the bottom provides a preview of changes in real time, making it easier to decide. One thing to note is that choosing the new font size from the Size section also causes the Command Prompt window size to change. However, you can adjust the window size according to the instructions in the next section below.
Customize, layout, size and location of the Command Prompt
The Layout tab controls the size and position of the Command Prompt window while it also allows you to decide how the content is displayed. In the first section, Screen Buffer Size , you can adjust the Width value to configure how many characters can fit one line in the Command Prompt window, before the text appears on the next line. The Height box adjusts the maximum number of lines stored and displayed in the application.
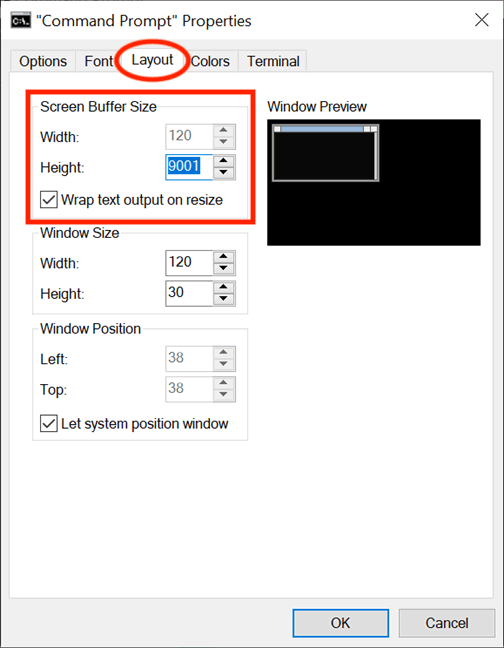
If you choose Wrap text output on resize , you won't be able to change the Width parameter because the text will automatically resize to fit the Command Prompt window. You should select this option to ensure the entire text output of the Command Prompt is always displayed.
Although you can always adjust the size of the Command Prompt window by dragging edges or corners, that change only applies to specific sessions and will be lost when the window is closed. However, the application will remember the changes made in the Windows Size section of the Layout tab. Note, these parameters are based on character cells, not pixels. Enter values for Width and Height for the Command Prompt window and you can preview them in Window Preview .

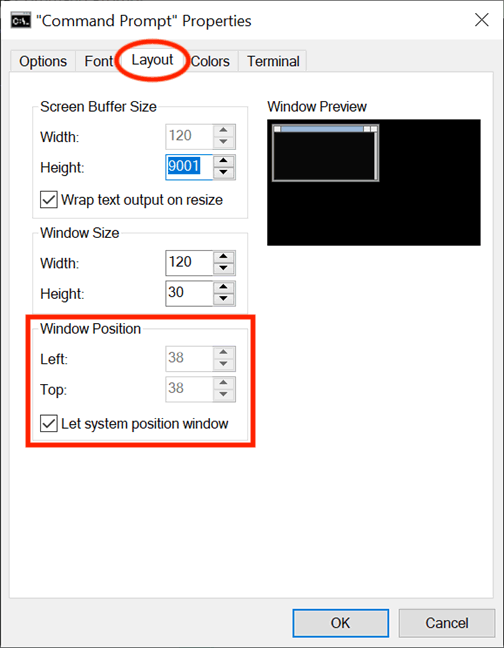
With Window Position , you can adjust exactly where the Command Prompt window appears on the screen. You can do this by configuring, in pixels, the application window distance from the Left and Top edges of the screen. Be sure to uncheck Let System Position Window to be able to change parameters in this section.
Customize the colors used in the Command Prompt
You can change its 'appearance' with options in the Colors tab with different colors. The first option in the top left corner of the tab is four custom sections: Screen Text, Screen Background, Popup Text and Popup Background. While the Screen Text changes the color of the text displayed in the Command Prompt window, the Screen Background changes the text background, the last two options are not of much interest because only developers will see the popup.
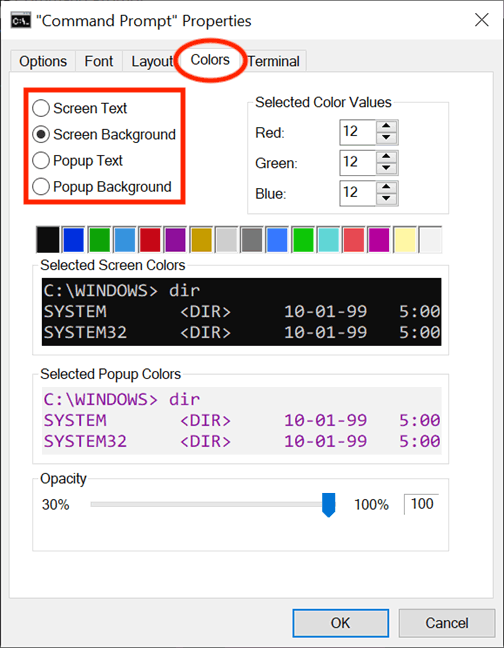
To change the font color or background color, select the corresponding option, then click on the given color shown below or use Selected Color Values to select a custom color by inserting its RGB decimal color code.
If you leave the Command Prompt window background the same color as the text, you will not be able to read the text displayed. The Selected Screen Colors and Selected Popup Colors options provide real-time feedback for the selections, making it easy to choose the right color.
In the Terminal tab, you can find color-related options, as a test setting. In addition to the Cursor Colors section we discussed earlier, it also has a Terminal Colors section. Using the Use Separate Foreground option will allow you to change the text color, and Use Separate Background allows you to customize the background.

Using the RGB value to determine the color, look at the boxes below each option to real-time preview your selection. If Terminal Colors is enabled, the color you select for text and background from the Terminal tab will be displayed first and overwrite the selected color from the Colors tab.
Customize the Command Prompt buffer with history records
Buffer acts as a history record of the commands that have been executed and you can navigate the previous commands entered into the Command Prompt with the up and down arrow keys. You can change the application settings for the buffer from the Command History section of the Options tab. Customize the number of commands kept in the buffer by changing the Buffer Size . Although the default value is 50 commands, you can set it to a larger value like 999 and pay attention to the amount of RAM. Selecting Discard Old Duplicates at the end of this section will allow Windows 10 to remove duplicate commands from the buffer.

The second option, Number of Buffers determines the maximum number of versions that have a separate command buffer. The default value is 4 so you can open 4 versions of Command Prompt at the same time and each version has its own buffer.
Customize the text on the Command Prompt
On the Options tab, the Edit Options and Text Selection sections help you choose how to interact with the Command Prompt window. When the QuickEdit Mode option is enabled, you can select and copy text from the Command Prompt window. To copy, select the text area using the mouse, then right-click or press Enter . Text will be copied to the clipboard.
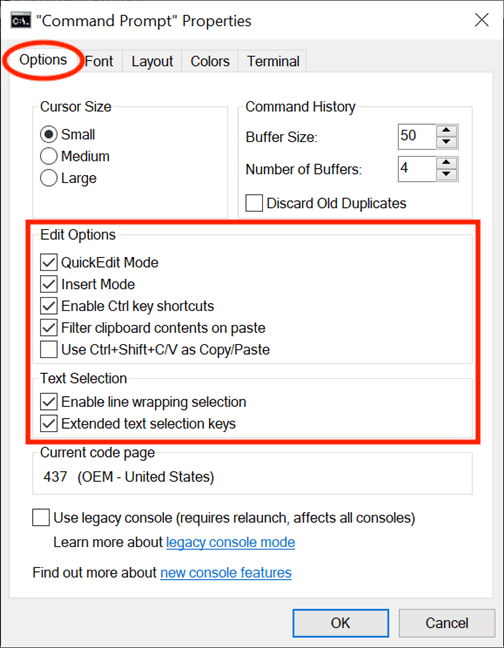
The two Insert Mode options have the same function as the Insert key on the keyboard. If Insert Mode is turned off, the text will be overwritten.
Windows 10 introduces keyboard shortcuts for the Command Prompt and to use them, you need to check the box next to Enable Ctrl key shortcuts (in Edit Options ) and Extended text selection keys (in Text ). You can also check the box next to the last option in the EditOptions section that Use Use Ctrl + Shift + C / V as Copy / Paste to enable using this shortcut.

If the Filter clipboard contents on paste option is turned on , when pasting content from the clipboard into the Command Prompt, special characters such as tabs are automatically deleted and smart quotes are converted to regular.
The first option in Text Selection is Enable line wrapping selection and if enabled it will enhance the way Command Prompt handles text selection. Earlier versions of the Command Prompt only allowed to copy text from it in blocking mode, meaning that each time pasting content from the Command Prompt into a text editor, you had to edit the tab manually. If this option is turned on, Windows will handle that so you do not need to edit the text.

If you select Use legacy console (requires relaunch, affects all consoles) at the end, you'll return to the previous command line version, making many options unavailable and the Terminal tab completely gone.
If you access the Terminal tab, there's an option that affects how to use the Command Prompt, in the Terminal Scrolling section at the bottom. Select the Disable Scroll-Forward option and you will not be able to scroll down through the last command input.

When finished making changes, click on OK to apply them. If no changes are found, restart the Command Prompt.
I wish you successful implementation!