Virtual network for Hyper-V - Part 6
In this final section, I will show you some of the VLAN configuration methods.
Network Administration - In this final section, I will show you some of the VLAN configuration methods.
In the previous part of this series, we discussed the concept of VLANs associated with Hyper-V. In this article, I will show you how to configure VLAN in this Hyper-V environment.
Before we get started, we want to say that using VLANs is only an option if your network switches support VLANs. As explained in the previous article of this series, both the parent and child partitions connect to the virtual switch, which provides VLAN support. Therefore, you must have a physical switch that supports VLAN traffic.
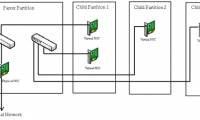
In other words, if the virtual machine needs to communicate with another virtual machine hosted on the same physical server, the VLAN traffic will go through the virtual switch, and so the VLAN communication here is fully supported. Conversely, if a virtual machine needs to communicate with the parent partition and the machine is also connected to a virtual switch, the VLAN traffic here will be supported. However, if the virtual machine needs to communicate with another client that is hosted on another physical server (or needs to communicate with a physical machine that is not in the same parent partition as it) then the data will go through the physical network. and traffic transport switches need to support VLAN.
Network switches must support VLAN traffic, so the server's network adapter must also support VLANs. Since not all network adapters can support VLAN traffic, you need to double-check to ensure that the server adapters support VLANs first and then forward them to VLAN configuration. Near the end of this article, I will show you how to detect if the network adapter supports VLAN traffic.
Three types of VLAN configuration
In Hyper-V environment, there are three different locations for you to enable VLAN communication. However, it should be noted that there is no need to enable VLAN support in all three locations. You only have to configure VLAN support where you really need it.
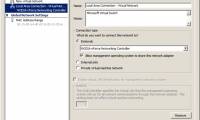
Parent partition
The first place you can configure VLAN support is the parent partition. This does not automatically configure VLAN support for virtual machines, but it only ensures that traffic travels through the adapter tagged with the VLAN ID number so you can identify it.
Enabling VLAN support for the parent partition is done via the Hyper-V Management Console. To do this, you need to open the Management Console, then click the Virtual Network Manager link. When the Virtual Network Manager window opens, you will see a list of all virtual networks configured on this machine.
Here, you need to select the virtual network you want to configure. When you're done selecting the virtual network, you'll see on the right side of the window there are different configuration options, as shown in Figure A. This section contains a checkbox to enable Virtual LAN Identification for parent partition. If this checkbox is enabled, you will need to provide the VLAN ID number that the parent partition can use.

Figure A: Check the Enable Virtual LAN Identification for the Parent Partition checkbox and provide the VLAN ID number
Virtual machine
In addition to being able to configure the parent partition to support VLAN traffic, you can also enable VLAN support on virtual machines. This activation is also done through the Hyper-V Manager console.
To enable VLAN support on the virtual machine, open the Hyper-V Manager, right-click on the virtual machine you want to configure. Choose the Settings command from the right-click menu and you will be taken to the Settings page of the virtual machine.
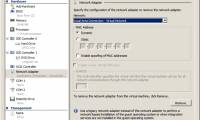
Select the network adapter you want to enable VLAN support. As you can see in Figure B, you can enable VLAN support by selecting the Enable Virtual LAN Identification checkbox and providing VLAN ID.
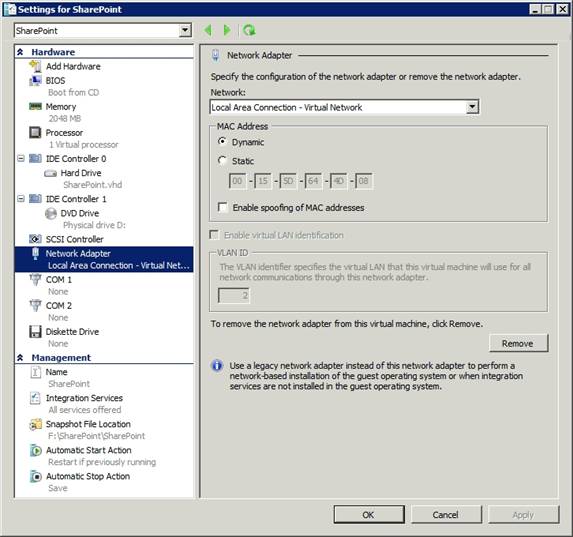
Figure B: The VLAN support configuration process on the client is very similar to the method used to provide VLAN support for the parent partition.
As you can see in the image above, you can see that the Enable Virtual LAN Identification option is still in gray. There are two things that cause this problem. It is possible that VLAN configuration options are not available if physical network hardware does not support the use of VLANs. Secondly, these options may be grayed out because the virtual machine is currently running.
Additional connection
When enabling VLAN support for the parent partition, we did this by selecting a network adapter attached to the Hyper-V virtual network and then configuring the settings for that adapter. This is not only the main method for enabling VLAN support at the parent partition level but it also has many other effects.
Usually Hyper-V is configured for many physical adapters. In these cases, at least one adapter will be used exclusively for the parent operating system. This method allows remote management, patch management, etc. However, since this adapter is not connected to a virtual switch, you will not be able to use the Hyper-V Manager interface to enable VLAN support for the adapter.
Before going on to introduce how to enable VLAN support for adapters, you need to know that this technique should only be used for network adapters that are not connected to the Hyper-V virtual network. If an adapter is being used by Hyper-V, you need to use another configuration method that we discussed above.
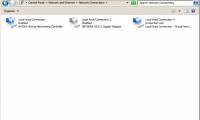
Here's how to do it, first you need to open Control Panel and click on the Network and Internet icon. Next open the Network and Sharing Center and then click the Change Adapter Settings link . Now Windows will display all physical network adapters installed in the server. Right-click on the adapter you want to configure and select Properties from the menu that appears. You will then see the adapter properties page. Click the Configure button, Windows will display a different property page. Go to the Advanced tab of the properties page, as shown in Figure C.
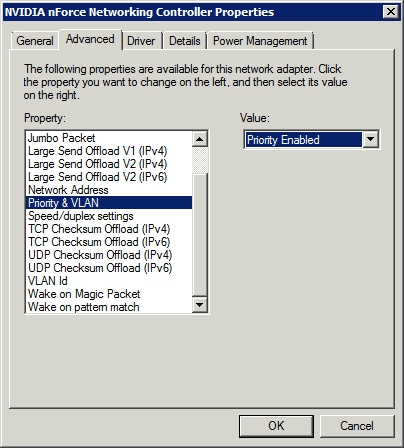
Figure C: You can enable VLAN support at the network adapter level
As you can see in the image above, you need to use the Priority & VLAN option to enable VLAN support for the adapter. After doing so, use the VLAN ID option to specify the VLAN ID, then click OK . If these options are not available, it also means that your network card does not provide VLAN support.
Was this article helpful?
Your feedback helps us improve.
Related Articles
 Virtual network for Hyper-V - Part 28 minutes read
 Virtual network for Hyper-V - Part 58 minutes read
 Virtual network for Hyper-V - Part 18 minutes read
 Virtual network for Hyper-V - Part 38 minutes read
 Create virtual machines with Hyper-V on Windows 8 and Windows 1015 minutes read
 Virtual network for Hyper-V - Part 48 minutes read
Reader Comments 0
Sign in with email or Google to join the discussion.