How to convert ESD files to WIM using DISM on Windows 10
This article will show you how to use DISM to convert ESD-based Windows Media Creation Tool into WIM format.
Table of Contents
Using the offline image, mounting the image, confirming the changes seems a bit complicated for the average Windows user. However, it is only a modification of the default Windows installation image, the install.wim file, and the procedure is simple. When changes are specified (saved or saved) in the image, the modified install.wim file can be used to deploy Windows or replace the original install.wim file on the existing installation media.
Using image offline is done with DISM (Deployment Image Servicing and Management), a native Windows tool. The DISM command options allow all sorts of changes, changing the way Windows is installed. You can add or remove drivers, use language packs to create multilingual Windows installation media, use Windows Updates to get the latest Windows installation updates right after installation, etc.
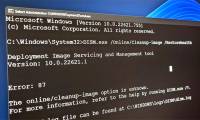
The default Windows installation media created by the Windows Media Creation Tool contains an encrypted and compressed install.esd file instead of the install.wim file. The Windows Windows Media Creation Tool ISO file is the official way Microsoft has chosen to provide the means to install Windows 10. Windows will have no problems installing from the ESD file but to use it offline, the ESD file needs to be decoded and convert to WIM format. If you try to mount the ESD file as an offline image, you will get the following error:

This article will show you how to use DISM to convert ESD-based Windows Media Creation Tool into WIM format. You can also use the same method to convert other ESD files to WIM.
- Instructions on how to convert ESD files to ISO install Windows XP, 7,8,10
- How to burn ISO image file to CD, DVD
- How to create and edit ISO files with UltraISO
1. Preparation
Step 1. Create a folder on the hard drive, give it a name. In this example, we will use the folder named D: ISO_Files .
Step 2 . If you already have the means to install the Windows Media Creation Tool on a USB flash drive, copy Sourcesinstall.esd to the D: ISO_Files folder.
Step 3 . If you have a dual USB architecture installation media, copy the install.esd file to convert the correct bit to D: ISO_Files. It is located in the x86Sources directory on 32-bit Windows and in the x64Sources folder for 64-bit Windows.
- What is the difference between 32-bit and 64-bit Windows?
Step 4 . If you have the means of installing Windows Media Creation Tool as an ISO image file, mount the ISO to a virtual DVD (right-click the ISO, then choose Mount ) and copy its contents (all files and folders from ISO) ) to the folder D: ISO_Files.
2. Convert ESD to WIM
Step 1 . Open PowerSell as admin.
Step 2 . Check the Windows version of image install.esd with one of the following commands:
If copying ESD files from USB to D: ISO_Files as done in Steps 2 and 3 of Part 1:
dism /Get-WimInfo /WimFile:D:ISO_Filesinstall.esd
If copying ISO content to D: ISO_Files as Step 4 of Part 1:
dism /Get-WimInfo /WimFile:D:ISO_FilesSourcesinstall.esd
Note: In case, the ISO file of Windows Media Creation Tool is a dual architecture, the ISO content copied to D: ISO_Files contains both 32-bit and 64-bit Windows images, you need to change the above command accordingly:
To check the version in 32 bit install.esd:
dism /Get-WimInfo /WimFile:D:ISO_Filesx86Sourcesinstall.esd
To check the version in 64 bit install.esd:
dism /Get-WimInfo /WimFile:D:ISO_Filesx64Sourcesinstall.esd
Step 3 . Write down the index number for your version. In this example using the Pro version, the index number is 1.

Enter the following command to convert ESD to WIM:
dism /Export-Image /SourceImageFile:D:ISO_FilesSourcesinstall.esd /SourceIndex:1 /DestinationImageFile:D:ISO_FilesSourcesinstall.wim /Compress:Max /CheckIntegrity
Step 4 . Make sure to use the correct SourceIndex number.
Step 5 . The command in Step 2 above is only valid if you copy the ISO content from the single-structure (32 or 64-bit) ISO image to the D: ISO_Files folder mentioned in Step 4 of Part 1.
If you only copy the ESD file from USB as in Step 2.3 of Part 1 or if you copy the contents of the dual architecture ISO iamge in Step 4 part 1, change the SourceImageFile and DestinationImageFile paths.
If copying ESD file from USB to D: ISO_Files folder as Step 2 part 1 or Step 3 part 1, both paths will be D: ISO_Filesinstall.esd.
If you copy the dual architecture ISO content to the D: ISO_Files directory as in Step 4 part 1, both paths will be:
D:ISO_Filesx86Sourcesinstall.esd để chuyển đổi file install.esd 32 bit
or
D:ISO_Filesx64Sourcesinstall.esd để chuyển đổi file install.esd 64 bit
Step 6. The conversion process will take a few minutes. When done, you'll see both the original install.esd file and the new install.wim file in the D: ISO_FilesSources folder.

Step 7. If you work with single-bit architecture ISO content Windows Media Creation Tool copies to D: ISO_Files, you can make an updated ISO image file.
Step 8. If you are working with the Windows Media Creation Tool duplex ISO content copy content to D: ISO_Files, you should repeat the process for the other non-converted bit version. For example, if you converted for a 64-bit instal.esd file, do the same for the 32-bit version.
Step 9 . If working with the install.esd file copied from USB to D: ISO_Files, delete the ESD file on the Sources folder and replace it with the new install.wim file.
Step 10. Before creating a new ISO from the ISO_Files folder, delete the install.esd file in the Sources folder (or x86Sources / x64Sources).
I wish you successful implementation!
Was this article helpful?
Your feedback helps us improve.
Related Articles
 Difference between CHKDSK, SFC and DISM in Windows 105 minutes read
 4 ways to fix DISM error 87 on Windows 10/114 minutes read
 Instructions for using DISM to fix Windows 11 errors3 minutes read
 How to use DISM to copy and restore images FFU6 minutes read
 4 tips to fix hidden Windows errors and quickly recover corrupted files.5 minutes read
 How to fix Windows 10 image with DISM8 minutes read
Reader Comments 0
Sign in with email or Google to join the discussion.