Table of Contents
This practical guide walks through how to disable audio devices on Windows 11, explains the main requirements, and highlights common issues that may appear along the way.
Here is how to disable the sound device on Windows 11
Disable Sound Devices on Windows 11
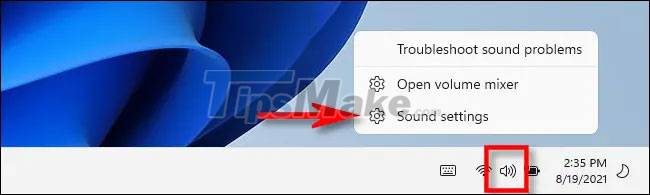
First, go to the sound settings page on Windows 11 by pressing Windows + i to open the Start menu, then navigate to System > Sound. Or you can right click on the speaker icon on the taskbar and select 'Sound Settings'.
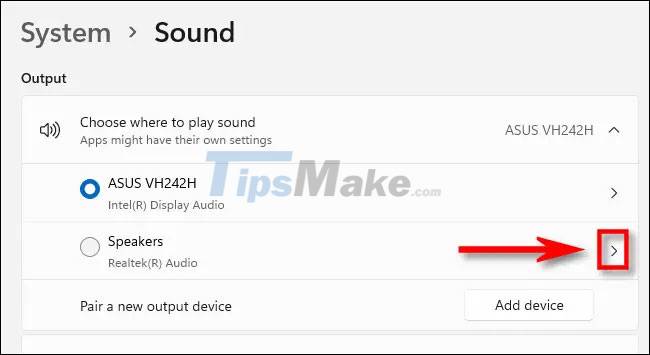
You are now on the Windows 'Sound' settings page. In the 'Output' section near the top, click the arrow icon to the right of the name of the audio output device you want to disable.
On the Properties page of the audio device, in the 'General' section, find the 'Audio' option (content Allow apps and Windows to use this device for audio below). Click the 'Don't Allow' button on the right.

The audio device will be disabled immediately. If you close the Settings app and reopen it later, you'll notice that the turned off device is no longer listed in the 'Output' section of the audio settings page as before.
Re-enable audio devices in Windows 11
To re-enable an audio device that you turned off using the method described above, follow these simple steps.
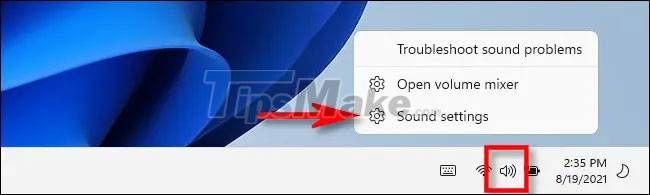
First, right click on the speaker icon on the taskbar and select 'Sound Settings'.
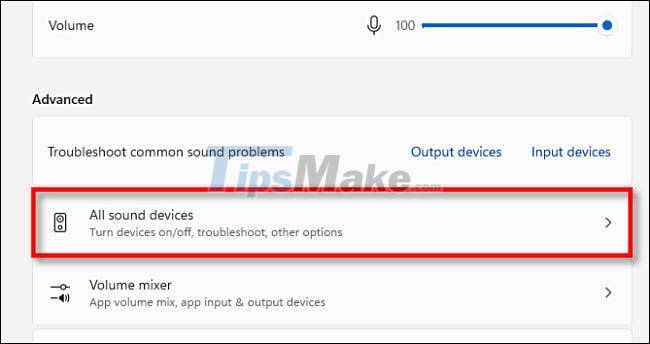
Windows Settings will open to System > Sound. Scroll down until you find the 'Advanced' section. Then click on 'All Sound Devices'.
In the list of available audio output devices, click the audio system you want to reactivate.
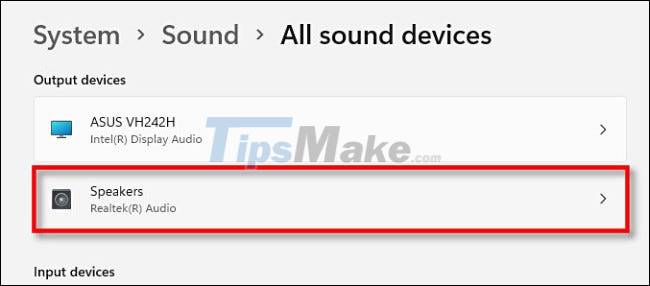
On the device's Properties page, under 'Audio', click the 'Allow' button.
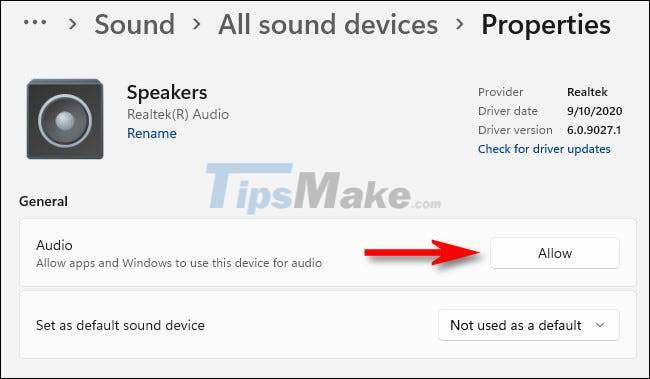
The audio device will then be reactivated and displayed again on the list of available output devices on the system sound settings page.
Enjoy listening to music!
Key Takeaways
Use the information above as a practical reference for how to disable audio devices on Windows 11. Review each step carefully, confirm any requirements, and choose the option that best fits your situation.
FAQ
What does this guide explain about Disable Audio Devices on Windows 11?
It explains the main concepts, practical considerations, and useful steps related to disable audio devices on Windows 11 without requiring advanced knowledge.
Who can benefit from learning about Disable Audio Devices on Windows 11?
This information is useful for readers who want a clear overview, practical guidance, and reliable steps related to disable audio devices on Windows 11.
What should I check before applying this information?
Review the requirements, confirm that your device, software, or situation matches the instructions, and back up important data before making major changes.
Related Articles
 Why You Should Rename an Audio Device in Windows 10 and How4 minutes read
 How to Share Audio Between Two Devices on Windows5 minutes read
 How to Enable / Disable Mono Audio on Windows 103 minutes read
 How to Fix Muddy Sound with Real Tech Audio and Windows 75 minutes read
 How to Output Audio to Multiple Devices on Windows 113 minutes read
 3 Simple Ways to Install Additional Audio Devices on Your Computer8 minutes read
Reader Comments 0
Sign in with email or Google to join the discussion.