How to Delete Temporary Files in Windows 7
This wikiHow teaches you how to remove temporary files from your Windows 7 computer. To do this, you must first enable your computer's 'Show Hidden Files' feature, after which point you can delete temporary files from your computer's App...
Table of Contents
Part 1 of 4:
Showing Hidden Files
-
 Close every open program that you can. Programs on your computer use files that are in the Temp folders, so you won't be able to delete some temporary files if they're being used by programs.
 -
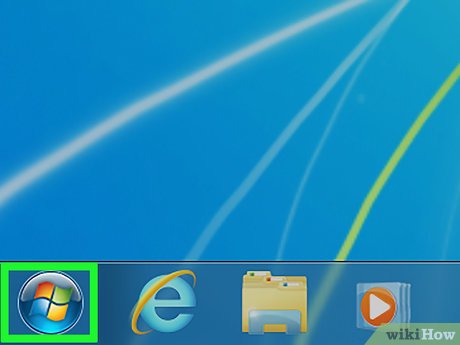 Open Start. Click the multicolored Windows logo in the bottom-left corner of the screen.
-
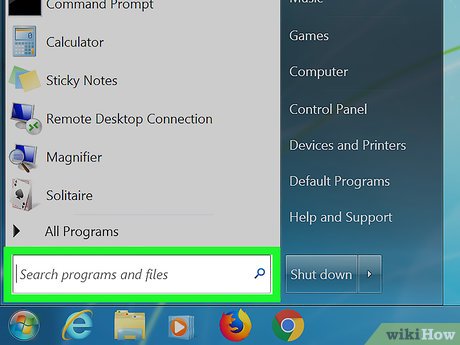 Click the text box. It's at the bottom of the Start window.
 -
 Type in windows explorer. Doing so will search your computer for the Windows Explorer app.
 -
 ClickWindows Explorer. It's the folder-shaped option at the top of the Start window.
-
 Click Organize. You'll find this tab in the top-left side of the window. A drop-down menu will appear.
 -
 Click Folder and search options. It's near the middle of the drop-down menu. This prompts a new window to appear.
 -
 Click the View tab. This option is at the top of the window.
 -
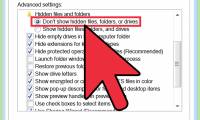
 Check the "Show hidden files, folders, and drives" circle. It's in the middle of the page.
- If this option is already checked, your computer is displaying hidden files.
-
 Click Apply, then click OK. Doing so ensures that you can access and open the Temp folder for your apps and Windows itself.
Part 2 of 4:
Deleting Temporary App Files
-
 Click My Computer. It's in the column of options on the left side of the window.
 -
 Double-click your computer's hard drive. This hard drive-shaped icon is under the "Devices and drives" heading. Your hard drive is usually the drive labeled "C" here.
 -
 Double-click the Users folder. You'll find it near the top of the window.
 -
 Double-click your user folder. This is the folder with the first few letters of your name (or username if you signed into your computer using an email address).
 -
 Double-click the AppData folder. It's near the top of the window.
 -
 Double-click the Local folder. This folder is at the top of the window.
 -
 Select the Temp folder. Click the Temp folder, which is near the bottom of the window, to select it.
 -
 Click Organize. This tab is in the upper-left corner of the window. A drop-down menu will appear.
 -
 Click Properties. It's at the bottom of the drop-down menu. Clicking it prompts a new window to open.
 -
 Uncheck the "Read-only" box. You'll find this near the bottom of the window.
 -
 Click Apply. It's in the bottom-right corner of the window.
 -
 Click OK when prompted. This will ensure that everything in the Temp folder is affected by the removal of the "Read-only" protection.
- You may have to click Continue or Skip, or otherwise verify that you want to remove read-only protection from this folder, before continuing.
-
 Click OK. It's at the bottom of the window. You can now proceed with deleting the Temp folder's contents.
 -
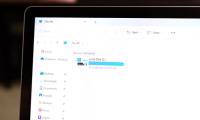
 Open the Temp folder. Double-click the Temp folder to open it in Windows Explorer.
 -
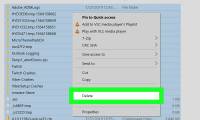
 Select all of the folder's files. Click Organize again and then click Select all, or press the Ctrl and A keys at the same time.
 -
 Delete the files. Press your computer's Del key, or click Organize and then click Delete in the drop-down menu. Doing so will move the Temp folder's contents into the Recycle Bin.
- You'll need to empty the Recycle Bin in order to permanently remove these files from your computer.
- There may be a couple of system files in the Temp folder. If so, you won't be able to delete these. They'll only take up a few kilobytes of space.
Part 3 of 4:
Deleting Windows Temporary Files
-
 Click the My Computer tab again. It's on the left side of the Windows Explorer window.
 -
 Double-click your hard drive. This will re-open your hard drive's folder.
 -
 Double-click the Windows folder. It's usually near the middle of this window.
 -
 Scroll down and select the Temp folder. You'll find this near the bottom of the window.
 -
 Remove the Temp folder's read protection. To do so:
- Click Organize
- Click Properties
- Uncheck the "Read-only" box.
- Click Apply
- Click OK when prompted.
- Click OK
-
 Open the Temp folder. Double-click the folder to do so.
 -
 Select all of the folder's files. Click Organize again and then click Select all, or press the Ctrl and A keys at the same time.
 -
 Delete the files. Press your computer's Del key, or click Organize and then click Delete in the drop-down menu. Doing so will move the Temp folder's contents into the Recycle Bin.
- You'll need to empty the Recycle Bin in order to permanently remove these files from your computer.
Part 4 of 4:
Deleting Internet Explorer Temporary Files
-
 Open Start. Click the Windows logo in the bottom-left corner of the screen.
-
 Click the text box. It's the search field at the bottom of the Start window.
 -
 Type in internet options. Doing so will search your computer for the Internet Options program.
 -
 Click Internet Options. It's the globe-shaped icon at the top of the Start window.
 -
 Click the General tab. This option is in the top-left side of the Internet Options window.
 -
 Click Settings. It's in the lower-right corner of the "Browsing history" section of the window.
 -
 Click View files. This option is near the bottom-right corner of the window.
 -
 Select the files. Click Organize again and then click Select all, or press the Ctrl and A keys at the same time.
 -
 Delete the files. Press your computer's Del key, or click Organize and then click Delete in the drop-down menu. Doing so will send the Internet cache folder's files to the Recycle Bin.
- You'll need to empty the Recycle Bin in order to permanently remove these files from your computer.
Was this article helpful?
Your feedback helps us improve.
Related Articles
 What is Temporary File? How to delete temporary files on windows computers3 minutes read
 How to Automatically Delete Temporary Files on Windows 113 minutes read
 Automatically delete temporary files every time a Windows 10 computer is opened3 minutes read
 Free up space on Windows 10 by deleting temporary files2 minutes read
 How to Clear Temp Files in Windows 103 minutes read
 How to Delete Temporary Files and Delete Prefetch Files from Your Computer3 minutes read
Reader Comments 0
Sign in with email or Google to join the discussion.