How to create a ZIP file on a Mac
In the article below, TipsMake.com will guide you on how to create a ZIP file on macOS..
There are many ways to create ZIP files on a Mac. macOS has many built-in tools, and there are also third-party applications that allow you to create compressed ZIP files on your Mac.
In the article below, TipsMake.com will guide you on how to create a ZIP file on macOS.
- How to compress and decompress files on iPhone
What is a ZIP file?
A ZIP file is a file format that can compress multiple files of different formats, with the extension ZIP. You can take all your folder structures and compress them into a single file, like putting things in a zip bag, hence the name.
There are many reasons why you should use ZIP files on a Mac. It's the most common compression method when you want to reduce file size and save disk space.
Additionally, ZIP files are created when people want to combine related files. For example, if you want to send 10 photos, instead of sending them individually, you can compress them into a single ZIP file and send it, which is faster and more convenient.
How to create a ZIP file using macOS tools
As mentioned above, macOS supports both creating and compressing ZIP files. This feature is built into Finder and can be accessed from a submenu (some applications extend Finder's functionality).
- Put all the files you want to compress into one folder.
- Open that folder in Finder .
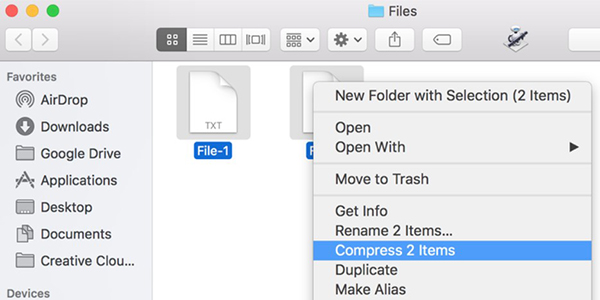
- Select the files you want to compress, right-click on any file and select Compress [X] Items (X is the number of selected files).
- macOS will create a ZIP file containing all the files you just selected. The ZIP file will be placed in the same folder.
If you want to check more information about the compressed ZIP file, right-click on the file and select Get Info.
To extract a ZIP file, double-click the file and macOS will access its contents.
How to create a ZIP file using Mac Terminal
Another way to create ZIP files on a Mac is to use Terminal. There's a command you can use within this tool to create the file.
This ZIP file creation process does not require password protection in the Terminal.
- Open Terminal on your Mac.
- Use the `cd` command to navigate to the directory containing the files you want to compress.
- Use the following command to create a ZIP file, where [sample.zip] is the filename and [mydocument.txt] is the file to be added to the ZIP file.
- The Terminal will then create and place the compressed ZIP file directly in the current directory.
zip sample.zip mydocument.txtCreate a password-protected ZIP file in Terminal.
Terminal allows you to create passwords for ZIP files, enhancing security for files that require a high level of protection. To do this, follow these steps:
- Open the Terminal.
- Use the `cd` command to navigate to the directory containing the source files.
- Type the following command, where [secure.zip] is the generated ZIP file, and [password.txt] are the compressed files.
- As soon as you press Enter , the Terminal will prompt you to enter a password for the new ZIP file. Type the password and press Enter, repeating this step twice. You will not see the password when typing it in the Terminal.
- The password-protected ZIP file has been created right in the current folder.
zip -er secure.zip passwords.txtExtract the ZIP file via Terminal.
You can also use Terminal to extract a ZIP file.
- Open the Terminal window.
- Type the following command and press Enter , where [myarchive.zip] is the name of the ZIP file you want to extract.
- The terminal will extract the ZIP file for you.
unzip myarchive.zipThere are countless reasons why you should use ZIP files on a Mac. They are easy to create and extract, making your work much faster and smoother. ZIP files can even compress very large files. However, if you're dealing with situations where you need the file to maintain a certain size, you might need to switch to a different compression type.