Steps to send photos from iPhone to Mac
In actual use, sometimes you need to send some pictures from your iPhone to your MacBook, how to do it?.
This article shows you how to send and transfer photos from iPhone to Mac via AirDrop, USB, and several other methods.
What is the fastest way to send photos from iPhone to Mac?
The fastest way for you to send photos on your iPhone to any Mac device is to use AirDrop — a feature designed to make it easy for users of Apple hardware devices to share data with each other over a wireless connection. AirDrop works via Bluetooth and Wi-Fi (locally) to create a secure local link between the two systems.
Send photos from iPhone to Mac via AirDrop
The process of sending data, or specifically photos here, from iPhone to Mac via AirDrop is generally not complicated, you just need to do a few simple steps:
Step 1. On iPhone, click on the photo library (Photo).
Step 2. Click to select the image you want to send.
Step 3. Click the arrow button at the bottom left.
Step 4. Tap AirDrop.
Step 5. A list of available devices will appear, click on the name of the Mac you want to send the photos to, then wait a moment for the photos to be automatically transferred. (Note that the iPhone on which your Mac device must be connected to a Wi-Fi network for this feature to work.)
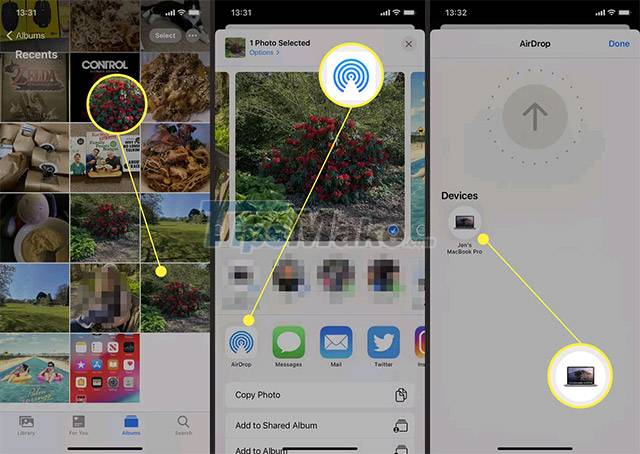
Step 6. Click 'Done' to complete the process.
Transfer photos from iPhone to Mac using iCloud
Assuming you have iCloud set up on your iPhone, transferring photos from your iPhone to your Mac is also super simple.
Step 1. On your Mac, launch any web browser, then go to iCloud.com and sign in with your Apple ID.
Step 2. On the iCloud homepage that appears, click Photos.

Step 3. Scroll through your photo library in a web browser, and click select the image you need.

Step 4. Next, click on the cloud icon in the top right corner to download the image.

Step 5. This image has now been downloaded to your Mac, and will be in the 'Downloads' folder by default.
How to transfer photos from iPhone to Mac using USB
You can of course also connect your Mac to your iPhone via a USB to Lightning cable. But note that this is not the most efficient method, only use it if your devices are offline, with no internet connection.
Step 1. Plug your iPhone into your Mac via the device's charging cable.
(Note: Recently released MacBook models usually only support the USB-C connector, so you may need an adapter if your iPhone is older.
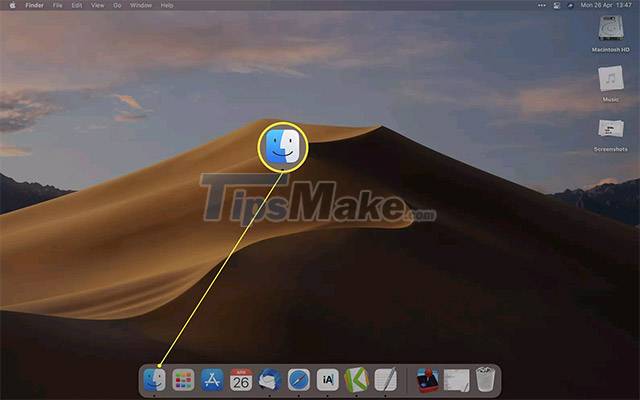
Step 2. On Mac, click Finder.
Step 3. Scroll down to the Locations section and click on the iPhone name listed there.

Step 4. Click Trust.
Step 5. Tap Trust on your iPhone, then enter the PIN.
Step 6. On Mac, click the Photos tab.

Step 7. The list of photos on your iPhone will be fully listed here. Select and move the images as usual.