How to install and open File Server Resource Manager in Windows Server 2012
File Server Resource Manager is a feature that helps system administrators manage shared folders, in terms of setting limits or expanding file restrictions.
Like previous versions, the current Windows Server 2012 version has File Server Resource Manager . As you know, this is a feature that helps system administrators manage shared folders, in terms of setting limits or expanding file restrictions. To install it, follow the steps below.
How to install File Server Resource Manager
Step 1 - Go to Server Manager> Manage> Add Roles and Features> Next. Select Role-based or feature-based installation , then select Select a server from the server pool . Click Next.
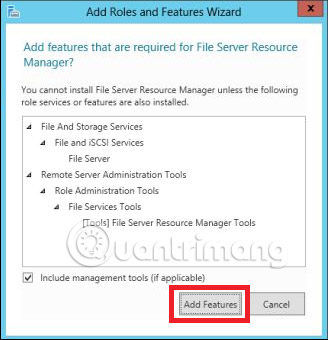
Then, at the list, find File and Storage Services and expand it. Then, expand Files and iSCSI Services , select File Server Resource Manager and then a window will open.

Step 2 - Click Add features and then click Next.
Step 3 - Click the Next button .

Step 4 - Click the Install button .

How to open File Server Resource Manager
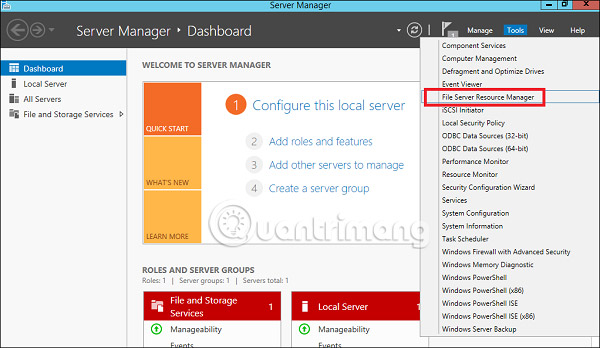
Now that you have installed the File Server Resource Manager, open it by following the instructions below.
Step 1 - Click Server Manager> Tools> File Server Resource Manager .
To set the norm for a folder, follow the steps as below.
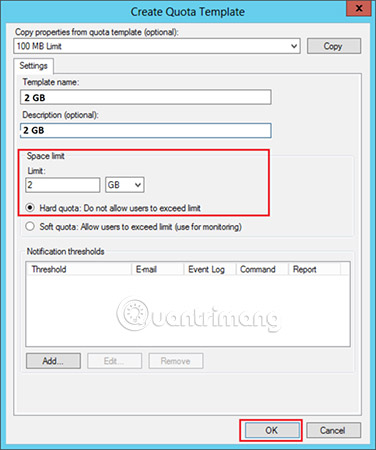
Step 2 - On the left panel click Quota Management , then expand the Create Quota Template section , then click Create Quota Template . on the right panel as shown in the screenshot below.

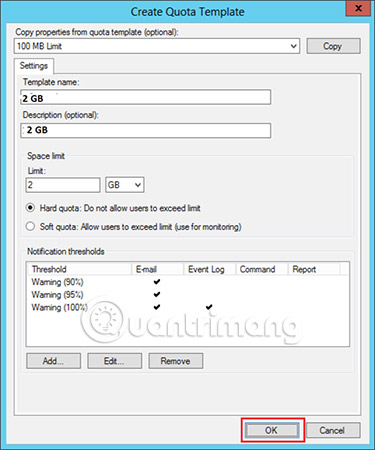
Step 3 - A new table will be opened, in which the most important aspect is to set the Space Limit , depending on your needs. Here, this example will set 2GB and then click OK.
Step 4 - You must set a set quota for it and once the folder reaches that quota, it will send you a notification about where you will have the option to place the email.
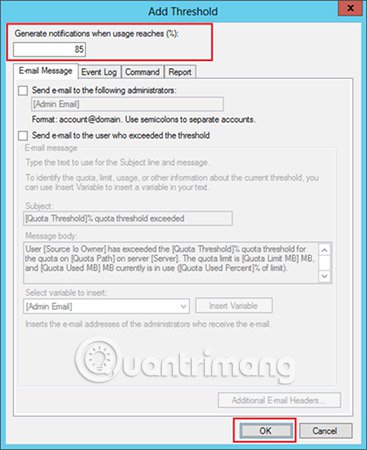
Step 5 - Click OK.
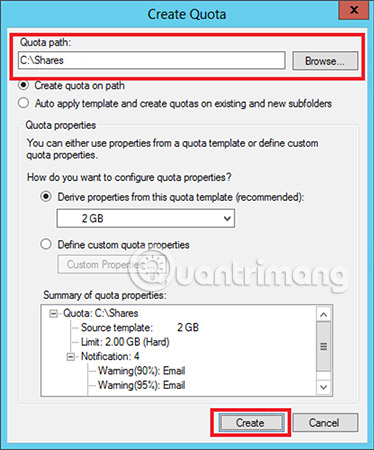
Step 6 - Then, to attach this norm to a folder, right-click on the template and then click Create Quota from Template .

Step 7 - Click Browse . and then select your folder. Click Create.
Step 8 - To set restrictions for your folders, go to the left side of the File Screening Management> File screening templates window, then click on the left panel of Create File Screen Template .
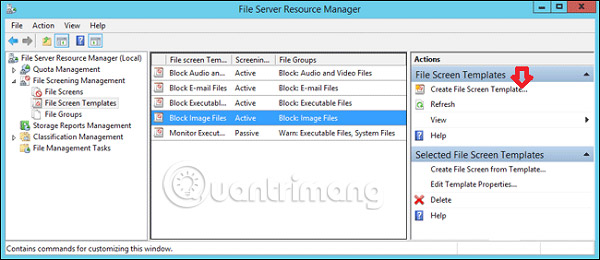
Step 9 - Click Browse . and find the folder you want to select. Finally, click Create.

See more:
- Learn about File and Storage Services in Windows Server 2012
- How to configure and adjust WSUS in Windows Server 2012
- How to install WSUS in Windows Server 2012
- Fsutil resource command in Windows
- 5 ways to open Resource Monitor in Windows 10
- 7 simple ways to open Task Manager on Macbook, Windows 10,11
- How to Enable Cross Origin Resource Sharing (CORS) for Sharing Resource Using Apache Servers, PHP and Jquery
- Learn Resource Monitor tool in Windows Server 2012
- 11 ways to open Resource Monitor in Windows 10
- How to install Owncloud server on Windows 10 (WSL)
- How to manage resources in Python using a context manager
- Learn About File Pilot: The Super Fast File Manager That Replaces Windows File Explorer
- 4 How to open Task Manager Windows 11
- Instructions for installing DHCP Role in Windows Server 2012
- How to add and manage logs in Windows Server 2012
- Learn about Resilient File System in Windows Server 2012
- How to install Hyper-V in Windows Server 2012
- How to install the Print Server in Windows Server 2012
- Learn about Easy Printing in Windows Server 2012
- Configure Print Driver in Windows Server 2012
- How to use Windows Server 2012 as a router
- How to install and configure backups in Windows Server 2012
- How to install WSUS in Windows Server 2012
-
 Create an AI voiceover for poems and inspiring stories.
-
Instructions on creating a Froggy Jumps game on Educaplay
-
How to make a piano game using Scratch
-
Instructions on how to add ChatGPT to Google Sheets
-
How to rotate any page horizontally in Word
-
How to install SPSS on a MacBook: A step-by-step guide.
 Create an AI voiceover for poems and inspiring stories.
 Instructions on creating a Froggy Jumps game on Educaplay
 How to make a piano game using Scratch
 Instructions on how to add ChatGPT to Google Sheets
 How to rotate any page horizontally in Word
 How to install SPSS on a MacBook: A step-by-step guide.