Create a Rule to move and store email to another folder in Outlook
If multiple emails are received from the same sender every day, why not create a separate folder for that address.
Table of Contents
If multiple emails are received from the same sender every day, why not create a separate folder for that address.And to keep the order in place for this Inbox, create your own Rule to move and store when you receive the email.
- Assign Background image to email in Outlook
- Instructions for exporting Windows Live Mail to Outlook2010
How to create rules to manage email
This guide applies to Outlook for Office 365, Outlook 2016, Outlook 2013, Outlook 2010, Outlook 2007
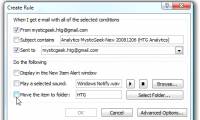
Step 1 . Start Outlook, right-click an email in the inbox or another email folder and select Rules .

Step 2 . Choose one of the options. Outlook will automatically suggest creating rules based on senders and recipients. To see other options, select Create Rule .
Step 3 . In the Create Rule dialog box, select one or more options in the first three options.

Step 4 . In the Do the following section , if you want the rule to move email to a specific folder, select the Move item to folder box, then select the folder from the Select Folder dialog box that pops up, and then click OK .

Step 5 . Click OK to save your rule.
Note : If you want to apply the rule to the email you received, select the box on the confirmation dialog that pops up and then click OK .
Create rules by using the Rules Wizard
There are three types of rules you can create with the Wizard Rules:
- Stay organized : These rules help you filter, send and track emails.
- Stay up to date: These rules notify you when you receive emails that match specific criteria.
- Custom rules : These are rules you create without templates.
You can customize these rules. There are many options for you to apply to each type of rule you create. Follow the steps below to learn how to create rules with the Rules Wizard.
Step 1:
1. Select File> Manage Rules & Alerts to open the Rules and Alerts dialog box.
2. On the Email Rules tab , select New Rule.
3. Select one of the templates from Step 1 . To start from the rule, select Apply rule on messages I receive or Apply rule on messages I send .
4. In Step 2: Edit the rule description , click on any underlined options to set them up. For example, if you selected Flag messages from someone for follow-up on Step 1 , click on people or public group to select the email of the sender you want to flag, then click follow up at this time to select the flag and tracking date.
5. Click Next .
Step 2:
On the second page of the Rules Wizard, you can add additional conditions to your rule. For example, you can choose emails sent from a specific person who also have certain words in the subject or email content.
1. In Step 1: Select condition (s) box , any conditions you set on the previous screen are selected. You can select additional conditions by checking the checkbox.
2 In the Step 2: Edit the rule description box , click the additional underline conditions you just added, and then click Next .
Step 3:
On the third page of the Rules Wizard, you can select additional actions to receive mail. For example, you can flag emails to track and mark important emails.
1. In Step 1: Select condition (s) box , any conditions you set on the previous screen are selected. You can select additional conditions by checking the checkbox.
2 In the Step 2: Edit the rule description box , click the additional underline conditions you just added, and then click Next .
Step 4:
On the fourth page of the Rules Wizard, you can add any exception in your rule.
In Step 1: Select condition (s) box , select any exception to your rule by selecting the checkbox.
In Step 2: Edit the rule description , click on any additional underlined exceptions you just added, then click Next .
Step 5:
1. On the fourth page of the Rules Wizard, enter a name for the rule.
2. If you want to apply the rule to the email you just received, select the Run this rule now option on messages already in "Inbox ".
3. By default, the Turn on this rule option will be selected. You can uncheck it if you don't want this rule to be enabled at this time.
4. Click Finish to save and apply the rule.
Delete the rule
You can remove the rule when it is no longer needed.
Step 1 . On the File tab, select Manage Rules & Alerts .
Step 2 . In the Rules and Alerts dialog box , on the E-mail Rules tab, select the rule you want to delete.
Step 3 . Select Delete> OK.
Manually apply rules
You can apply one or more rules manually by following the steps below:
Step 1 . On the File tab, select Manage Rules & Alerts and on the E-mail Rules tab, select Run Rules Now .
Step 2 . In the Run Rules Now box , in Select rules to run , select the checkbox for each rule you want to use.
Step 3 . In the Run in Folder box, to select another folder, click Browse , then select the folder, then select OK .
Step 4 . Select the Include subfolders option to include all the folders you have selected. .
Step 5 . In the Apply rules to list , accept the default settings of all emails or change them to read or unread emails.
Step 6 . Select Run Now.
I wish you all success!
See more:
- How to create a folder in Outlook 2013 by creating a rule
- Instructions for creating incoming mail filters on Gmail
- 7 ways to filter, classify and search effective email
Was this article helpful?
Your feedback helps us improve.
Related Articles
 How to create a folder in Outlook 2013 by creating a rule3 minutes read
 How to create a folder in Outlook 2016 using the rule2 minutes read
 Move daily email to a folder in Outlook2 minutes read
 Steps to create a new folder in Microsoft Outlook3 minutes read
 How to change the default email storage folder in Outlook desktop3 minutes read
 How to create a Group Email in Outlook4 minutes read
Reader Comments 0
Sign in with email or Google to join the discussion.