However, there are two easy solutions that allow you to upgrade your old Windows 10 PC to Windows 11. The article will share them below.
1. Bypass TPM and Secure Check Using Command Prompt
You can upgrade an incompatible Windows 10 PC to Windows 11 using a simple command line trick. Before you begin, back up your Windows PC so you can revert your changes if something goes wrong.
To get started, download the latest version of Windows 11 ISO to your computer. We recommend using the Media Creation Tool to download the ISO, as it will automatically detect the correct language preference to match your current installation. If it doesn't match, the upgrade option will be greyed out. Once the ISO is ready, right-click the ISO file and select Mount .
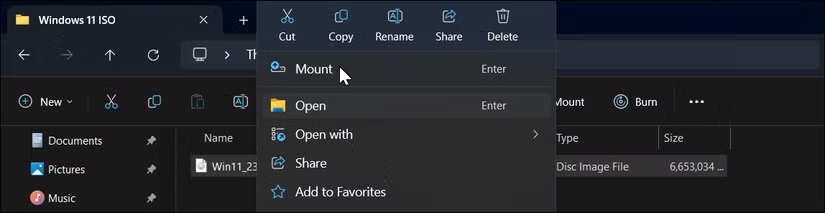
Next, open File Explorer, locate the mounted drive in the left pane, and note the drive letter assigned to it. If you double-click the mounted drive, you can see the contents of that drive, including the setup.exe file.

Finally, click Start , type cmd , and click Command Prompt from the results. In the Command Prompt window, enter the following command:
G:setup /product serverReplace G: with the drive letter assigned to your mounted drive and press Enter .

When the warning dialog box appears, click Run , then click Yes . This will launch Windows Server Setup , which is completely normal.
On the next screen, click Change how the setup downloads updates and select Not right now . Under Choose What to Keep , select Keep files, settings, and apps to install Windows 11 without removing apps. Otherwise, click Nothing . Then, click Next and follow the on-screen instructions.
2. Bypass Secure Boot and Check TPM with Rufus
Rufus is a popular third-party bootable installation media creation tool with built-in options to bypass Secure Boot and TPM 2.0 requirements for installing Windows 11. To create a bootable USB media, you need the latest Windows 11 ISO, so keep it with you.
Start by downloading Rufus from the official website. Extract the zip file and double-click to run Rufus.exe . Then, connect the USB to your computer and wait for Rufus to detect it.
In Rufus, click Select , then select the ISO file you downloaded. Leave all options at default, then click Start .
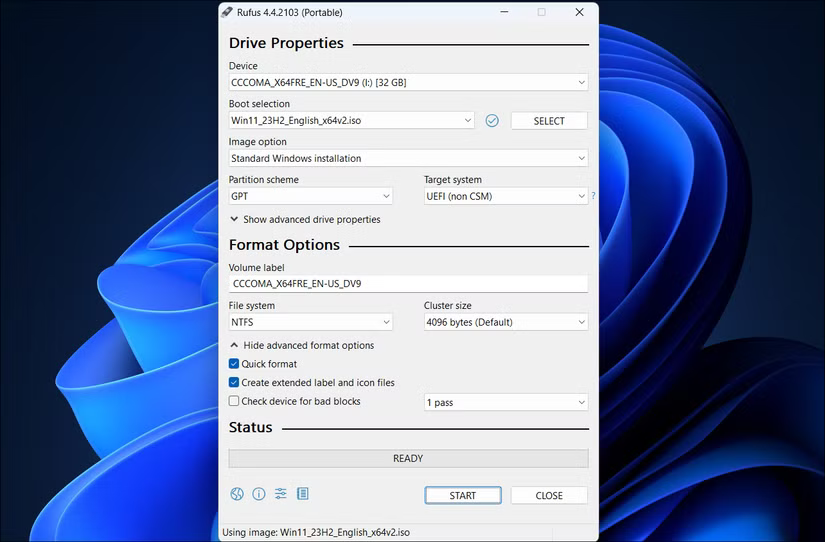
Select the first two options in the Windows User Experience dialog box, as shown in the screenshot below. Feel free to go through the other options to select or deselect them according to your preferences.

Click OK and wait for the copy to complete. Once complete, you can use the installation media to clean install Windows 11 on unsupported hardware.
Install Future Windows 11 Updates by Modifying the ISO File
One big problem with installing Windows 11 on ineligible hardware is that it won't get features or security updates. But there's a workaround.
You can install future updates using the Command Prompt method discussed above. Make sure to download the ISO image of the version of Windows 11 you want to upgrade to, then run the setup.exe file using the command setup /product server .
If that doesn't work, you can modify the contents of the appraiserres.dll file in the ISO image and then run setup to perform the upgrade. To get started, download and mount the latest version of the Windows 11 ISO.

Since we can't edit the contents of the ISO image directly, we need to copy the files to a new folder first. So double-click to open the mounted drive in File Explorer. You'll see it in the left pane under This PC . Then, press Ctrl + A to select all the files.
Create a new folder called Windows 11 Update and paste the copied contents into it. Once done, right-click on the mounted drive and select Eject .
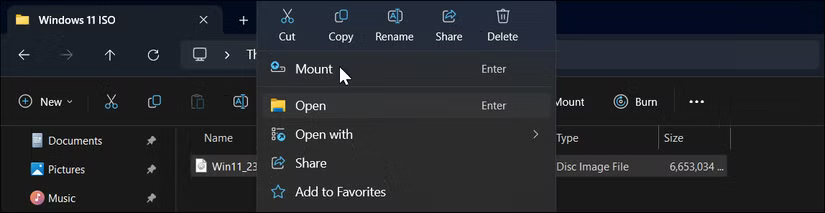
Open the Windows 11 Updates folder, go to the Sources folder, and locate the appraiser.dll file. Right-click that file and select Open With > Notepad .

In Notepad, press Ctrl + A to select all the content, press Backspace to delete it, then press Ctrl + S to save the file. Now, go back to the Windows 11 Update folder and run the setup.exe file. Follow the on-screen instructions to complete the upgrade.
What Happens If You Install Windows 11 on Unsupported Hardware?
While you can install Windows 11 on an unsupported PC, there are a few things you should know. First, your PC will most likely not receive future updates from Microsoft—including security updates.
While a world without Microsoft pushing update notifications every few days sounds appealing, those pesky updates do a lot to keep your PC secure.
Note that Microsoft warns of compatibility and stability issues on unsupported hardware. For example, you may see a persistent "System requirement not met" message on your desktop or in Settings. However, you can remove this watermark by messing with the registry.
Since Microsoft won't support Windows 10 after October 2025, you can simply install Windows 11 and continue installing newer updates using these workarounds for as long as possible.





Reader Comments 0
Sign in with email or Google to join the discussion.