Table of Contents
This guide provides a clear overview of windows 11, including Why Does Windows 11 Display the ""system Requirement Not Met"" Message, how to Get Rid of the ""system Requirement Not Met"" Message. Use it to understand the topic, compare the available options, and make a more informed decision.
This may not be a concern if you use the operating system on a virtual machine. But for most people, this message feels very uncomfortable. Fortunately, you can get rid of this annoying message by doing a trick with the Registry. TipsMake will guide you through the following article!
Why Does Windows 11 Display the ""system Requirement Not Met"" Message?
Microsoft's Windows 11 has much stricter hardware requirements than any previous version. If your system does not meet the minimum system requirements, including TPM 2.0, the installation will stop unexpectedly.
However, this problem has many solutions. You can bypass the restriction and install Windows 11 on unsupported hardware.
Although Microsoft initially allowed installation on unsupported hardware with warnings about security issues and lack of future updates, Microsoft has now decided to put a permanent watermark to remind users that their system is not supported. A similar message may also appear in the Settings app.
How to Get Rid of the ""system Requirement Not Met"" Message
If you see the "System requirement not met" watermark on your PC, you can remove it by modifying the DWORD value in Registry Editor.
Follow these steps to remove "System requirement not met" message on Windows 11:
- 1. Press Win + R to open the Run dialog box.
- 2. Type regedit and click OK to open the Registry Editor.
- 3. In Registry Editor, navigate to the following path. You can also copy and paste the path into the Registry Editor address bar for quick navigation.
- HKEY_CURRENT_USER/Control Panel/UnsupportedHardwareNotificationCache
- 4. In the right pane, right-click on the SV2 DWORD value and select Modify.
- 5. Enter 0 in the value data field.
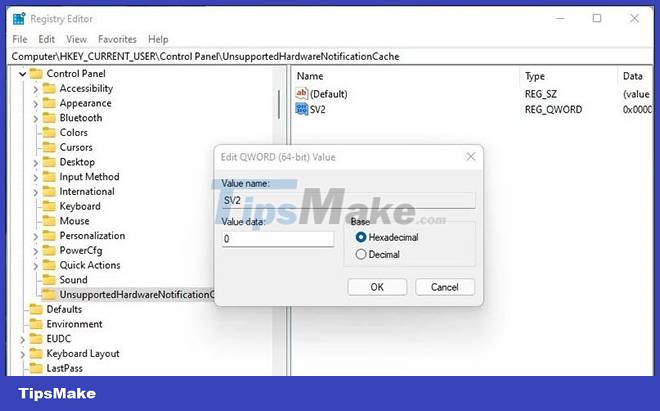
- 6. Click OK to save the changes.
- 7. Close Registry Editor and restart the PC to apply the changes. After rebooting, Windows 11 will no longer show the unsupported hardware message.
- If you do not have an UnsupportedHardwareNotificationCache key, you will need to generate a new key and set a value for that key. To do this:
- 1. In the Registry Editor, right-click the Control key (HKEY_CURRENT_USER/Control Panel) and select New > Key.
- 2. Next, rename the key to UnsupportedHardwareNotificationCache.
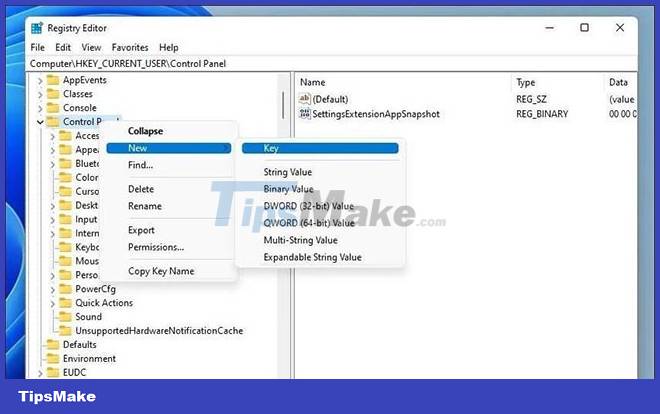
- 3. Next, right-click on the new key and select New > DWORD (64-bit).
- 4. Rename the value as SV2.
- 5. Next, modify the SV2 DWORD value and set its Value data to 2.
- 6. Click OK to save the changes.
Maybe this message will reappear with new updates. So you will need to repeat the steps after installing the update.
Conclusion
Understanding Windows 11 makes it easier to compare options, avoid common mistakes, and apply the information in this guide more effectively. Review the relevant requirements before making changes or choosing a solution.
FAQ
What is Windows 11?
Although Microsoft initially allowed installation on unsupported hardware with warnings about security issues and lack of future updates, Microsoft has now decided to put a permanent watermark to remind users that their system is not supported.
Why is Windows 11 important?
Understanding Windows 11 helps you evaluate features, compatibility, performance, and potential limitations before you choose a product or follow a procedure.
What should you consider when using or choosing Windows 11?
Consider your specific goal, compatibility requirements, available features, cost, security, and the practical recommendations described in this guide.
Related Articles
 GTA VI PC System Requirements, GTA 6 PC System Requirements8 minutes read
 System Requirements for Installing Windows 10 April 2018 Update3 minutes read
 Do You Need a Powerful PC to Play Hogwarts Legacy: Explained4 minutes read
 Minimum PC System Requirements for Forza Horizon 65 minutes read
 Configuration Requirements: Configuration Required to Use Windows3 minutes read
 This Powershell Script Can Bypass Windows 11 System Requirements4 minutes read
Reader Comments 0
Sign in with email or Google to join the discussion.