How to Print Screen on Windows 7
Method 1 of 3:
Capturing the Entire Screen
-
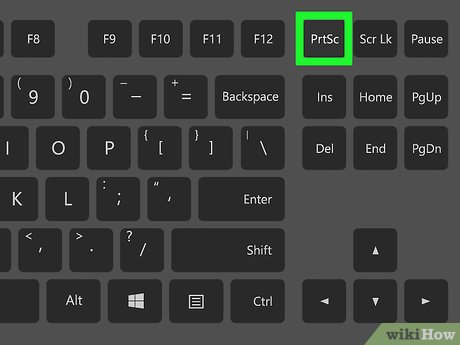
 Press PrntScrn. Doing so saves the entire image on the screen to your computer's Clipboard, in the same resolution as your monitor setting. For example, a 1280x720 dpi monitor will result in a 1280x720 dpi image.
- If your keyboard doesn't have a PrntScrn key, press Fn+Insert.
-
 Open a document or create a new one. Do so in any app that supports the pasting of images, like Word, Outlook, or Paint.
 -
 Paste the screenshot. Do so by pressing Ctrl+V or selecting Paste from the Edit drop-down in the menu bar. The screenshot will be pasted into the document. You can now save it, email it, print, or otherwise share it.
Method 2 of 3:
Capturing a Specific Window
-
 Click on the window you want to capture.
 -
 Press Alt+PrntScrn. Doing so saves an image of the window to your computer's Clipboard.
- If your keyboard doesn't have a PrntScrn key, press Fn+Insert.
-
 Open a document or create a new one. Do so in any app that supports the pasting of images, like Word, Outlook, or Paint.
 -
 Paste the screenshot. Do so by pressing Ctrl+V or selecting Paste from the Edit drop-down in the menu bar. The screenshot will be pasted into the document. You can now save it, email it, print, or otherwise, share it.
Method 3 of 3:
Using the Snipping Tool
-
 Open the "Start" menu. It's in the lower-left corner of the screen.
 -
 Click on Search.
 -
 Type snipping tool in the "Search" bar.
 -
 Click on Snipping Tool. Doing so opens a dialog box
 -
 Click on Mode. It's in the menu bar of the dialog box.
 -
 Click on Rectangular Snip to create a rectangle-shaped image.
 -
 Click and drag the pointer to outline a rectangular area of the screen. This takes a screenshot of the section of the screen you outlined and shows you the resulting image.
 -
 Click on Save Snip. It's the icon that looks like a purple floppy disc. This will open the "Save As" window and you can enter a filename for the screenshot and choose where to save it.
- The default image file type for the snipping tool is JPEG. You can change this by clicking on the "File Type" drop-down menu in the dialog box.
-
 Click on Save. The selected portion of the screen will be saved as an image to your computer.
Share by
Lesley Montoya
Update 04 March 2020


