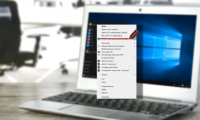
Customize the context menu of Windows 7
Adding some context menu functions (right-click menu) is a useful method to simplify tasks and save time.
Network administration - Adding some context menu functions (right-click menu) is a useful method to simplify tasks and save time.
We can add some items such as Command Prompt, Copy the contents to clipboard (Copy data to the clipboard), CopyTo, MoveTo to the context menu of Windows 7. Obviously these additional components will save save a lot of time when performing simple tasks on the computer.
In this article they will add the above items to the context menu.
Before doing so, we need to back up the Registry to prevent the worst possible situation because every method will be done by configuring the Registry.
Additional Open Command Prompt in This Folder option
When working in Command Prompt, we will have to spend a certain amount of time to open a folder in the Command Prompt with the cd command [directory path]. If the file needs to be deep in the hard drive, repeating these tasks will be quite troublesome. Therefore Windows 7 allows users to add an item to the right-click menu so that they can open the Command Prompt directly in this folder with just two clicks. Do as follows:
Go to Start menu | Run , enter regedit and press Enter to open the Registry Editor .
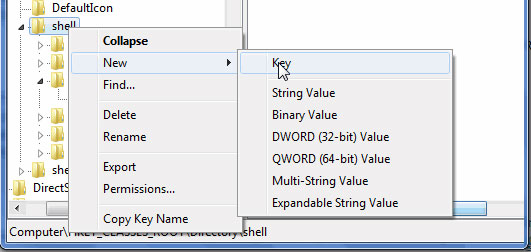
Visit HKEY_CLASSES_ROOTDirectoryshell .
In the shell , create a new key named Command Prompt .
In the right panel, change the value of Default by right-clicking it and selecting Modify and then entering Command Prompt here in the Value Data field.
In the Command Prompt key, create another new key named command .
Select the newly created key and change Default , in the Value data field enter the following code:
Next close the Registry Editor and right-click any folder we will see the Command Prompt here option .
After selecting this option, the Command Prompt will appear with a link pointing to that directory.
Add the option to 'Copy the content to clipboard'
Add "CopyTo" option
Name this key CopyTo .
Double-click on Default in the right panel, enter the following code in the Value data field:
We can add some items such as Command Prompt, Copy the contents to clipboard (Copy data to the clipboard), CopyTo, MoveTo to the context menu of Windows 7. Obviously these additional components will save save a lot of time when performing simple tasks on the computer.
In this article they will add the above items to the context menu.
Before doing so, we need to back up the Registry to prevent the worst possible situation because every method will be done by configuring the Registry.
Additional Open Command Prompt in This Folder option
When working in Command Prompt, we will have to spend a certain amount of time to open a folder in the Command Prompt with the cd command [directory path]. If the file needs to be deep in the hard drive, repeating these tasks will be quite troublesome. Therefore Windows 7 allows users to add an item to the right-click menu so that they can open the Command Prompt directly in this folder with just two clicks. Do as follows:
Go to Start menu | Run , enter regedit and press Enter to open the Registry Editor .
Visit HKEY_CLASSES_ROOTDirectoryshell .
In the shell , create a new key named Command Prompt .
Figure 1: Create a new key in the shell.
In the right panel, change the value of Default by right-clicking it and selecting Modify and then entering Command Prompt here in the Value Data field.
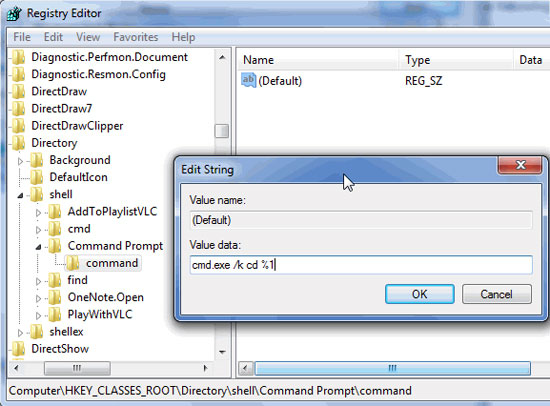
In the Command Prompt key, create another new key named command .
Select the newly created key and change Default , in the Value data field enter the following code:
cmd.exe / k cd% 1
Figure 2: Edit the Default of the key command.
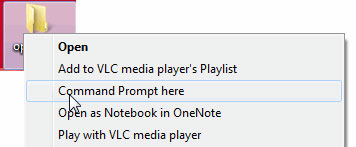
Next close the Registry Editor and right-click any folder we will see the Command Prompt here option .
Figure 3: The Command Prompt here option appears in the context menu of the folder.
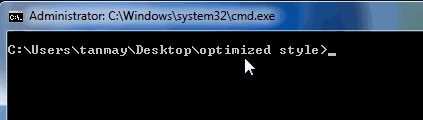
After selecting this option, the Command Prompt will appear with a link pointing to that directory.
Figure 4: Command Prompt pointing to the folder that opens.
Add the option to 'Copy the content to clipboard'
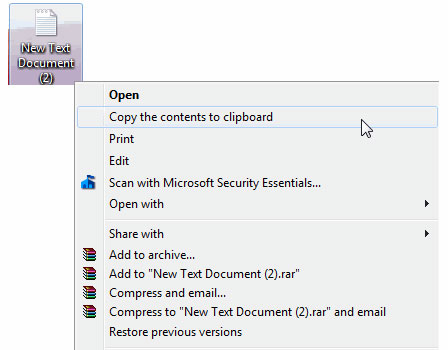
Let's say we want to copy the entire text of a Notepad document and paste it into a Word document. Normally we will have to open the Notepad document, select the text and then copy. However, all these operations will be simplified by right-clicking on the Notepad document and selecting the Copy to clip option .
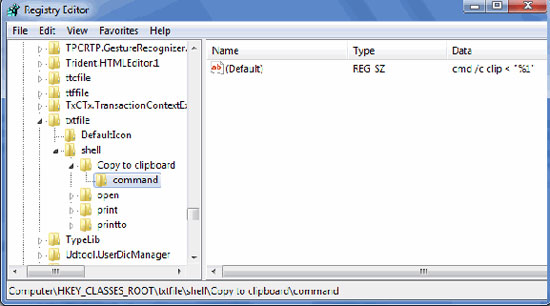
First, access HKEY_CLASSES_ROOTtxtfileshell in Registry Editor .
Create a new key in the shell and name it Copy to clipboard .
In the right pane, right-click on Default choose Modify . In the Value data field, enter Copy the contents to clipboard .
In Copy to clipboard , create a new key and name it command . Right click on Default choose Modify and then enter the following code in the Value Data field:
cmd / c clip <'% 1'
Figure 5: Create key command in Copy to clipboard.
When you right click on any file and select Copy the content to clipboard in the context menu, the contents of this file will be copied to the Clipboard. And we can Paste into any text file.
Figure 6: Option Copy the contents to clipboard.
Add "CopyTo" option
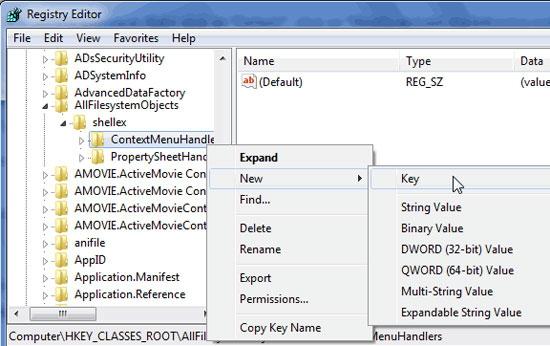
Access HKEY_CLASSES_ROOTAllFilesystemObjectsshellexContextMenuHandlers in Registry Editor .
Right-click on the ContextMenuHandlers select New | Key
Right-click on the ContextMenuHandlers select New | Key
Figure 7: Create a new key in the ContextMenuHandlers.
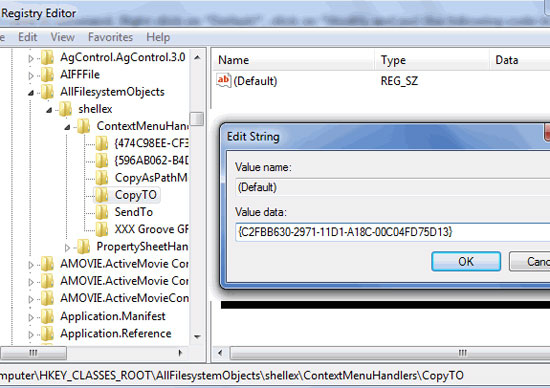
Name this key CopyTo .
Double-click on Default in the right panel, enter the following code in the Value data field:
{C2FBB630-2971-11D1-A18C-00C04FD75D13}
Figure 8: Change the value of the CopyTo key.
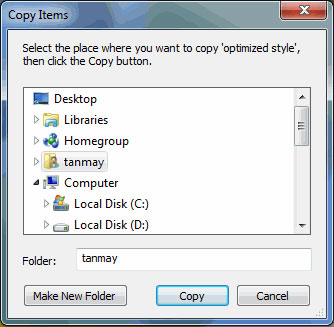
Then the CopyTo entry will be added to the context menu. Now, whenever you right-click any file or folder and select CopyTo , the dialog box shown in Figure 9 will appear.
Figure 9: Copy Items dialog box.
In this dialog box we can choose the location where we want to copy the next file or directory.
Add SendTo option
To add the MoveTo entry to the context menu, do the following:
Access HKEY_CLASSES_ROOTAllFilesystemObjectsshellexContextMenuHandlers in Registry Editor .
Create a new key with the name MoveTo .
In the Value data field of Default in the right table, enter the following code:
Add SendTo option
To add the MoveTo entry to the context menu, do the following:
Access HKEY_CLASSES_ROOTAllFilesystemObjectsshellexContextMenuHandlers in Registry Editor .
Create a new key with the name MoveTo .
In the Value data field of Default in the right table, enter the following code:
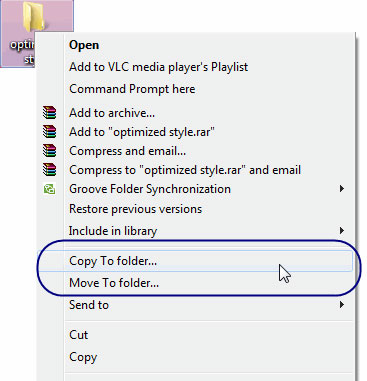
{C2FBB631-2971-11D1-A18C-00C04FD75D13}When you close the Registry Editor and right-click the file or folder, you will see the MoveTo entry appear in the context menu.
Figure 10: The Copy to Folder and Move to Folder options appear in the context menu.
In addition to Windows 7, we can perform these little tricks on Windows Vista and Windows XP.
Was this article helpful?
Your feedback helps us improve.
Related Articles
 The context menu of Windows 11 will have a new eye-catching design3 minutes read
 This small application helps bring the context menu interface of Windows 10 to Windows 113 minutes read
 Microsoft is committed to improving the context menu experience on Windows 113 minutes read
 How to add items to the 'Create New' context menu in Windows 105 minutes read
 How to delete options in the Windows context menu11 minutes read
 How to restore the old context menu in Windows 114 minutes read
Reader Comments 0
Sign in with email or Google to join the discussion.