How to Enable AutoRecover in Microsoft Office 2010
Does this sound familiar? You are working in Excel, Word or Access in Microsoft Office 2010, and your device suddenly crashes, in the middle of a session. You have not saved your document yet, losing all of your hard work and progress.....
Method 1 of 6:
Excel
-
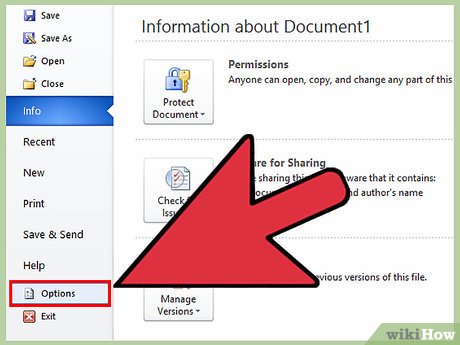
 Click on the File Tab on top left corner of the window.
 -
 Click on "Option" button, which is adjacent to the Exit button.
 -
 Click on Save from the Excel Option window, which is in left side panel.
 -
 Leave the Save files in this format: as it is, if don't want AutoSave your work in any other format. Default is Excel Workbook.
 -
 Select the Save AutoRecover information every XX minutes check box.
 -
 Put 1 minute at that time box. Default is 14 minutes.
 -
 Leave the AutoRecover file location as it is. Default is "C:Documents and SettingsAdministratorApplication DataMicrosoftExcel", if Administrator is the user who logged in.
 -
 Leave the Default file location as it is, if you want to change your default file location, then change here. Default is "C:Documents and SettingsAdministratorMy Documents", if Administrator is the user who logged in.
 -
 Click on OK button at bottom left part adjacent to Cancel button.
Method 2 of 6:
Word
-
 Click on the File Tab on top left corner of the window.
 -
 Click on Option button, which is adjacent to the Exit button.
 -
 Click on Save from the Word Option window, which is in left side panel.
 -
 Leave the Save files in this format: as it is, if don't want AutoSave your work in any other format. Default is Word document(*.docx).
 -
 Select the Save AutoRecover information every XX minutes check box.
 -
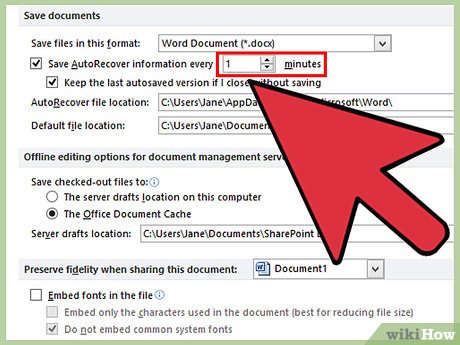 Type "1" minute into the box. While the default is 10 minutes, a more frequent time is preferred.
 -
 Leave the AutoRecover file location as it is. The default is "C:Documents and SettingsAdministratorApplication DataMicrosoftWord", if you are the administrator.
 -
 Leave the Default file location as it is. If you want to change your default file location, then change it here. The default is "C:Documents and SettingsAdministratorMy Documents" if you are an administrator.
 -
 Click on OK button at bottom left part, adjacent to the Cancel button.
Method 3 of 6:
PowerPoint
-
 Click on the File Tab on top left corner of the window.
 -
 Click on Option button, which is adjacent to the Exit PowerPoint button.
 -
 Click on Save from the PowerPoint Option window, which is in left side panel.
 -
 Leave the Save files in this format: as it is, if don't want AutoSave your work in any other format. Default is PowerPoint Presentation.
 -
 Select the Save AutoRecover information every XX minutes check box.
 -
 Put 1 minute at that time box. Default is 10 minutes.
 -
 Leave the Default file location as it is, if you want to change your default file location, then change here. Default is "C:Documents and SettingsAdministratorMy Documents", if Administrator is the user who logged in.
 -
 Click on OK button at bottom left part adjacent to Cancel button.
Method 4 of 6:
Publisher
-
 Click on the File Tab at the top left corner of the window.
 -
 Select Options.
 -
 Click on the Save tab.
 -
 Select Allow background saves.
 -
 Select the Save AutoRecover information every XX minutes check box.
 -
 Put 1 minute at that time box. Default is 10 minutes.
 -
 Click on the OK button at bottom left, adjacent to the Cancel button.
Method 5 of 6:
Outlook
-
 Click on the File Tab on top left corner of the window.
 -
 Select Options.
 -
 Click on Mail from the Outlook Options window, which is in left side panel then scroll down to Save messages.
 -
 Select the Automatically save items that have not been sent after this many minutes check box.
 -
 Select Drafts in "Save to this folder:" menu.
 -
 Put 1 minute as the chosen time.
 -
 Click on the OK button at bottom left, adjacent to the Cancel button in the "Options" window.
Method 6 of 6:
Visio
-
 Click on Tools from menu bar.
 -
 Select Options.
 -
 Go to the Save/Open tab.
 -
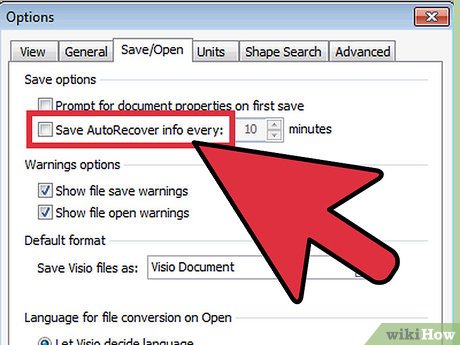 Select the Save AutoRecover information every X minutes check box.
 -
 Put 1 minutes as AutoRecover time.
 -
 Click on the OK button, adjacent to the Cancel button.