How to activate Supabase in Cursor
This guide shows you how to connect Supabase to Cursor via MCP so that AI can gain a deep understanding of the database, enabling super-fast programming and data management..
In the era of AI -powered programming , enabling tools to understand the project's data structure (schema) is crucial for increased productivity. The combination of Cursor – the most intelligent IDE currently available – and Supabase – a powerful backend-as-a-service platform, via the Model Context Protocol ( MCP ) , has created a seamless workflow. This article will guide you on how to set up and leverage the power of this duo.
What is Supabase? Why should you use it with Cursor?
Before delving into the technical aspects, we need to understand the "heart" of this data system.
Supabase is often referred to as an open-source alternative to Firebase. However, instead of using NoSQL, Supabase is built on PostgreSQL , one of the world's most powerful and stable relational database management systems.
The core benefits of Supabase:
- Real-time database: Allows you to listen for changes in the database and update the user interface instantly.
- Identity Management (Authentication): Provides a system for logging in, registering, and assigning user permissions with just a few lines of code.
- Storage: Easily manage large files such as images and videos.
- Edge Functions: Execute server-side code closest to the user to reduce latency.
- AI compatibility: Supabase supports vector storage, which is crucial for applications using RAG (Retrieval-Augmented Generation) techniques.
Detailed steps for connecting Supabase to Cursor
Please ensure you have installed the latest version of Cursor for optimal performance of MCP features.
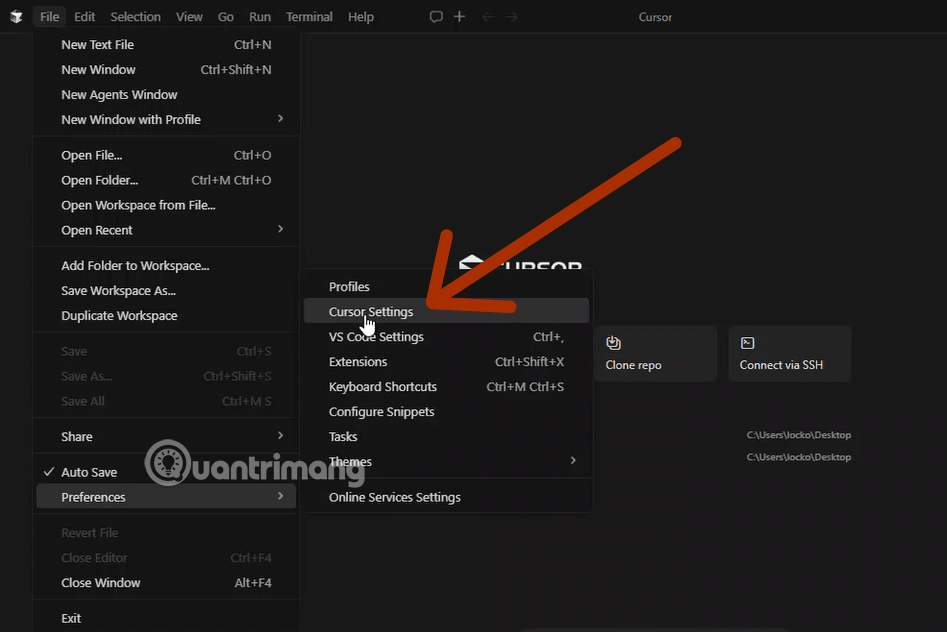
Step 1: Open the MCP driver in Cursor
Open the Cursor application. On the toolbar, select File > Preferences > Cursor Settings . In the left sidebar, find and select the Tools & MCP tab (or simply MCP depending on the version). Also, register an account using the Supabase link below.
https://supabase.com/
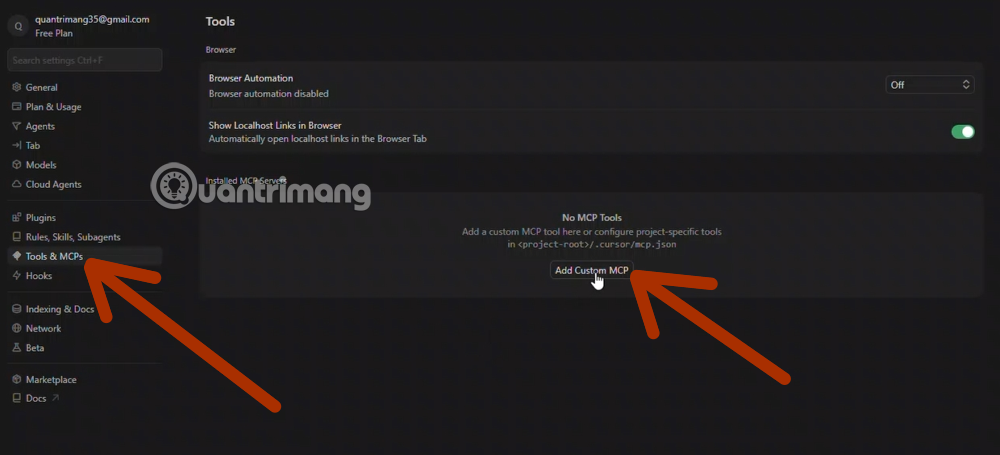
Step 2: Add a custom MCP server
Click the + Add Custom MCP (or New MCP Server ) button. Cursor will prompt you for configuration. In some cases, Cursor will open a configuration JSON file or an information entry form.
Step 3: Set up connection parameters
Here, you need to enter information for the Supabase Server. Typically, you will choose the connection type as stdio (run local commands) or provide a pre-configured URL from the Supabase MCP community.
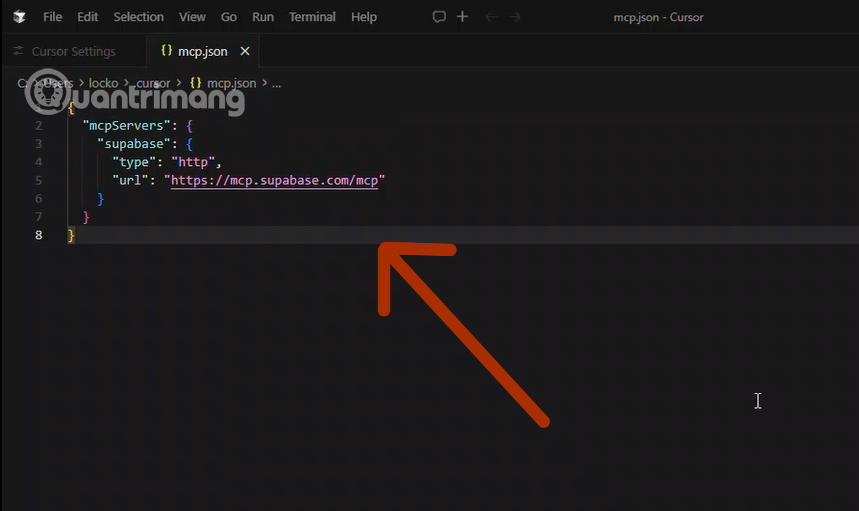
Copy the code below and paste it into the information field as shown above, and the system will automatically detect and connect to Supabase.
{ "mcpServers": { "supabase": { "type": "http", "url": "https://mcp.supabase.com/mcp" } } }Step 4: Authorization
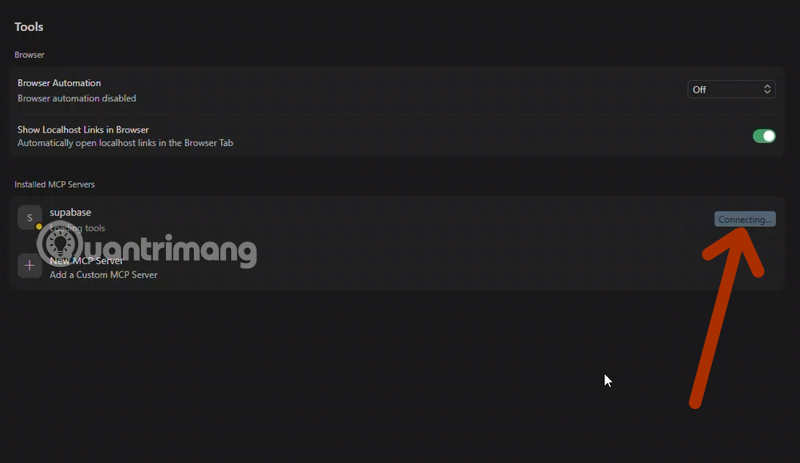
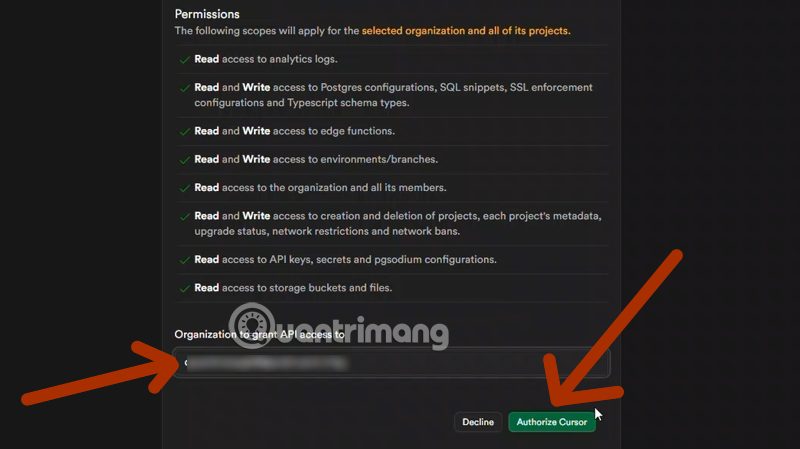
After clicking Add, go back to the list of installed servers, find Supabase , and click Connect .
A browser window will pop up asking you to log in to the Supabase dashboard. Here, select the project you want the AI to access and click Authorize Cursor .
Step 5: Check the status
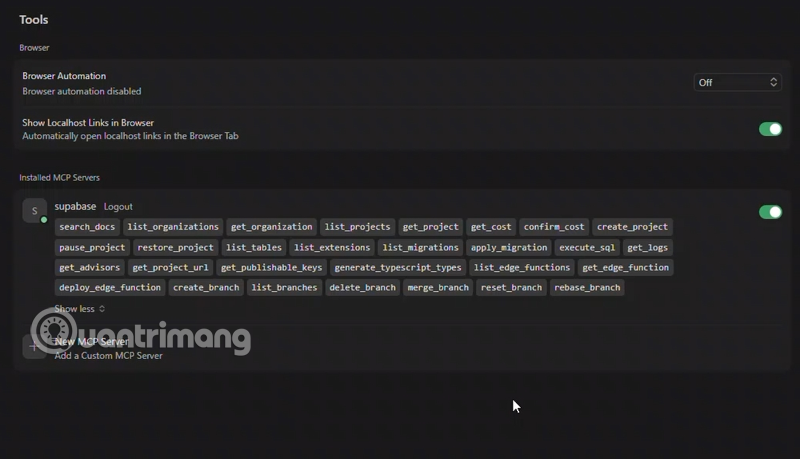
Go back to Cursor, if you see the circle next to the word Supabase turn green , it means the AI has successfully connected with your database.
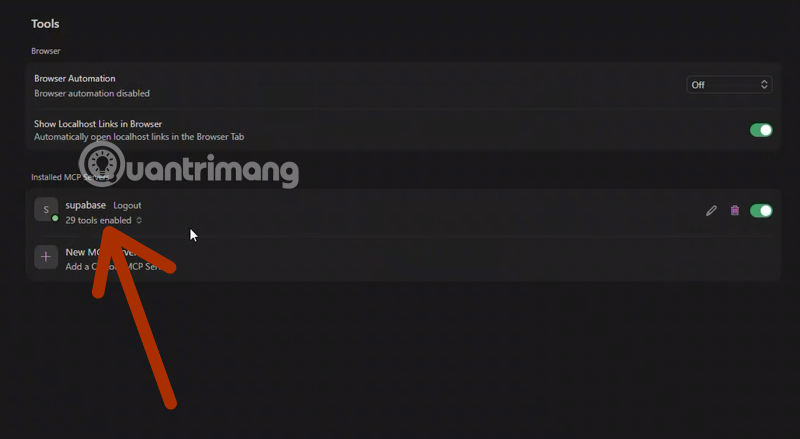
Check the connected tools by selecting "Tools Enabled" there; the tools will be displayed as shown in the image below.
Why is connecting Supabase to Cursor via MCP a "turning point"?
Typically, when programming with AI, you have to copy-paste the table structure (Table Definition) into the chat window for the AI to understand. This is very time-consuming and prone to errors if the database changes.
When connecting via MCP (Model Context Protocol) , Cursor AI will have the following permissions:
- Self-reading of the Schema: It knows exactly
userswhich columns the table has and what data types they are. - Direct query: You can tell the AI: "Get me the 10 most recent orders from this user," and it will automatically run SQL to retrieve the actual results.
- Migrations Management: AI can automatically write and execute database structure modification files without you leaving the IDE.
How to use Cursor AI to manipulate Supabase data
After successfully connecting, you can execute powerful commands directly in the Chat or Composer window (Ctrl + I):
- Quick lookup: "Please explain the relationship between tables
ordersandproductsin this project." - Write API code: "Write a Next.js API function for me to add a new product, ensuring it adheres to the correct data types in Supabase."
- Data verification: "Why aren't users with email addresses
test@gmail.comreceiving their orders? Please check the database for me." The AI will automatically query and provide an answer based on the actual data.
Optimize security and performance when using Supabase MCP.
Empowering AI to access databases is powerful, but information security considerations are also crucial.
- Least Privilege: When delegating authority on Supabase, ensure that the AI only has access to necessary projects.
- Development Environment: It's best to connect the Cursor to the development environment
stagingorlocal developmentSupabase to prevent the AI from accidentally executing commandsDELETEonDROP TABLEreal customer (Production) data. - Check the SQL command: Cursor will usually display the SQL statement it intends to execute. Make it a habit to review it before clicking "Execute" to ensure safety.
Conclusion
Connecting Supabase to Cursor via the MCP protocol isn't just a technical trick; it's a way to elevate your programming skills to a new level. Instead of wasting time on repetitive tasks like schema lookups or manual SQL writing, you can now focus entirely on logical thinking and product creation.
Try setting it up today and experience the power of having an "AI data expert" right in your code editor!