Table of Contents
n8n's Supabase node can create, read, update, and delete rows through the Supabase Data API. The connection requires a project host and a server-side secret key. Because that key has elevated access and bypasses Row Level Security (RLS), the safest setup uses a test project first, stores the key only in n8n credentials, restricts the Data API surface, and adds explicit workflow validation before any write or delete operation.
What you need
- A Supabase project with the Data API enabled.
- An n8n instance that can reach the project's Supabase URL over HTTPS.
- Permission to create credentials in n8n.
- A test table containing non-sensitive sample data.
- A current Supabase secret key, or a legacy
service_rolekey while the project still uses legacy keys.
Supabase is moving from legacy anon and service_role JWT keys to publishable and secret keys. Use the key type shown in the current n8n Supabase credential documentation. Do not use a publishable or anon key in the n8n credential field when the node expects a secret.
1. Add a Supabase node
Open an n8n workflow, add a node, and search for Supabase. Select the Supabase app node and choose the row operation that matches the task. The available operations include creating a row, retrieving one or many rows, updating a row, and deleting a row.
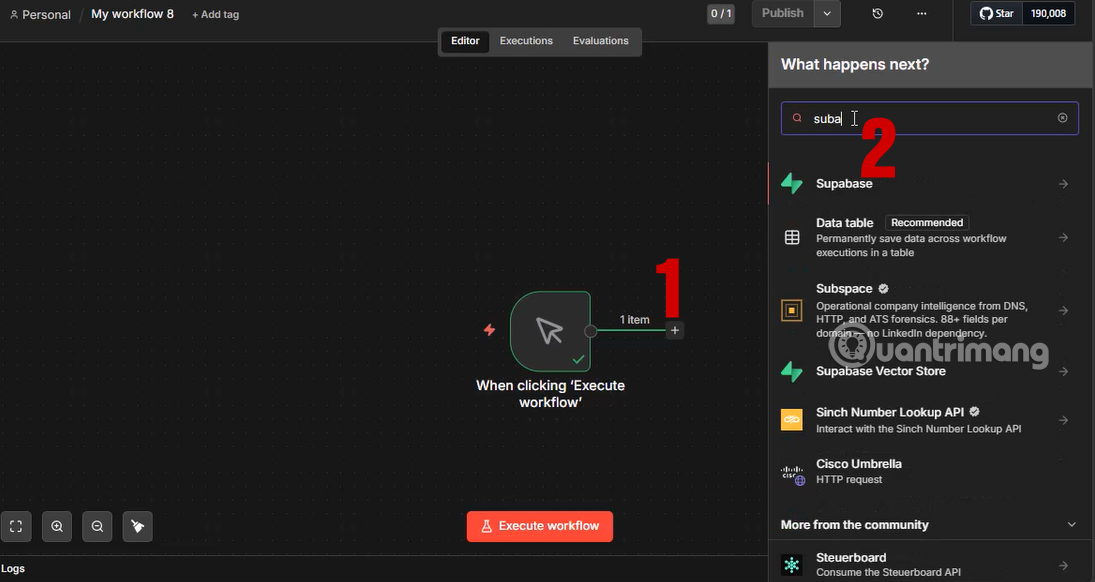
Add the built-in Supabase node from n8n's node picker.
For a first test, use a read operation such as Get Many. A read-only test is safer than inserting or deleting data while credentials and filters are still being checked.
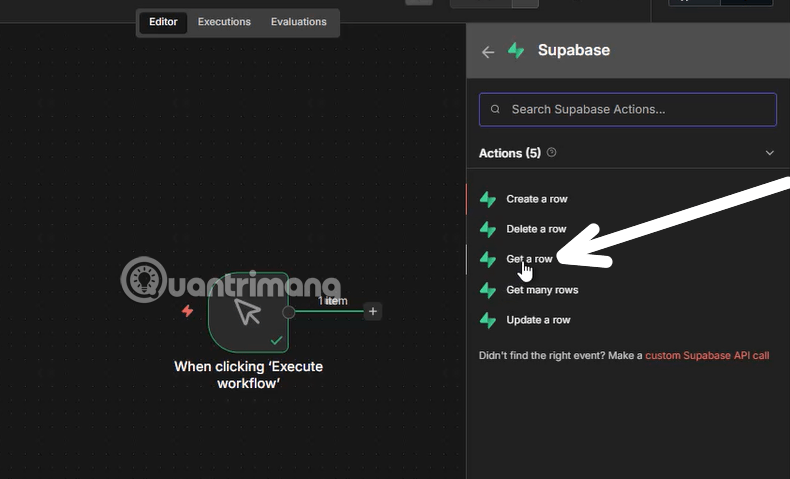
Begin with a read operation against sample data.
2. Create the Supabase credential in n8n
In the node's Credential field, create a new Supabase credential. n8n currently asks for:
- Host: the project URL, normally
https://PROJECT_REF.supabase.co. - Secret Key: a server-side Supabase secret key. Older projects may still use the legacy
service_rolekey.
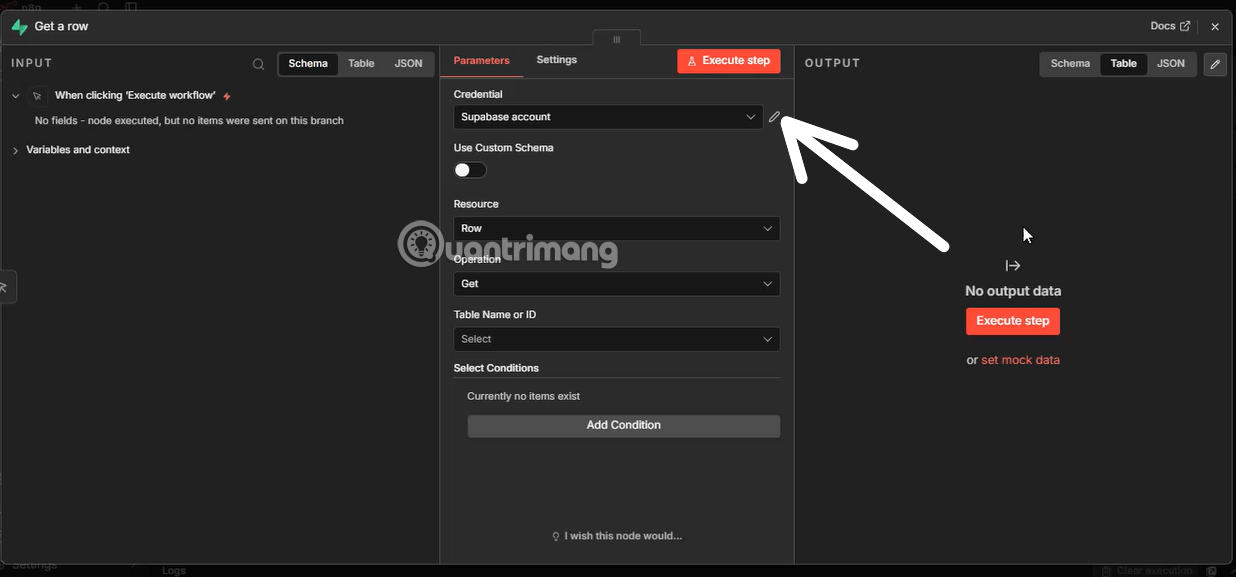
The credential keeps the host and secret separate from workflow expressions.
Never paste the secret into a Set node, Code node, URL, webhook response, execution note, or exported workflow JSON. Restrict access to n8n credentials and execution logs, and use different Supabase projects or keys for development and production.
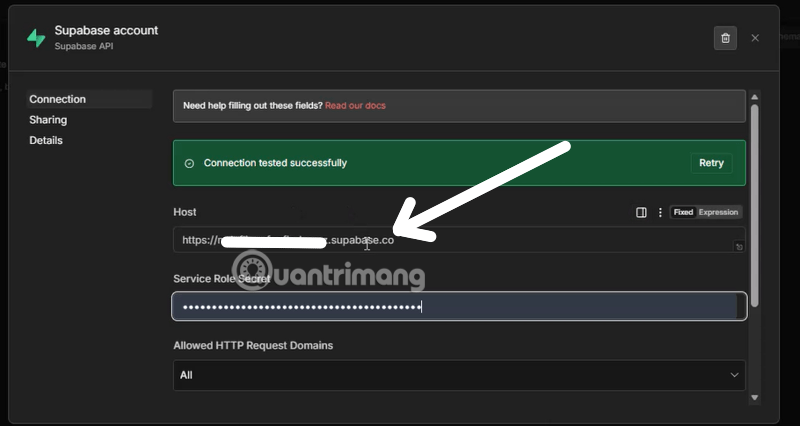
Store the key in n8n's credential manager, not in ordinary node data.
3. Copy the project URL and secret key
In the Supabase dashboard, open the project's Connect dialog or Settings > API Keys. Copy the Project URL and a server-side secret key. Supabase's API-key documentation explains the new publishable/secret keys and the legacy keys.
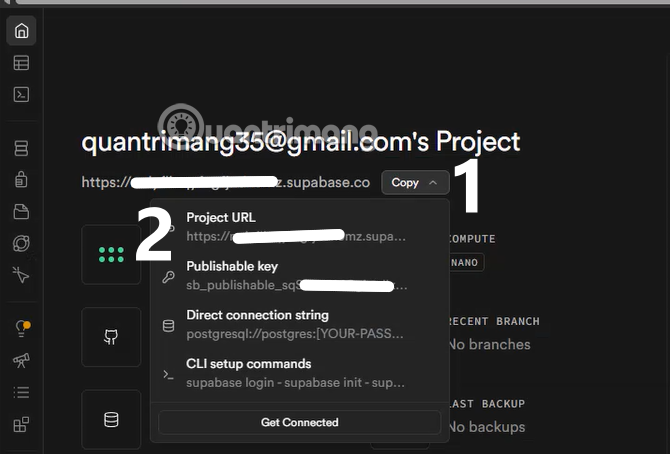
Use the URL for the exact development or production project you intend to reach.
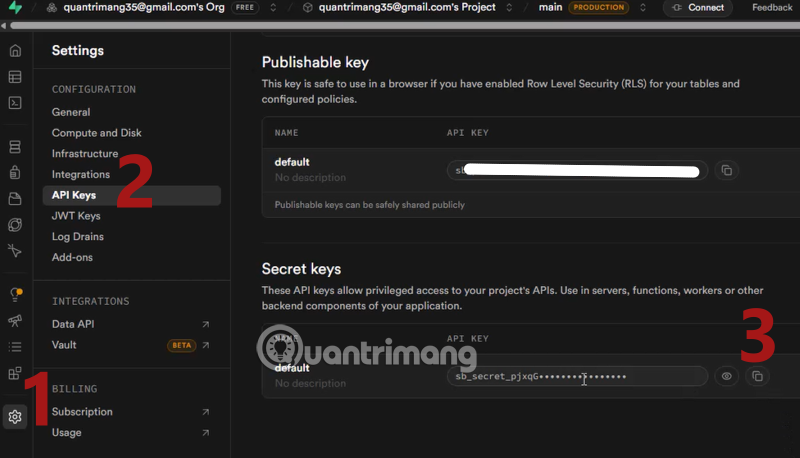
A Supabase secret or legacy service-role key is highly privileged.
Important: secret and service_role keys bypass RLS. RLS policies do not limit a request authenticated as the service role. If you need a credential whose database permissions are narrower, consider n8n's Postgres node with a dedicated Postgres role, or expose a carefully authenticated Edge Function or database function with only the required operation. Do not claim that a normal Supabase user will restrict the built-in node while it still authenticates with an elevated key.
4. Prepare a small test table
Create a test table with non-sensitive rows. Enable RLS for client-facing use and configure grants appropriately, but remember that the privileged n8n credential still bypasses RLS. Keep private internal tables out of the Data API's exposed schemas whenever possible.
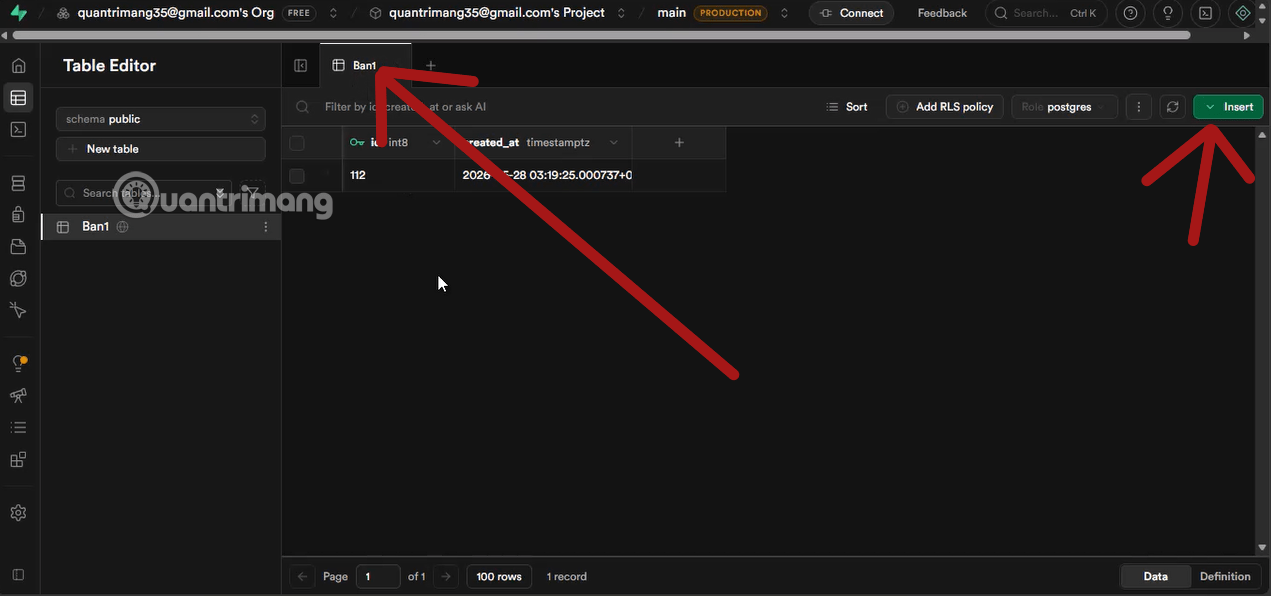
Test with disposable data before connecting a production table.
Supabase recommends combining Postgres grants, RLS, and a deliberately limited API schema. Its Data API security guide explains how those controls fit together.
5. Configure the row operation
Return to n8n, select the saved credential, and configure the node:
- Resource and operation: choose the row action needed by the workflow.
- Table: select or enter the exact table.
- Schema: use the supported custom-schema option when the table is not in
public. - Filters: narrow the operation to the intended records.
- Fields: send only the columns required for a create or update.
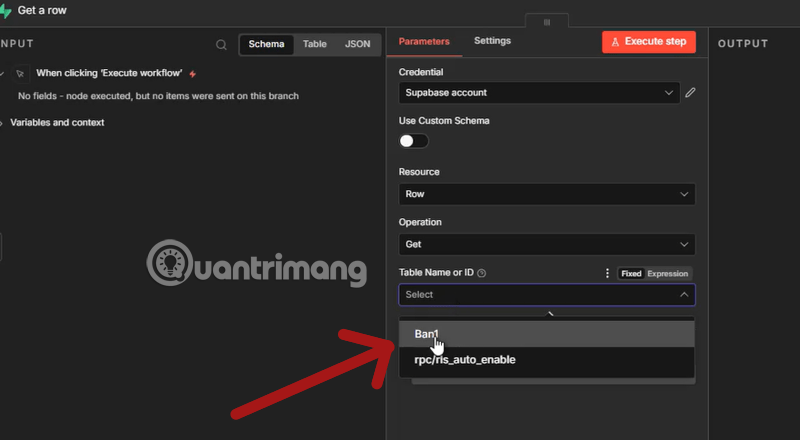
Choose the schema, table, fields, and filters explicitly.
n8n expressions can map values from an earlier node, for example {{ $json.user_id }} or {{ $json.email }}. Validate and normalize those inputs first. Do not place an untrusted expression directly into a delete filter or use a missing identifier as a broad match.
Safer write-operation pattern
- Validate required values and types in a preceding node.
- Reject empty IDs and unexpected status values.
- Look up the target row and confirm the expected current state.
- Update only the required fields.
- Record the operation ID and result without logging secrets or sensitive row contents.
- Route failures to an alert or review queue.
6. Execute and inspect the result
Select Execute step with known test input. Check the returned rows, count, identifiers, and error messages. Then open Supabase and verify that the result matches the intended table and project. A successful green node only means the request completed; it does not prove that the business rule or filter was correct.
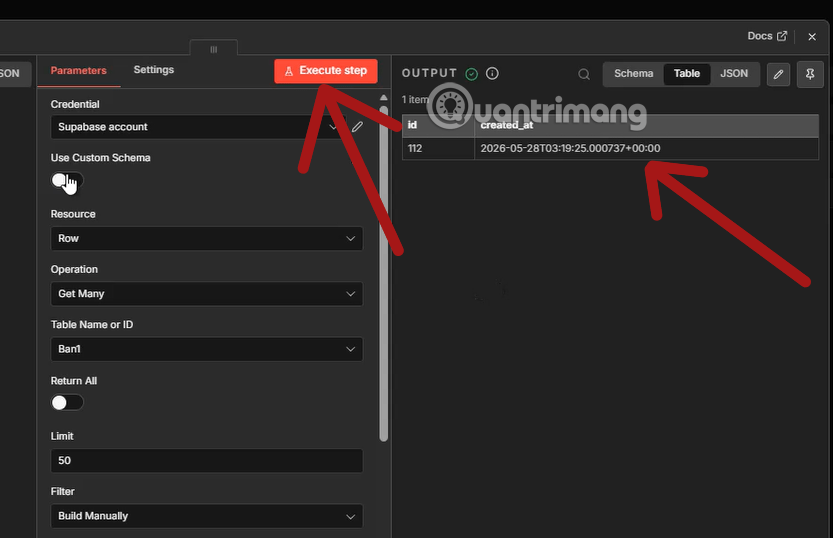
Verify the n8n output and the database state before activating the workflow.
Example workflow: synchronize an approved contact
A practical workflow can receive a form submission, validate the email and consent status, search Supabase for an existing contact, then create or update one row. Add an idempotency key so retries do not create duplicates, and store the source timestamp separately from the workflow execution time.
- Form or webhook trigger receives the submission.
- A validation node checks required fields and allowed values.
- Supabase Get Many searches by a normalized unique email or external ID.
- An If node chooses Create or Update.
- The Supabase write node changes only approved fields.
- A final node records success or sends a controlled error notification.
For other workflow platforms and trade-offs, see TipsMake's Power Automate alternatives.
Supabase Vector Store for RAG workflows
n8n also provides a separate Supabase Vector Store cluster node for documents and embeddings. It can insert documents, retrieve matching content, connect to a chain, or be attached to an AI agent as a tool. This supports retrieval-augmented generation (RAG), where the model receives selected context from your data.
Follow n8n's Supabase Vector Store documentation for the required table and function. Keep user or tenant filters in the retrieval design; semantic similarity alone is not an authorization control. Never let an agent choose unrestricted database write or delete arguments without validation and approval.
TipsMake's overview of AI-agent frameworks provides broader context on agent and RAG architectures.
Real-time events and complex queries
The standard Supabase app node is action-based: it runs when the n8n workflow reaches it. To react to database changes, configure an authenticated Supabase Database Webhook that calls an n8n Webhook URL, then verify a shared secret and validate the payload before processing it.
For operations the built-in node does not expose, use one of these controlled alternatives:
- An HTTP Request node calling the Supabase Data API.
- A Postgres node using a dedicated database role.
- A reviewed database function with a narrow interface.
- An authenticated Edge Function that enforces validation and authorization.
Production security checklist
- Separate development and production projects, credentials, and webhook URLs.
- Use a named secret key where supported so it can be identified and rotated.
- Restrict who can view or edit n8n credentials and execution data.
- Expose only the schemas, tables, views, and functions the automation needs.
- Validate every dynamic value before a database operation.
- Require additional approval for bulk updates, deletes, financial actions, or sensitive records.
- Set error handling, retry limits, idempotency, and alerting.
- Rotate a key immediately if it appears in logs, screenshots, exports, or source control.
- Test restores and keep database backups appropriate to the impact of the workflow.
The connection itself takes only a few minutes. The real work is constraining what the credential and workflow can do, verifying each operation, and ensuring that retries or malformed inputs cannot damage production data.
Related Articles
 How to Activate Supabase in Cursor8 minutes read
 What is Zapier?8 minutes read
 Instructions on How to Connect to MySQL Database in Eclipse6 minutes read
 How Claude Cowork Helps You Automate Your Familiar Workflows8 minutes read
 Ini: How to Use R Language to Connect with an Oracle Database3 minutes read
Reader Comments 0
Sign in with email or Google to join the discussion.