Share data in Windows 7 HomeGroup
Network Administration - As we all know, the new Libraries feature in Windows 7 is integrated into the HomeGroup. When creating a HomeGroup, we can choose the libraries we want to share with that HomeGroup.
In the Network Connection article with Windows 7's HomeGroup , we learned how to create, configure and exploit the HomeGroup. To do so on the network must have at least two Windows 7 systems joined to a HomeGroup. We can start accessing Computer, expand the HomeGroup area in the navigation panel to see other systems in the HomeGroup. We can then access the shared libraries on any system in the HomeGroup.
Libraries
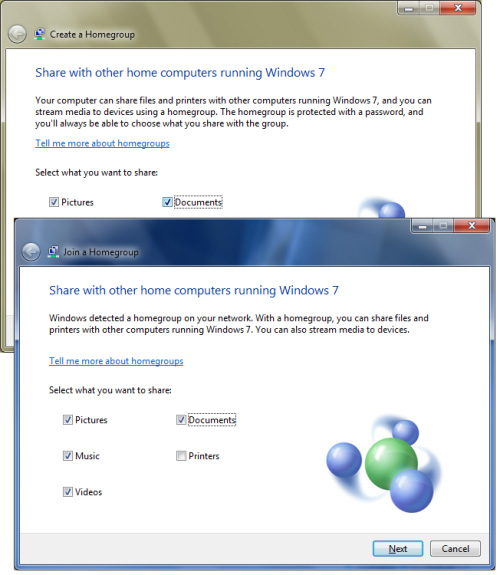
As we all know, the new Libraries feature in Windows 7 is integrated into the HomeGroup. When creating a HomeGroup, we can select the libraries we want to share with that HomeGroup (Figure 1). After that, the users in this HomeGroup can access all the data in those directories, however, these accesses have some limitations.

Figure 1: Select the data you want to share while creating the HomeGroup.
1. Read-only
When sharing a Library in HomeGroup, data in personal folders (such as My Documents or My Pictures) will be shared with Read-only access, only allowing users in that HomeGroup to open and read a file. whether to watch a photo. Remember, when this document file is open, users can still make changes to it, but they will not be able to save those changes to the shared library, but they can save the file and actually Local changes appear on their computers. Therefore, before sharing we should create a backup copy.
2. Full Access
Data in Public Folder on our computer (Public Documents or Public Pictures) will be shared with read / write permissions, allowing any user in HomGroup to have full access to the data. That material. In other words, in addition to opening and viewing documents or other file types, HomeGroup users can edit or delete existing files in Public Folder.
Add data to the Library
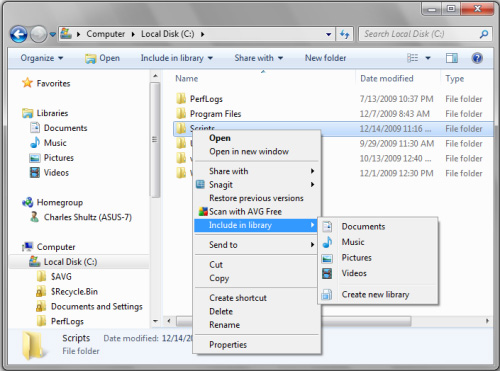
If you want to share data that does not appear in the shared library, we can add the directory containing these data to the shared library. Just right-click on that folder, click the Include in library submenu, and then select an existing shared library that we want to put this folder in, or we can create a new folder to share the message with. This item is shown in Figure 2.

Figure 2: Folder sharing does not appear in the shared library.
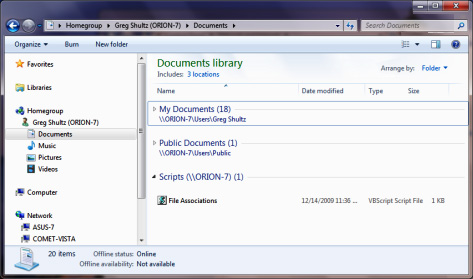
When this folder has been added to the shared library, users in the HomeGroup can access the data in it (Figure 3). When adding a folder to the Library, the folder will be shared automatically with Read-only access.

Figure 3: Additional folders will be automatically shared in the Library.
Share multiple folders
Although Libraries are the main method for sharing and accessing data in a HomeGroup, this is not the only method, especially in case we want to provide full access to these files. That's because of the ability to share folders directly with HomeGroup without adding them to the Library.
Directly sharing a directory gives us more control over shared users. It allows us to select certain users as well as customize the shared license level for each individual.
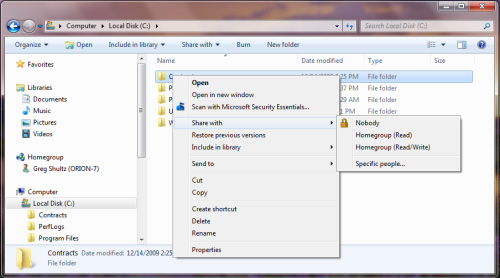
Right-click on the folder you want to share, click the Share With submenu, choose one of the options shown in Figure 4. Although this submenu has 4 options, only three options are used for HomeGroup. If you select the Specific people option, we can share the folder with users who have accounts on this system.

Figure 4: Folder sharing options.
1. HomeGroup option (Read)
We can select the HomeGroup (Read) option to share data in the directory with Read-only access. Then all users in this HomeGroup will be allowed to read a document file or open a multimedia file.
2. HomeGroup Options (Read / Write)
We can choose HomeGroup (Read / Write) to share data in the directory with full access. Then all users in the HomeGroup can edit or delete data.
The HomeGroup (Read / Write) option can also be used within the Library. For example, suppose that inside the My Documents folder we have another file or folder that we want to share with all users in this HomeGroup with full access. In that case, just right-click on the file or folder and select Share With | HomeGroup (Read / Write) . After that, all users in the HomeGroup will have full access to this file or folder.
3. Nobody options
If after sharing a folder, we want to disable sharing of this folder, then the Nobody option will be used. When selecting the Nobody option, this folder is marked as private, and is only visible to the owner.
In addition, the Nobody option can be used within the Library. For example, suppose that in the My Documents folder we have another file or folder that we don't want to share to all users in the HomeGroup, but we want to keep it in the My Documents folder for easy access. . In that case, just right-click on the file or folder and select Share With | Nobody . This file and folder will no longer appear or display with the HomeGroup.
Conclude
In this article we explored some of the configuration options for data shared in the Libraries feature of HomeGroup.
Share by
Jessica Tanner
Update 25 May 2019