Exchange's Pickup folder
Neil Hobson
If you have browsed the directory structure created after installing Exchange 2007, you can find a folder called Pickup that appears in some folders under the original Exchange. This folder is also available in some previous versions of Exchange and so you probably already know a bit about it. One common point in using this directory is to test mail flow without using a mail client. This is done by copying properly formatted text files into this pickup folder, then Exchange will process and distribute them as usual. In this article, we will introduce you to the pickup folder and how to use it to test mail flow within the Exchange infrastructure.
Configure the Pickup folder
The pickup folder does not exist in every Exchange 2007 server. It really only needs to exist in the Exchange 2007 server running the Hub Transport or Edge Transport role. By default, this pickup folder is located in the Program FilesMicrosoftExchange ServerTransportRoles in the drive where you installed Exchange, see Figure 1.
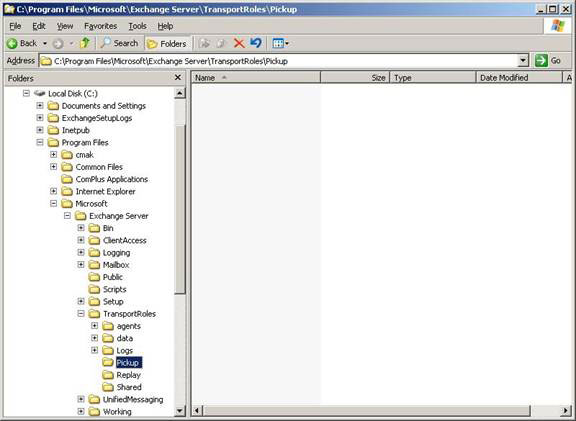
Figure 1: Default location of the Pickup folder
Since the configuration of the pickup folder is not the same as what you need to do every day, it is possible to guess that this directory is only configured through the Exchange Management Shell. The cmdlet command can be used to check the settings of this directory as Get-TransportServer . However, if you include the results of the Get-TransportServer command into the format-list (cmdlet), you will find that there are many transmission server properties and the search for the properties of the pickup folder. It will not be easy. The best way to do this is to filter out the results to find properties that start with the pickup string and so the cmdlet to use will have to look like this:
Get-TransportServer | fl pickup *
You can see the results of this cmdlet in Figure 2 below.

Figure 2: Properties of the Pickup folder
One thing to note about this command is that the server running in this example has already installed the Hub Transport role, so we do not need to reference the server name in this case. You should also remember that if you need to run this command on a remote server, you need to specify the server name using the identifier parameter. Also, you need to use the identifier parameter when using the Set-TransportServer command to change the configuration of the pickup folder.
Let's take a look at each of the properties in Figure 2 in turn and discuss their tasks, the names of the attributes need to be explained clearly. First the PickupDirectoryMaxHeaderSize attribute is used to configure the maximum size of the message header that the Exchange 2007 Hub Transport or Edge Transport server will approve. By default, it is set to 64KB and therefore meets almost all needs. However, if you need to change this value, use the command below:
Set-TransportServer –Identity {server name} –PickupDirectoryMaxHeaderSize {value}
The parameter {value} can be expressed in bytes to gigabytes by string values like 128KB or 1MB.
Next, the ickupDirectoryMaxMessagesPerMinute attribute is the attribute that specifies how fast the server can handle mail from the pickup folder and has a default setting of 100. This default configuration will suffice for all needs mail flow, however if you write an application with more than 100 correspondence per minute to the pickup folder, you need to change this value. Obviously the test here is important to see if the configuration is valid or not.
You can also restrict the number of recipients for each message that has been applied to the pickup folder via the PickupDirectoryMaxRecipientsPerMessage attribute. Its default value is 100. If you have configured Exchange 2007 in such an organization, users can only send one message with a maximum number of recipients to ensure system performance, you Also consider setting up a pickup folder to match this value. For example, if you want to set the maximum number of recipients that have been submitted for the pickup folder to 500, use the following command:
Set-TransportServer –Identity {server name} –PickupDirectoryMaxRecipientsPerMessage 500
Finally, you can change the location of the pickup folder by changing the PickupDirectoryPath property. For example, perhaps you've implemented a dedicated disk array on your Hub Transport server to manage database queues and you want this dedicated array to also manage the pickup folder. Personally, I like to ensure that the full default path should be maintained when moving directory locations into other disk arrays. For example, if I am converting the pickup folder into an E: drive, then I need to make sure that the location of the pickup folder needs to be set in the E: Program FilesMicrosoftExchange Server folder through the following cmdlet:
Set-TransportServer –Identity {server name} –PickupDirectoryPath 'E: Program FilesMicrosoftExchange ServerTransportRolesPickup'
You might be wondering which pickup folder will be used for nefarious purposes, like sending unwanted messages is an example. The answer here is ' yes ' and therefore this directory needs to be protected. If you are confident that you do not need the function of the pickup folder, you can disable it by specifying the pickup folder path as $ null, as shown in the command below:
Set-TransportServer –Identity {server name} –PickupDirectoryPath $ null
Remember that the pickup folder is enabled by default in all Exchange 2007 servers that install the Hub Transport or Edge Transport roles.
Send mail
We have configured the pickup folder with our required settings, now consider how you can use it. As stated in the first part of the article, the pickup folder is used to send messages through the Exchange 2007 system by sorting these messages into the pickup folder. These messages can be created under a simple text editor like Notepad, then saved into a file with the extension .eml , then placed in the pickup folder to process. The mail content must be properly formatted for processing. A simple example of this message is shown in Figure 3 below. Note that the file name here is message.eml . In order for Exchange 2007 to handle the correct message, the file must have an extension called .eml .
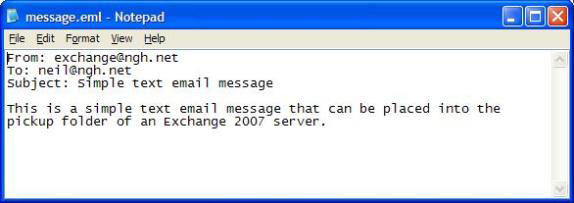
Figure 3: A sample letter
Let's see what happens when the .eml file is copied into the pickup folder. First you will see the .eml file listed short in the directory before it is renamed to message.tmp as shown in Figure 4 below. In my experience, this process appears for about 5 seconds to submit files to the directory. Assuming that everything is configured in accordance with the format of the message, Exchange will process it and the message will be delivered to the correct address as you see in Figure 5. Here you can see the .tmp file already. locked and cannot open via Notepad; Every attempt to do so has an Access Denied error message.
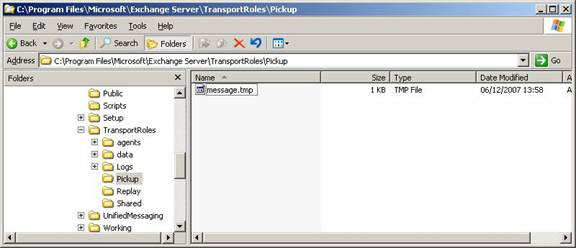
Figure 4: Convert to .tmp file
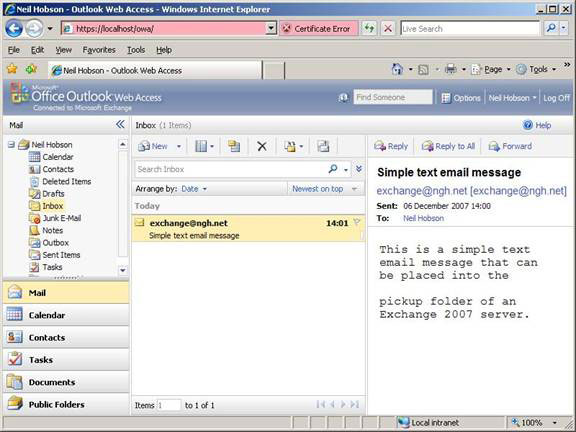
Figure 5: Mail distributed
The .tmp files are automatically deleted by the system in a basic cycle. The Microsoft Exchange Transport service seems to be responsible for handling messages from the pickup directory, so learn more about what happened if the service was stopped and restarted before the .tmp files were erase. With the .tmp files already in the pickup folder, we tried to stop and restart the Microsoft Exchange Transport service and found that the existing .tmp files were deleted.
Wrong format
So what happens if the .eml file is formatted incorrectly? In one test, we used an original .eml file and deleted the first line (the line specifying the sender). The result is that instead of renaming the file so that it has the .tmp extension and then distributing the message, Exchange renames the file with the .bad extension and leaves the file in the pickup folder ( See Figure 6).
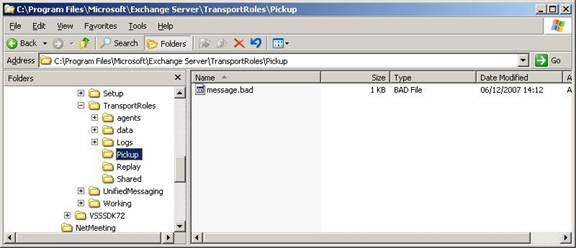
Figure 6: Error message
In addition, an event log entry is also logged in the Application event log as shown in Figure 7. This issue is derived from MSExchangeTransport and event ID 9010 . The section describes quite specifically the problem but it does not explicitly declare the file name causing the problem. That said, all you need to do is find the .bad files in the pickup folder and check them to see why they are in such a format.
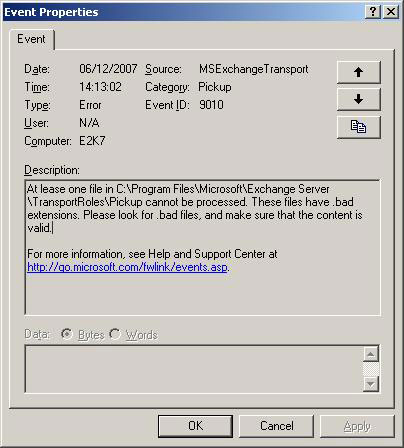
Figure 7: The event log entry error message
Another interesting point we want to mention here is that, unlike .eml files, when a .bad file exists in the pickup folder, it will not be deleted after stopping and restarting the service. Microsoft Exchange Transport. Obviously these files need to be manually deleted when you see the event ID listed in Figure 7 so that there are no unwanted files in this folder. We also mentioned that after the Microsoft Exchange Transport service is restarted, a new copy of the 9010 event ID will not be written to the application event log until a new event of the error message appears. This is an advantage to prevent error messages every time the Microsoft Exchange Transport service is restarted.
Conclude
The SMTP Pickup folder in the Exchange 2007 Hub Transport or Edge Transport server can easily be overlooked by administrators who want to test mail flow or perhaps in search of a simple method to send trial emails. have email client. It is also worth reminding myself of this directory and vice versa if you are concerned about security and do not want to use it, disable this function altogether.