Balancing download of Exchange 2007 SP1 Hub Transport servers with Windows Network Load Balancing (Part 2)
 Balance loading of Exchange 07 SP1 Hub Transport servers with Windows Network Load Balancing technology (Part 1)
Henrik Walther
In the second and final part of this two-part series, we show you how to provide error tolerances and load balancing for Exchange 07 SP1 Hub Transport servers with Windows Network Load Balancing technology. .
Create and add receive connectors on Hub Transport servers
As we mentioned in Part 1 of this series, Hub Transport only supports to load the incoming (inbound) SMTP connections from applications (such as LOB application, MOSS 07, SCOM 07, .). and other non-Exchange sources using WNLB technology. In order not to affect intra-org communication (Hub Transport server to Hub Transport server), so we have to create a new receiver to listen on port / SMTP using the address Virtual IP specified when creating NLB cluster. To do so, launch Exchange Management Console and click Server Configuration, then Hub Transport. Now select the first Hub Transport server in the results pane, then open the properties page for the default receiver in the working pane as shown in Figure 1 below.
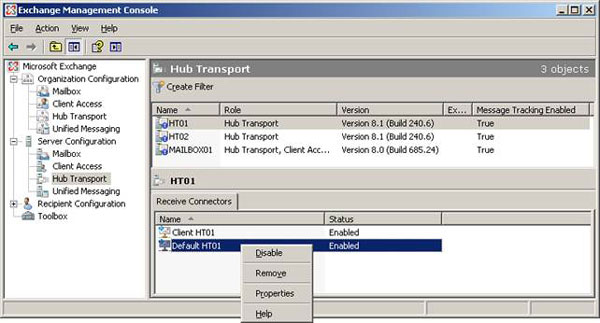
Figure 1: Open the properties page for the default receiver
Click the Network tab and configure the IP address to be an internal non-cluster address (Figure 2).
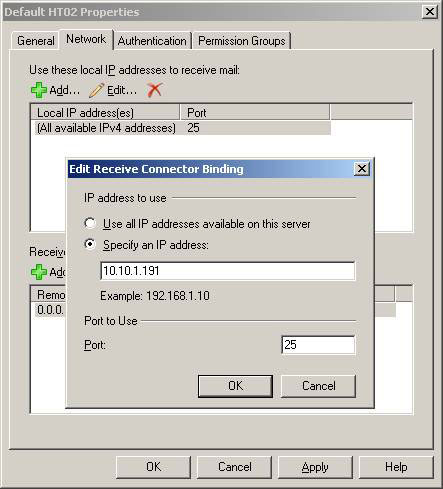
Figure 2: Specify a non-clustered IP address for the default server receiver
Now create a new receiver (optional type) and the Inbound SMTP relay name (WNLB), then click Next (Figure 3).
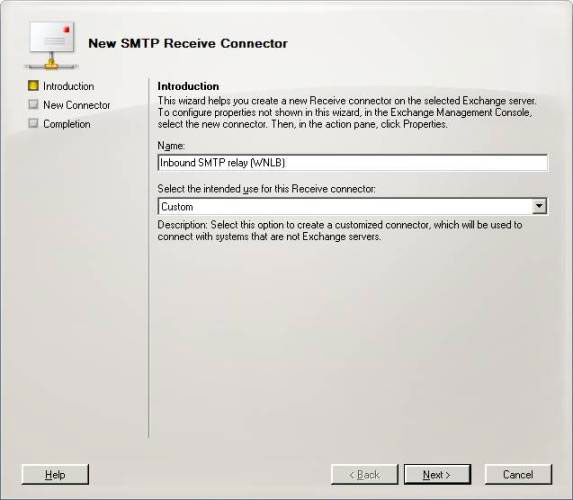
Figure 3: Name the new Receive WNLB receiver
On the Local Network Settings window (Figure 4), you configure the receiver so that it only listens for the port on the NLB cluster address, the address in the example is 10.10.1.194. You can also import an FQDN for the connector. Click Next to continue.
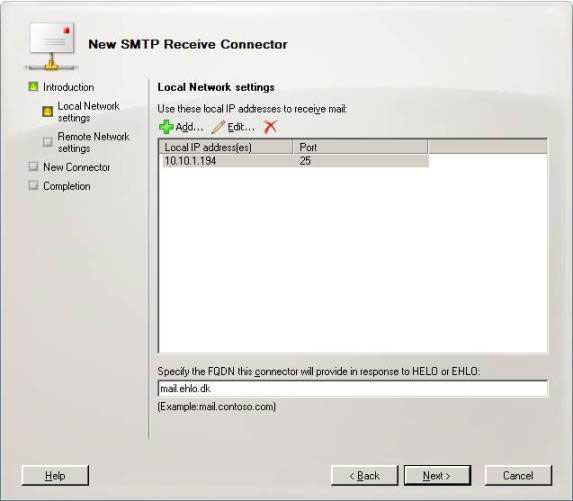
Figure 4: Configure the receiver to listen on the virtual NLB cluster IP address
Now enter the IP address allowed to relay (relay) through the receiver. Do not specify a range here but only the specified IP address that is configured on the server running applications that submit messages to Exchange 07 through this receiver (Figure 5). Then click Next.
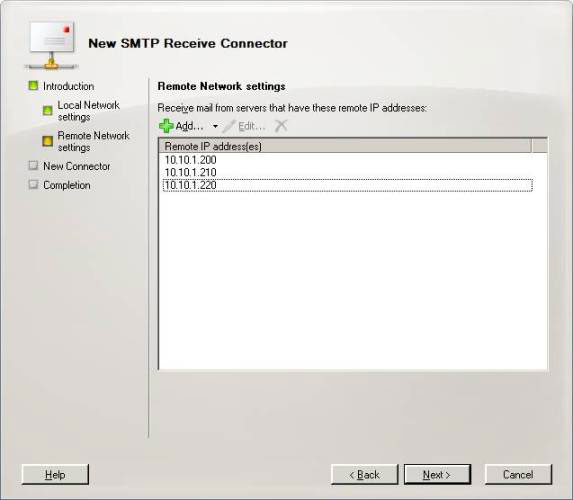
Figure 5: IP address needs to be allowed to submit messages to this receiver
Finally, click New and then Finish to create a new receiver (Figure 6).
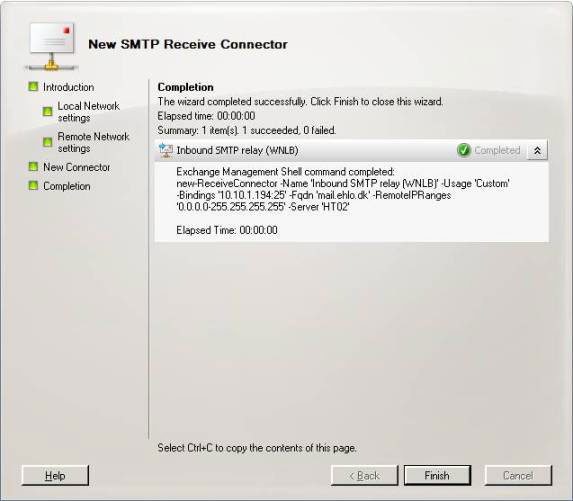
Figure 6: The page is complete
Now open the properties page for the new recipient, and then click the Permission Groups tab. Under this tab, check the 'Anonymous users' option as shown in Figure 7.
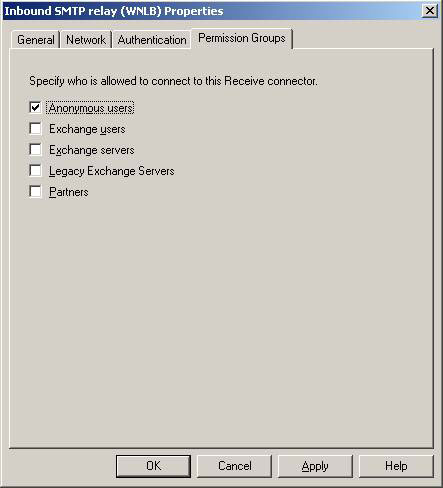
Figure 7: Allow anonymous users to submit notifications to the receiver
Next we have to recognize the necessary permissions in order for certain remote IP addresses to be able to relay through this receiver. To do that, you must open the Exchange Management Shell and type the following command:
Get-ReceiveConnector "Inbound SMTP relay (WNLB)" | Add-ADPermission -User "NT AUTHORITYANONYMOUS LOGON" -ExtendedRights "ms-Exch-SMTP-Accept-Any-Recipient"

Figure 8: Allow the necessary permissions for a new receiver
Now take the same steps on the second Hub Transport server.
Check the Hub Transport Server connection via NLB Cluster FQDN
Now that the two Hub Transport Servers have been added as nodes in the WNLB cluster as well as the new receivers that have been created for the WNLB virtual IP address, we can now telnet to ports and 587 using the NLB cluster. FQDN, the factor for the purpose in this article is mail.ehlo.dk. To do so, open a command window on the remote server (the server can submit messages to Exchange 07 using NLB FQDN) and type in it:
Telnet mail.ehlo.dk
You will then see ESMTP banner from one of the Hub Transport servers (see Figure 9 below).

Figure 9: ESMTP Banner from HT01's WNLB dedicated receiver
Telnet to port 587 also needs the same ESMTP banner result (port 587 is the port used by the Client receiver in the default Exchange 07 Hub Transport server).
Let's try telnet the Hub Transport servers using the default receiver using the FQDN for the servers themselves (in this case ht01.ehlo.dk and ht02.ehlo.dk). This approach gives slightly different results as shown in Figure 10.

Figure 10: Telenet to the default receiver
So far everything is fine, we have verified that we can submit messages using a new receiver using the NLB cluster FQDN (mail.ehlo.dk).
Check the elasticity for Hub Transport Server
Let's see if the remote server (non-Exchange source like LOB application, MOSS 07, or SCOM 07) needs to submit messages to Exchange 07 that can actually do so when one of NLB cluster nodes have problems. To check the status of this work, let's drainstop the first button, in our article HT01. We do this by opening the NLB Manager and right-clicking on the first node, then selecting Drainstop as shown in Figure 11.
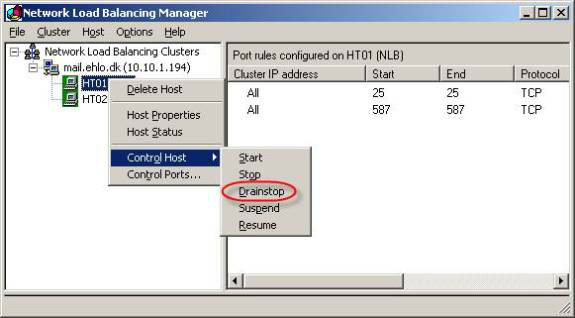
Figure 11: Drainstop the first node in NLB Cluster
When this first button is Drainstop, its icon will turn red (Figure 12) and we can do our test here.

Figure 12: HT01 is drainstop
Let's try telnet to the port using NLB cluster FQDN again. As you can see in Figure 13, we have connected to HT02, which is the second node in the NLB cluster.

Figure 13: Results obtained from ESMTP connection to mail.ehlo.dk
Clearly we have now determined whether to install an elasticity in the Hub Transport server using WNLB technology for both intra.org communication as well as communication from non-Exchange sources to machines. Hub Transport master. Although it is outside the scope of this article, you can still use a hardware based load balancing solution or if there are multiple ISA servers already configured in this server array, be sure to currently load balancing on ISA servers in your network organizations.
Provides the ability to fix errors and load balancing for outgoing messages
So far, we have shown you how to upload submitted messages from a LOB application using WNLB, we will continue to explain to you how to load balance and provide troubleshooting for outgoing mail streams. Indeed this is a very simple task in manipulation. You only need to add some Hub Transport servers in the Source Server tab of Send Connector, which is where routing messages (or perhaps routing to a set of SMTP ports in the network). However, it should be noted that load balancing will not work for Send connector alone unless the Hub Transport server located in the Source Server tab is from the same Active Directory location.
So to add Hub Transport source servers to the Send Connector, you need to open the Exchange Management Console (EMC), go to Organization Configuration and navigate to the directory tree on the left part of the console. Here you need to select Hub Transport and click on the Send Connector tab. Now open the properties page of the respective Send Connector and click the Source Server tab as shown in Figure 14 below. Next, you add the required Hub Transport servers by clicking the Add button and applying the settings.
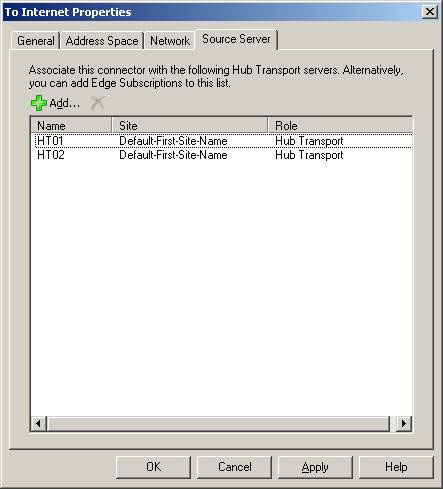
Figure 14: Multiple source servers (Source Servers) in the Internet Send Connector
All outgoing messages will now be load-balanced between the source servers and if one of these servers fails (probably for maintenance), the Hub Transport server needs to provide mail to the recipient. outside your organization will choose the next source server to perform the task. One thing to note is that if a certain Hub Transport server is forwarding mail to the Internet, this server is also listed in the Source Server tab of Send Connector, then the load balancing issue will not be exported. Currently, local servers are always more prioritized.
If the Send Connector routes messages outside the organization configured to deliver mail to a specific host, then you need to add those smart hosts to eliminate all errors in the mail routing topology. go.
If you use the Edge Transport servers that are registered as a solution to filter viruses and spam in your perimeter network, then instead of the Hub Transport servers, add the Edge Transport servers that are registered in the tab. Source Server (as shown in Figure 15). This will ensure that all outgoing messages are load-balanced between Edge Transport servers in the perimeter network.
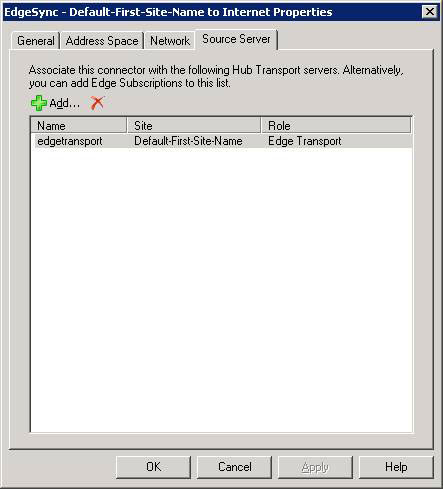
Figure 15: Registered Edge Transport Server is listed in the Source Server tab
Note that only one Edge Transport server is listed in the figure, this is because we only have one server registered with Exchange in a lab environment used for the purpose of this article. When using registered Edge Transport servers in your Exchange organization, the Send connector settings are automatically replicated for Edge Transport servers listed in the Source Server tab.
Check the ability to fix errors and load balancing for outgoing messages
OK, let's evaluate the ability to fix errors and how load balancing works. To do that, send a test message from some third-party Exchange 07 server in your lab environment. This server installs the Mailbox, Client Access and Hub Transport roles, and although this server is the Hub Transport server, it is not added as a source server in the end Connector, which means that it will provide Test mail sent to HT01 or HT02. Figure 16 shows the Internet Mail header of this test message in the external recipient's Mail client.
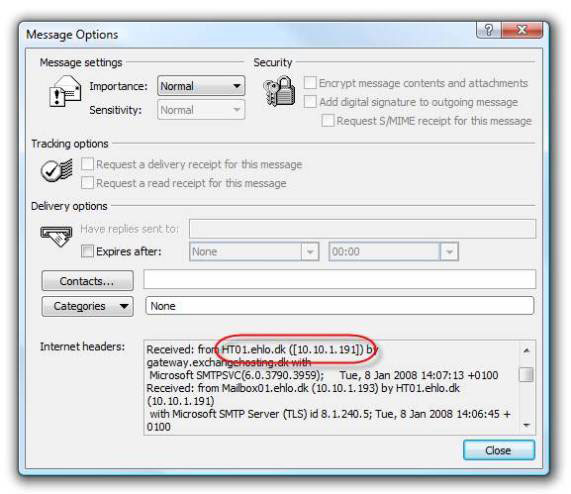
Figure 16: HT01.ehlo.dk is the source server in the Internet Mail Header
Now is the time to turn off the first Hub Transport server (HT01) and then send another test letter to see how HT02 resolves this situation. As you can see in Figure 17, our test letter was successfully executed.
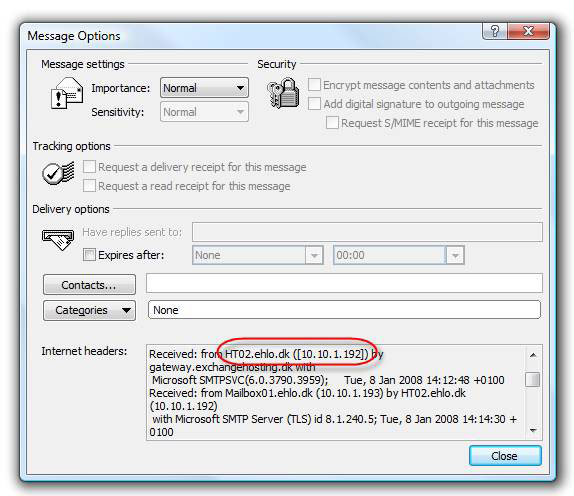
Figure 17: HT02.ehlo.dk is the source server in the Internet Mail Header
You should read it
- ★ Transport Dumpster in Exchange 2007 (Part 1)
- ★ Introduction to Exchange 2007's Edge Transport Server (Part 1)
- ★ Installing, configuring, and testing Exchange 2007 CCR on Mailbox Server (Part 2)
- ★ Transport Dumpster in Exchange 2007 (Part 2)
- ★ Standby Continuous Replication Management (SCR) - Part 1