Standby Continuous Replication Management (SCR) - Part 1
In Exchange Server 2007 RTM and Windows Server 2003 there are two options for SCC (Single Copy Cluster) and CCR (Cluster Continuous Replication) (Figure 01), although we still do not have high elasticity or availability. effective in the same scenario.
Anderson Patricio
In Exchange Server 2007 RTM and Windows Server 2003 there are two options for SCC (Single Copy Cluster) and CCR (Cluster Continuous Replication) (Figure 01), although we still do not have high elasticity or availability. effective in the same scenario.

Figure 1: Solutions with efficient provisioning in Exchange Server 2007 RTM
Windows 2008 with group failover has a new feature that allows installing a CCR or SCC on different IP subnets, which is absolutely impossible in Windows Server 2003. Using Windows 2008 we can use Use two data centers, one for each CMS (Clustered Mailbox Server) CCR node. However, in this scenario, we still do not have a solution for providing high internal effectiveness.
Note :
To use elasticity (state recovery) with the Windows Server 2003 Cluster, we must have both nodes in the same subnet even though they are located in two completely different locations. The only way to do that is to use virtual LAN to expand the network.
Using Exchange Server 2007 RTM, we can choose: efficient provisioning or resilience, not both at the same time. However, the release of Service Pack 1 introduced a new feature that is SCR, which can perform both of these needs (availability and resiliency) using Exchange Server. 2007. For example, we can have a main site with a mailbox server located in a certain mailbox server, CCR or SCC and a copy of the storage groups in standby mode; In the case of the main site error, we can use the replicated data on the second site to quickly recover the user's mail data.
SCR adds more options to High availability solutions available in the RTM version and extends it, creating an environment to copy the main site database to a site. secondary to create an extended security layer in the disaster recovery scenario.
SCR feature uses the concept of Source and Target. SCR sources (SCR source) can be any Exchange Server 2007 Mailbox deployment, such as: mailbox server, Single Copy Cluster (SCC) or Cluster Continuous Replication (CCR). The SCR target can be a mailbox server or a CMS passive node, where no CMS cluster is configured to deserve a passive node.
SCR uses the same copy technology used by CCR and LCR but is implemented in a different way. Using SCR we have a concept of Source (Active copy) and Target (Passive Copy) and they have some needs below:
-
The operating system has been used by the target and the source must be the same
-
Exchange Server 2007 SP1 must be installed in both Source and Target.
-
They must be in the same Active Directory domain
-
Target can manage 50 storage groups in the Enterprise version and 5 storage groups in the Standard version.
-
Target must at least be installed on the Mailbox Server role.
-
In the target server, there is no directive of the following version using the Exchange Management Console.
-
The paths for the database and the storage group must be in conjunction with the source and target; This means that the path must be carefully defined. For example, two sources cannot use the same path for a database and storage groups with a destination.
-
The Replication service will maintain the database, log files and paths in the destination SCR, it does not need to create a directory or anything else before enabling it.
-
A source can have multiple goals; A destination can also have multiple sources.
-
Microsoft recommends that you do not use more than 4 destinations for one source.
The last thing to note before starting with SCR is that we cannot back up a SCR target just a source SCR.
Activate SCR
In this series we will use two servers with the following three roles: Client Access Server, Mailbox Server and Hub Transport and they will run on Windows Server 2008 RTM. The script used in this article is similar to the one shown in Figure 2.

Figure 2
The server placed in the main site ( srv-ex01 ) has Storage Group named UsersSG , the Mailbox database named UsersSG and all other log files along with the database will be stored in the path c: UsersSG , See figure 3.
Note :
In this article, our emphasis is on demonstrating how SCR will work. Keeping the database and log files on the same drive with the operating system is not a good solution and it is taboo in production environments.

Figure 3
Let's open the Exchange Management Shell on srv-ex01 and list all the existing storage groups through the Get-StorageGroup –Server cmdlet . Our original purpose was to configure SCR on the UsersSG storage group. We will do this by using a command to enable the storage group to use a SCR target. Enable-StorageGroupCopy command in SP1 has some new options below:
Enable-StorageGroupCopy –Identity -StandbyMachine -ReplayLagTime day.hours: minutes: seconds 0.0: 0: 0> -TruncationLagTime
The name command works to enable the SCR target in the existing Storage Group. Using this command we get the key parameters used in SCR:
-
Standbymachine : The name of the SCR target, where a passive copy of the current storage group will be kept.
-
ReplayLagTime : The files are copied to the SCR target and the Replication Service waits for a certain amount of time in this parameter to slow down the copied log files into the passive database copy. Although designated as 0, a hard limit is also 50 log files, which means that the SCR Target will have at least 50 log files behind the production environment. The default value is 24 hours.
-
TruncationLagTime : We can specify the amount of time that log files are kept slow in the passive database will be deleted from the SCR Target.
Note :
ReplayLagTime and TruncationLagTime cannot be changed, only disabling or activating the star will change their value.
Note :
There is a default value and can be changed for the slow time of 50 log files to avoid restarting in case of a failover. Even if the failure to fail could only occur with LCR / CCR execution, the 50 log files are still the default in SCR of SCR source.
The steps to list the storage group and create the UsersSG copy are shown in Figure 4.
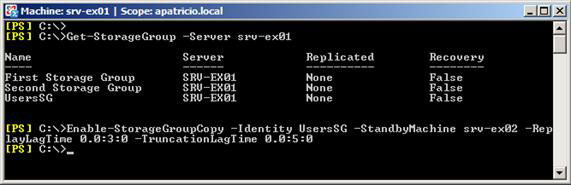
Figure 4
After a few minutes we will see a new entry appear in Event Viewer of the SCR target. This new item has EventID 2114 and source is MSExchangeRepl - basically this information will be a case where the storage group has started, see Figure 5.
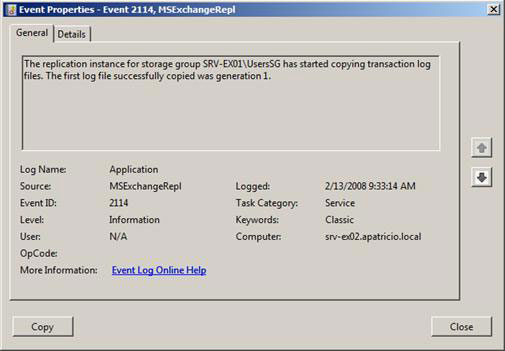
Figure 5
We can also use the Get-StorageGroupCopyStatus command to see the current SCR information, to get only the SCR information we can use the StandbyMachine parameter and the SCR Target server name, see Figure 6.
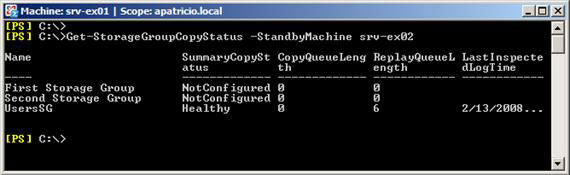
Figure 6
We can validate the log file copy (Figure 7) in the SCR target ( srv-ex02 ), as you have seen before, the path used by the source must be the same in the destination. There is one thing that we still can't see as a database in SCR Target. This is a normal behavior because the database will be created in SCR Target only after 50 records are created in SCR source and after the replaylagtime parameter is also reached.
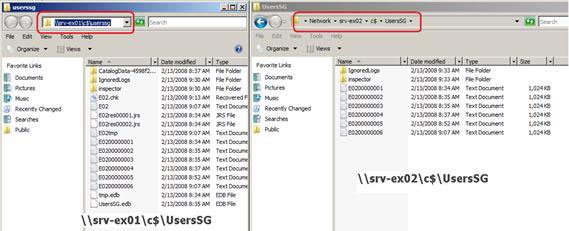
Figure 7
Finally, let's look at srv-ex02 (Figure 08) and see no changes in the number of storage groups or mailbox numbers. The only way to manage SCR is to use the Exchange Management Shell. Note, however, that srv-ex02 will receive all the log files in the path c: UsersSG, but the information about it will not be displayed in the Exchange Management Console.
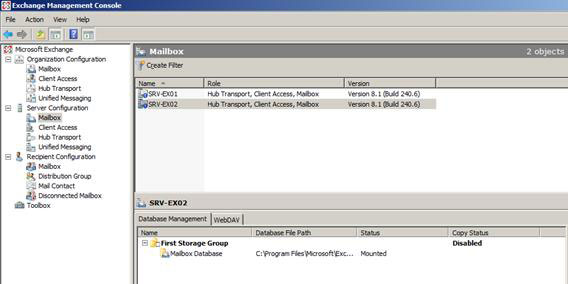
Figure 8
Conclude
In this article we demonstrated how to enable SCR and define source and destination. We have also validated changes in the source server and destination server after enabling this feature. In the next part of this series we will test the possible scenarios, in these scenarios SCR can add more options to the disaster recovery plan and introduce how to recover using SCR.
Was this article helpful?
Your feedback helps us improve.
Related Articles
 How to disable Modern Standby on Windows 10/118 minutes read
 Exchange 2007 SP1: Manage CCR Cluster with the Exchange Management Console17 minutes read
 Windows 10's new standby can 'kill' laptop batteries3 minutes read
 Replica Set in MongoDB5 minutes read
 How to use StandBy on iOS 17 to turn iPhone into a smart watch3 minutes read
 How to enable Standby iPhone to always be on2 minutes read
Reader Comments 0
Sign in with email or Google to join the discussion.